
MazBook.ru
English Русский
Български
Беларускі
Український
Српски
Hrvatski
Română
Polski
Slovenský
Magyar
• Bookmark • Sitemap • Contacts •   
Cars Opel Cars Ford Cars Volkswagen Cars Audi Cars Kia Cars Renault Cars Peugeot


Familia Capella Mazda3 Mazda6 CX-? Others Articles
Mazda 121 (3) (1996-2003) Mazda BT-50 (1) (2006-2011)

Installing the cylinder head (Mazda 121 (3))

  • Home
  • Mazda
  • 121 JASM (1996-2003)
  • Power unit
  • Diesel engine
  • Installing the cylinder head
0
Check the flatness of the cylinder head and block using a steel ruler in the longitudinal and transverse directions. The permissible deformation due to heat exposure should not exceed 0.08 mm along the entire length. The block head must not be processed or reground. If the deformation is too great, replace the block head.

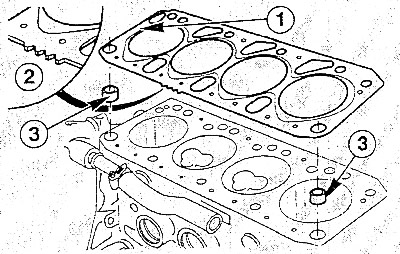
Check the tightness of the fit of both guide bushings (3) in the cylinder block. These bushings…


Check the tightness of the fit of both guide bushings (3) in the cylinder block. These bushings ensure precise centering of the cylinder head and gasket.

Position the new gasket without sealant so that the holes are not covered and the "TOP/OBEN" inscription at (1) faces the head.

Note: The cylinder head gasket thickness is indicated by notches (2). Use a gasket of the same thickness when installing. The number of notches indicates the gasket thickness in accordance with the piston protrusion. Gaskets for oversize cylinder bores are indicated by holes instead of notches.


Before installing the cylinder head, check that the camshaft is in the TDC position.

Install the cylinder head.

Insert new, ungreased cylinder head bolts and tighten them by hand.

The original text is published on [mazbook]


Caution: Cylinder head bolts should always be replaced. These are the expandable bolts that have already been used once.
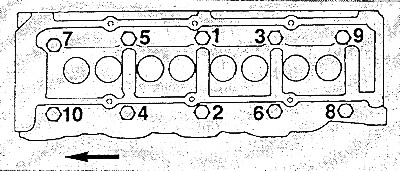

Tighten the cylinder head bolts in the sequence shown above from 1 to 10 in three stages:


Tighten the cylinder head bolts in the sequence shown above from 1 to 10 in three stages:
  • Step 1: Tighten all bolts to 10 Nm.
  • Step 2: Tighten all bolts to 100 Nm. Finally, wait about 3 minutes for the bolts to settle. The next step is performed in accordance with the tightening sequence for each bolt separately.
  • Step 3: loosen with a regular wrench by 180°, tighten with a torque of 70 Nm, tighten with a regular wrench by 120°.
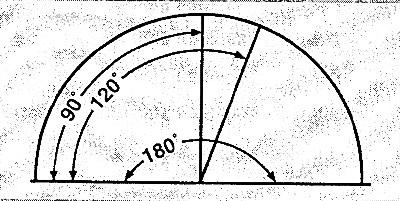
Note: After that, the cylinder head bolts do not need to be tightened any further. To accurately…


Note: After that, the cylinder head bolts do not need to be tightened any further. To accurately maintain the tightening angle, you can make a template out of paper or use a suitable protractor.


Screw in the glow plugs and tighten them to a torque of 30 Nm. Connect the electrical wires to the plugs.
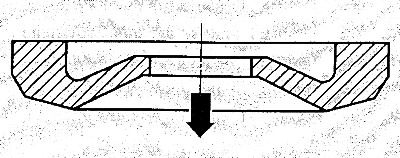
Screw in the injectors with new heat-protective seals and tighten them to a torque of 70 Nm. The…


Screw in the injectors with new heat-protective seals and tighten them to a torque of 70 Nm. The recess in the seal must point upwards. The arrow points towards the cylinder head.

Further installation is carried out in the reverse order of removal.

Install the timing belts.
This article is available at: russian, bulgarian, belarusian, ukrainian, serbian, croatian, romanian, polish, slovak, hungarian
This text was checked by: Evgeny Mereshnikov
Share with friends on social networks:

Previous
Mazda 121 (3) » Diesel engine
Next

Removal the cylinder head
Installing a timing belt
Setting the engine to the TDC position of the first cylinder
Removal the timing belt
Toothed Belt Drive — Design Description
Removal and installation a vacuum pump
Camshaft/Diesel Valve Drive Mechanism
Removal and installation the camshaft
Removal, installation and tensioning the poly V-belt
Diagnostics of diesel engine faults
More articles on repairing other Mazda models
Installing the cylinder head Mazda Familia 5 (1985-1989)
Installing the cylinder head Mazda Capella 4 (1987-1992)
Installing the cylinder head cover Mazda3 BK (2003-2009)
Installing the cylinder head cover Mazda6 GG (2002-2008)
Installing the cylinder head Mazda CX-5KE (2012-2017)
Link in different formats to this article
Comments and feedback from visitors
No comments yet


How much will 29 + 12 ?


Mazda BT-50 (1) (2006-2011) 
  • General information
  • Introduction to guide
  • User manual
  • Maintenance
  • Power unit
  • Engine repair (diesel)
  • Cooling and lubrication system
  • Fuel injection system
  • Intake and exhaust system
  • Engine electrical equipment
  • Transmission
  • Clutch
  • Mechanical gearbox
  • All-wheel drive system
  • Transfer case and gearboxes
  • Chassis
  • Front suspension
  • Rear suspension
  • Steering
  • Brake system
  • Body
  • Exterior (external elements)
  • Interior (internal elements)
  • Heating and air conditioning
  • Security system SRS
  • Electrical equipment
  • Equipment and devices
  • Electrical circuits
Mazda 121 (3) (1996-2003) 
  • General information
  • User manual
  • Maintenance
  • Power unit
  • Petrol engine 1.3 l
  • Petrol engine 1.25/1.4 l
  • Diesel engine
  • Lubrication system
  • Cooling system
  • Ignition system
  • Supply system
  • Fuel injection (gasoline)
  • Fuel injection (diesel)
  • Exhaust system
  • Transmission
  • Clutch
  • Car gearbox
  • Chassis
  • Front suspension
  • Rear suspension
  • Steering
  • Brake system
  • Wheels and tires
  • Body
  • Exterior (external elements)
  • Interior (internal elements)
  • Doors, windows and locks
  • Heating system
  • Electrical equipment
  • Troubleshooting
  • Equipment and devices
  • Lighting system
  • Power devices
  • Electrical circuits
MazBook.ru © 2018–2026 · Mobile version · Articles and news · Sitemap: EN BG BY UA RS HR RO PL SK HU · Feedback · Site search · Add to bookmarks Familia 5 (BF) · Familia 6 (BG) · Capella 3 (GC) · Capella 3 and 4 (GC) · Capella 4 (GD) · Capella 5 (GE) · Capella 6 (GF) · Mazda3 BK · Mazda6 GG · CX-5KE · Mazda 121 (3) · Mazda BT-50 (1) ·
By continuing to use the site, you agree to the use of cookies 🔐