


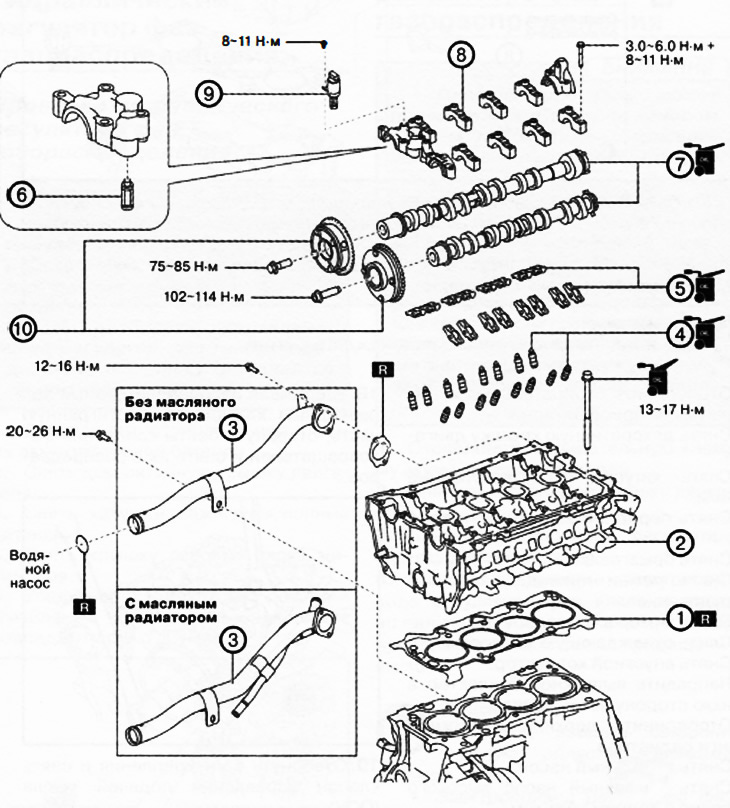
1. Cylinder head gasket.
2. Cylinder head.
Z. Inlet pipe of the cooling system.
4. Hydraulic compensators.
5. Rocker arms.
6. OCV valve oil filter.
7. Camshafts.
8. Camshaft covers.
9. Oil control valve (OCV).
10. Electric and hydraulic phase shifters.
Note:
: replace the part with a new one after each removal.
: apply oil.
(Article is based on website data MazBook)
1. Thoroughly clean the contact surfaces of the cylinder block and cylinder head.
2. Install a new cylinder head gasket
3. Install the cylinder head onto the engine.
4. Check the length of the cylinder head bolts (see the relevant section below) and replace the bolts with new ones if necessary. If the cylinder head bolts are reused, apply engine oil to the mounting surface of the bolt head and the cylinder head.
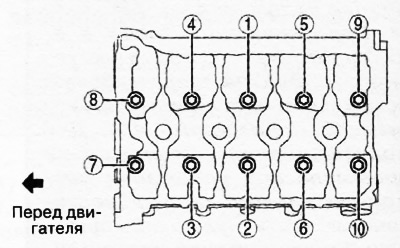
5. Tighten the cylinder head bolts in four stages in the sequence shown in the figure:
- Stage 1:13-17 Nm
- Stage 2: 43-47 Nm
- Stage 3: 85-95°
- Stage 4: 85-95°
6. Remove any remaining sealant from the bolt holes in the cylinder block on the side of the cooling system intake manifold stand.
7. Apply cooling liquid to the O-rings.
Caution: Do not apply oil (engine, transmission, etc.) on the O-rings of the water inlet pipe. Otherwise, the O-ring material may be damaged, which will lead to a loss of tightness.
8. Install the O-ring onto the cooling system inlet pipe.
9. Insert the cooling system inlet pipe into the water pump, being careful not to damage the sealing ring.
10. Install the cooling system inlet pipe gasket so that its protrusions are positioned as shown in the figure.
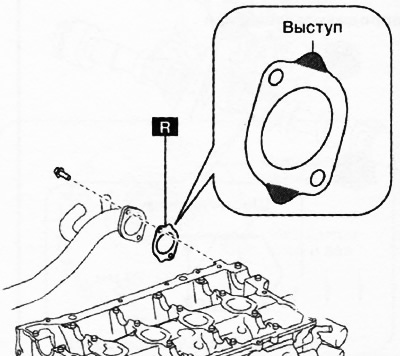
Note:: replace the part with a new one after each removal.
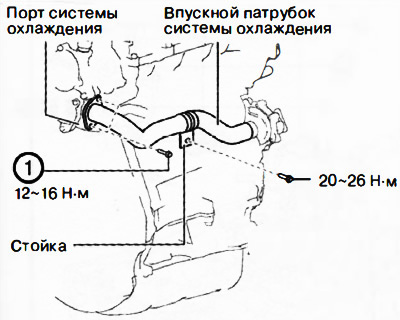
11. Tighten the bolts in the sequence shown in the figure.
12. Bleed air from the hydraulic compensators:
Place the hydraulic compensator in a reservoir with engine oil.
Caution: Do not insert the rounded rod with great force, as the check valve ball spring is extremely weak.
By lightly pressing on the check valve ball with a rounded rod (diameter approximately 1.0 mm), remove air by moving the plunger up and down.
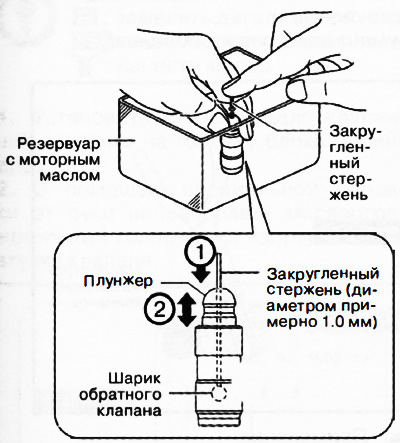
Press the end of the plunger into the oil and make sure there is no feeling of pushing out. Otherwise, it is necessary to replace the hydraulic compensator with a new one.
13. Visually inspect the surface of the hydraulic compensator that contacts the rocker arm for wear or damage. If any defects are found, replace the gyro compensator with a new one.
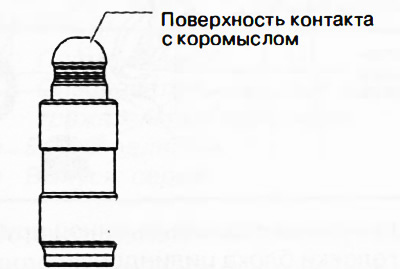
14. Install the hydraulic compensator in its original position in the cylinder head.
15. Apply engine oil to the hydraulic lifters and the ends of the valve stems, then install the rocker arms in the original positions they occupied before removal.
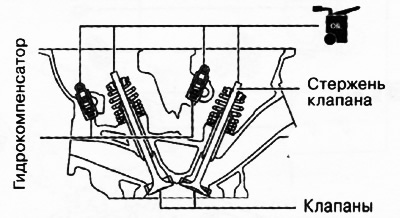
Note:: apply oil.
16. Insert the OCV oil filter into the front camshaft cover.
17. Apply transmission oil (SAE 90 or similar) or engine oil to the center of each bearing in the cylinder head as shown in the figure.
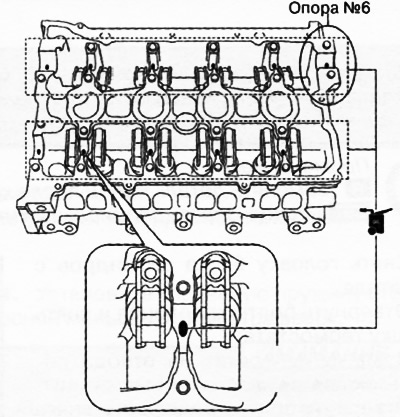
Attention: No more than 0.05 ml of oil should be applied to support #6.
18. Apply transmission oil (SAE 90 or similar) or engine oil on the thrust surface of the front camshaft journals.
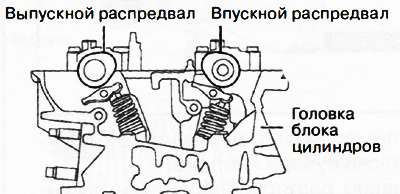
19. Aligning the position of the camshaft cam with the position of almost the top dead center of the piston of the first cylinder (TDC), as shown in the figure, install the camshafts in the cylinder head.
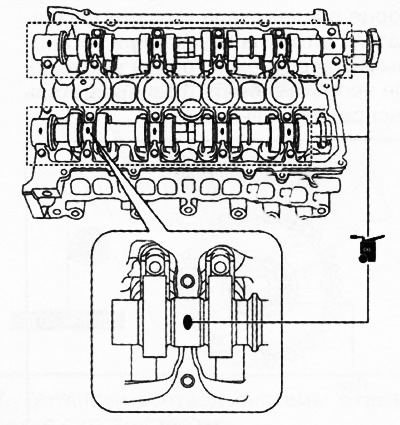
20. Apply transmission oil (SAE 90 or similar) or engine oil to the center of each camshaft journal as shown in the figure.
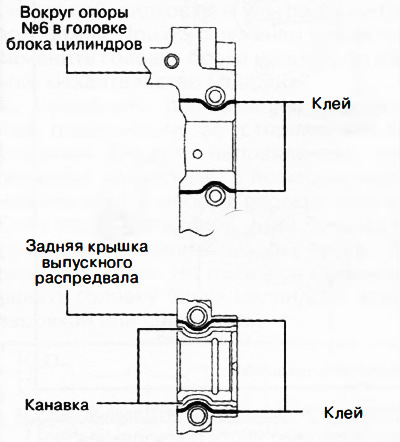
21. Apply adhesive (Loctite 962T) around support No.6 of the cylinder head or on the rear cover of the exhaust camshaft.
Caution: Make sure that no adhesive comes into contact with the camshaft journal.
Note: Adhesive roller width: 0.5-1.5 mm.
22. Install the camshaft covers in numbered order (according to the markings on the lids) and evenly tighten the cap bolts in two or three steps in the sequence shown in the figure.
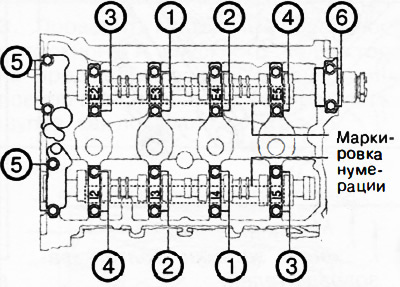
23. Tighten the camshaft cover bolts in two stages in the sequence shown in the figure: first to 3.0-6.0 Nm, then to 8-11 Nm.
24. Screw in the oil supply control valve.
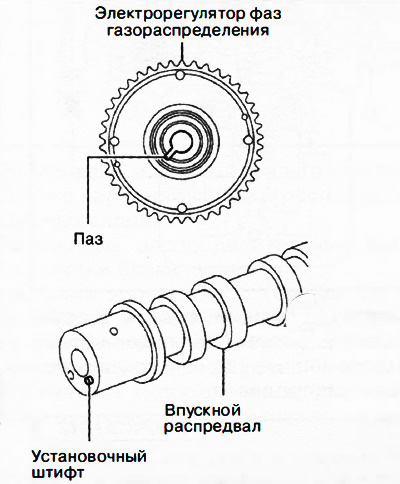
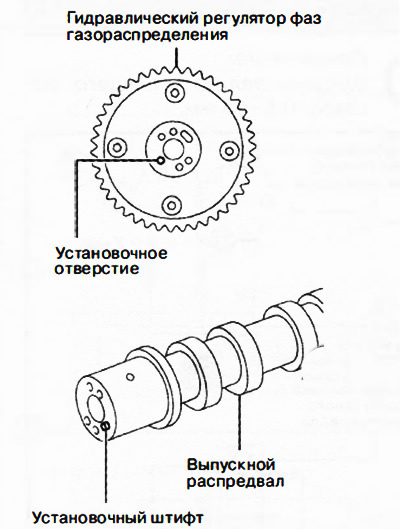
25. Align the installation pin on the end of the camshaft with the groove of the phase shifter (intake side) or mounting hole (release side), then install the phase shifter on the camshaft.
 |
 |
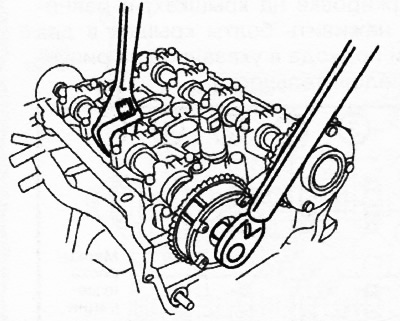
26. Holding the camshaft by the hexagonal part with an adjustable wrench, tighten the phase shifter bolt to the specified tightening torque.
Note:
Tightening torques for phase shifter bolts:
- Electric phase regulator: 102-114 Nm.
- Hydraulic phase regulator: 75-85 Nm
27. Subsequent installation is carried out in the reverse order of removal.