
Note: Whenever the block bolts are loosened or removed, the engine must be cold.
Removing
1. Disconnect the negative cable from the battery and remove the air filter assembly and injection air tubes.
2. Drain the cooling system and disconnect the upper radiator hose.
3. Remove the distributor Section 5 and the rear cover of the gearbox (Chapter 10).
4. Remove the timing belt cover and belt.
5. Remove the fuel pump (Section 4).
6. Remove intake manifold (Chapter 14).
7. Remove the generator. On air-conditioned models, remove the compressor pinch bolt and move the compressor away, being careful not to damage the wires (containing high blood pressure) or radiator. Remove the alternator/air conditioner bracket bolts to the cylinder head and loosen the remaining bracket bolts.
8. Remove the camshaft cover (Chapter 2).
9. Remove the three bolts attaching the exhaust manifold to the catalytic converter or exhaust pipe and separate the exhaust pipe from the manifold.
10. Loosen the cylinder head bolts several turns at the same time, in the sequence shown in the accompanying illustration.
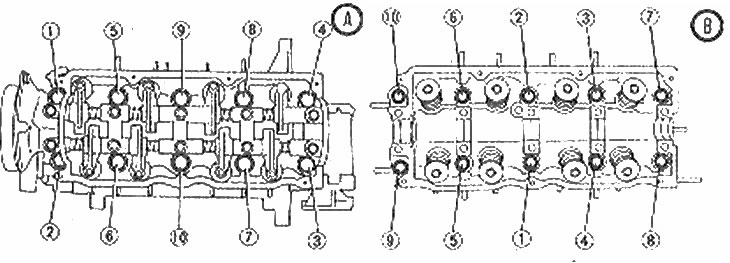
Unscrewing the cylinder head bolts (A) and tightening sequence (IN)
11. Once they are all loose, remove the cylinder head bolts and place them on a piece of cardboard so that they can be easily reinstalled (photo).

Use a cardboard box to store the cylinder head bolts
12. If the cylinder head does not rise immediately, break the gasket using a rod inserted between the alternator-compressor bracket and the cylinder head.
13. Separate a head of the block of cylinders from the engine and remove a lining.
Installation
14. Remove all traces of gasket material from the engine block and cylinder head (photo). Make sure the cylinder head bolt threads and the screw holes in the block are clean as this may affect the installation torque.
Use a scraper to remove the gasket material
15. Place a new gasket on the cylinder head, camshaft and rocker arm assembly (if removed). Make sure the gasket is properly installed.
16. Establish bolts of fastening of a head of the block of cylinders and clamp them gradually the tightening effort regulated by Specifications in the sequence shown in an accompanying illustration.
17. The rest of the installation procedure is the reverse of removal. See Chapter 11 for the tightening sequence of the rocker bolts.
18. After the engine warms up, check the valve clearances and tighten the cylinder head bolts as described in Section 1, Chapter 37.