


Contents: Removal ⇓ Installation ⇓
The cylinder head is removed only when the engine is cool. The exhaust and intake manifolds remain connected. Since the right engine support needs to be loosened, the engine will need to be lifted with a lift. Some operations are described in more detail in the previous section, which should be read in advance.
A defective cylinder head gasket is identified by one or more of the following symptoms.
- Power loss.
- Coolant level low. White exhaust gases when engine is warm.
- Engine oil leaks.
- Coolant gets into the engine oil. The engine oil level does not decrease, but increases. Gray color of engine oil, foam on the dipstick, oil is liquid.
- Engine oil in coolant.
- The coolant is bubbling violently.
- Low compression in two adjacent cylinders.
Removal
Caution: If the cylinder head is being replaced, remove the plastic valve protectors immediately before installing the cylinder head. In addition, all coolant must be replaced.
The cylinder head gasket should be removed from its packaging immediately before installation and handled with extreme care. Damage to the gasket will result in leaks.
With the ignition off, disconnect the negative cable from the battery.
Note: This will erase the data from the electronic memory blocks. See the instructions in the chapter "Electrical equipment".
Drain the coolant.
Ford Fiesta/Mazda 121: loosen the intake pipe clamps on the air filter and intake manifold, remove the intake pipe.
Ford KA: remove the air filter.
Disconnect the gas drive cable (rod) from the throttle body and from the support, and set it aside.
Remove the spark plug connectors by pulling on the connectors, not the high-voltage wires. To avoid installation errors, mark the high-voltage wires of the spark plugs.
Pull the hose off the radiator on the thermostat housing (at the top of the cylinder head), to do this, loosen the clamp and slide it along the hose.
Pull the heater hose off the coolant branch pipe (tee) by squeezing the quick-release coupling with your hand.
Tighten or disconnect the electrical wires going to the engine. Cut the wire fastening tapes, having previously marked the wires:
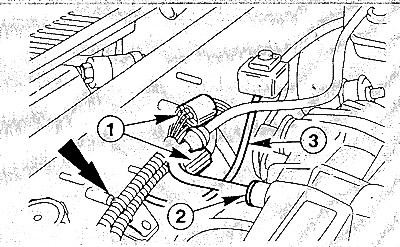
- two "engine" plugs (1);
- plug connection for lambda probe (is located in the exhaust manifold);
- plugs of the coolant temperature sensor, camshaft position sensor and oil pressure warning lamp switch on the cylinder block.
Disconnect the vacuum hose (2) for the brake booster.
Remove the vacuum hose (3) for the activated carbon filter system. If necessary, cut the clamps with snaps and replace them with screw clamps when installing.
Remove the engine oil filler cap. Remove the engine crankcase ventilation hoses from the filler cap. Put the cap back on.
Unscrew the oil dipstick from the cylinder head.
Pull the fuel supply and return hoses off the fuel distributor by squeezing the quick release coupling by hand. To ensure installation, mark the fuel lines before removing.
Warning: The fuel system is under pressure! Before loosening the hose connections, place a thick rag around them - this will allow the pressure to be released safely. Wear safety glasses when working.
Ford Fiesta/Mazda 121: remove heat shield and catalytic converter from exhaust manifold.
Ford KA: remove the wire guide on the engine compartment bulkhead near the cylinder head.
Attach a chain or cable from a hoist to the right side of the engine. If necessary, make lifting eyes and screw them into the appropriate threaded holes in the cylinder block. Attach the chains to the eyes.
Raise the engine enough to relieve the load on the right engine mount.
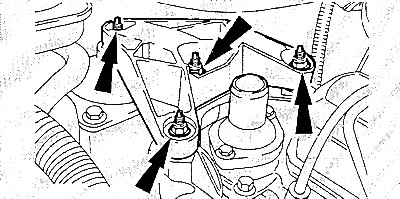
Unscrew the nuts and remove the right engine support.
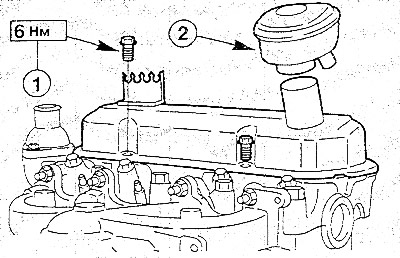
Unscrew the four bolts (1), remove the washers. Remove the valve cover. (2 - oil filler cap).
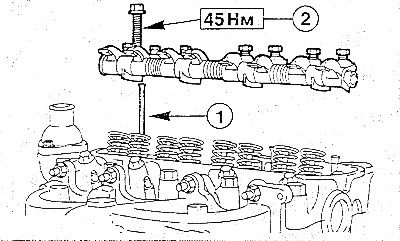
Unscrew the four bolts (2) and remove the axle with the rocker arms.
Remove the valve lifter rods (1).
Note: The push rods must be placed in their original positions when installed. For this reason, the rods must be marked with adhesive tape or laid out so that they cannot be mixed up later.
(The original text is published on mazbook.ru)
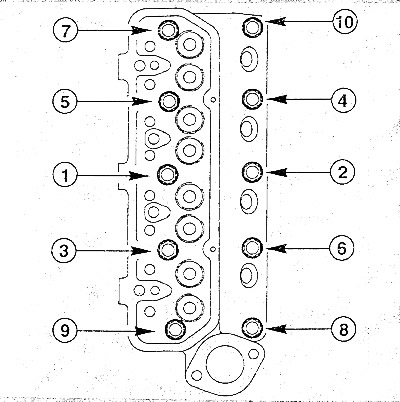
Unscrew the cylinder head mounting bolts in the reverse order to that shown in the figure, i.e. from number 10 to 1, one by one, half a turn, and after the second pass, unscrew them.
Caution: Cylinder head bolts can only be reused once. Bolts that have already been used once must be marked, for example with a punch.
Check that all wires and hoses leading to the head are disconnected.
Raise your head (together with an assistant) and install it on two wooden blocks.
Remove the cylinder head gasket.
Installation
Before installation, the cylinder head and block must be thoroughly cleaned with a suitable scraper from the remains of the old gasket. Make sure that dirt does not get into the holes of the cylinder block. It is better to cover the holes with rags.
Be careful not to create long scratches. If sandpaper is used, its grain size should be around 100 units. Carefully remove any remaining abrasive and grinding powder.
Check whether the cylinder head bolt holes are free of oil and, if necessary, remove the oil. To do this, insert a clean rag into the hole and wipe off the oil.
Caution: Oil remaining in the holes may damage the cylinder block when tightening the bolts.
Check the head deformation using a steel ruler and flat feeler gauges in several places. The deformation along the entire length should not exceed 0.25 mm.
The cylinder head plane must not be reground.
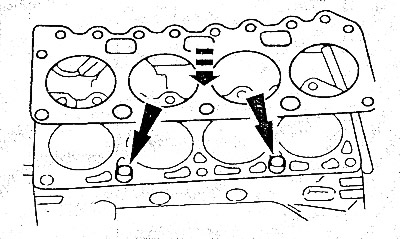
The cylinder block must have two guide bushings for centering the cylinder head. Position the new cylinder head gasket without sealant so that none of the holes are blocked. Handle the gasket with extreme care. The smallest damage can lead to leaks. Remove the new gasket from its packaging only immediately before installation.
Install the head with the help of an assistant, without tilting it.
Insert the ten cylinder head bolts and tighten them by hand.
Note: These bolts can only be reused once. If it is not known how many times they have been loosened and tightened, it is better to replace the bolts.
Caution: Tightening the cylinder head bolts must be done very carefully. Before tightening, check the torque wrench for accuracy. Tighten the bolts on a cold engine.
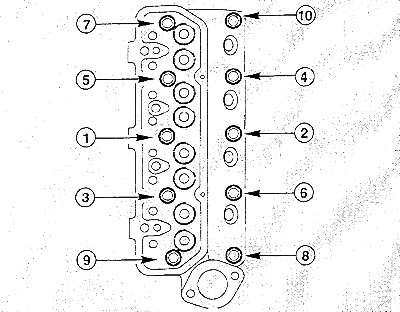
The cylinder head bolts must be tightened in three stages. In each stage, the bolts are tightened in the order shown.
- Stage 1: torque 30 Nm.
- Step 2: tighten all bolts with a regular wrench by 90° (at one time).
- Step 3: tighten all bolts with a regular wrench by 90° (at one time).
When tightening the cylinder head bolts, control the tightening angle using the wrench handle, turning the wrench a quarter turn (90°) at a time.
Caution: Tightening the cylinder head bolts on a warm engine during maintenance or after repairs is not permitted.
Tighten the new engine mount nuts to 70 Nm.
Remove the lifting device and engine lifting eyes.
Lubricate the push rods at both ends with engine oil and insert them into the push rod stops.
Note: The push rods must be installed in the same positions they were in before removal.
Position the rocker shaft so that the adjusting bolts fit into the tappet stops. Then tighten the shaft bolts first by hand, then tighten them evenly to a torque of 45 Nm.
Adjust the valve clearance.
Replace a pressed or damaged valve cover gasket. Install the valve cover and tighten its mounting bolts evenly with a small torque (6 Nm).
Screw the oil dipstick into the cylinder head.
Secure the wire guide to the engine compartment bulkhead with bolts.
Connect all electrical wires to the engine. Secure the wires with clamps (tapes) in the previously marked places.
Place the high-voltage wires on the spark plugs in accordance with the marks made earlier and secure them in the holder on the valve cover.
Attach the vacuum hoses and secure them with clamps if necessary.
Place the fuel supply and return hoses onto the fuel distributor and secure them.
Attention: Do not mix up the fuel lines, pay attention to the marks.
Put on the coolant hoses going to the engine and to the heater, secure them with clamps.
Place the crankcase ventilation hoses onto the oil filler cap.
Ford KA: Install the exhaust manifold with new gaskets and tighten the mounting nuts crosswise to 25 Nm.
Ford Fiesta/Mazda 121: Install catalytic converter and heat shield on exhaust manifold.
Attach the throttle cable to the throttle body and support and adjust it.
Place the air intake hose onto the air filter and onto the intake pipe, securing it with clamps.
Check the engine oil level and top up if necessary.
Caution: If the cylinder head was removed due to damage to the head gasket, it is recommended to change the oil and oil filter, as the engine oil may contain coolant.
Fill with fresh coolant.
Start the engine and warm it up to operating temperature, which you need to monitor using the coolant temperature gauge. Finally, you need to drive an additional 5 km to be sure that the engine oil has warmed up.
Check the engine oil and coolant levels again, as well as the tightness of the hose connections.
Connect the negative cable to the battery. Set the clock and codes.