


Contents: Removal ⇓ Installation ⇓
Removal
1. Disconnect the negative cable from the battery.
2. Remove the camshaft cover (Chapter 2).
3. Little by little, loosen the rocker arm assembly mounting bolts in the sequence shown in the accompanying illustration.
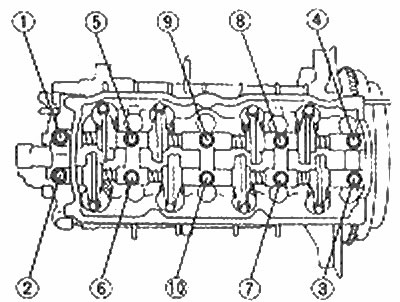
8. Sequence of loosening the rocker arm assembly bolts
4. Once the bolts are loose, remove them and place them in a specific order on a pre-numbered piece of cardboard for reinstallation in the same position.
5. Lift the rocker arm assembly away from the engine.
6. Once you have the drive, you need to disassemble the rocker arms and make marks so that the parts can be installed in their original position. Rocker arms, shafts and camshaft covers are mutually non-replaceable.
Installation
7. Carefully clean the mating surfaces of the rocker arm assembly and the cylinder head to remove all traces of sealant.
8. If the rocker arms were separated, lubricate them with clean engine oil before installation.
9. Apply sealant to the mating surfaces of the cylinder head to the rocker arm assembly as shown in the accompanying illustration.
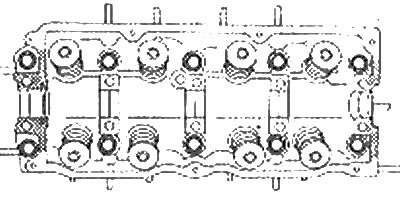
Apply sealant to the shaded areas before installing the rocker arm assemblies
10. Place the rocker arms in place, install the bolts and finger tighten them into their original positions.
11. Tighten the bolts, all a little at a time, with the specified tightening force Specification, in the sequence shown in the accompanying illustration.
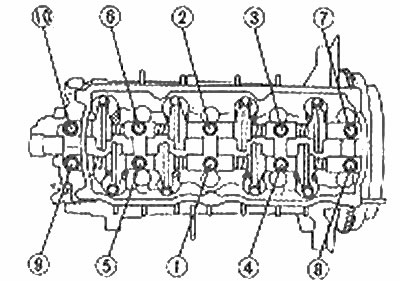
Rocker arm assembly bolt tightening sequence
For details, see the website (www.MazBook.ru)
12. Check the valve adjustment and adjust it if necessary (Section 1).
13. Install the camshaft cover and connect the battery terminals.