MazBook.ru
English Русский
Български
Беларускі
Український
Српски
Hrvatski
Română
Polski
Slovenský
Magyar
• Bookmark • Sitemap • Contacts •   
Cars Opel Cars Ford Cars Volkswagen Cars Audi Cars Kia Cars Renault Cars Peugeot


Familia Capella Mazda3 Mazda6 CX-? Others Articles
Mazda 121 (3) (1996-2003) Mazda BT-50 (1) (2006-2011)

Upper control arm front suspension (Mazda BT-50 (1))

  • Home
  • Mazda
  • BT-50 J97M (2006-2011)
  • Chassis
  • Front suspension
  • Upper control arm front suspension
0
Contents: Removal and installation ⇓ Examination ⇓

Removal and installation


Note: Carrying out repairs without first removing the ABS wheel speed sensor may damage the sensor wiring. To prevent damage to the sensor or its wiring, remove the wheel speed sensor and secure it to the side before performing major repairs.


1. Remove the wheel speed sensor and sensor brackets.
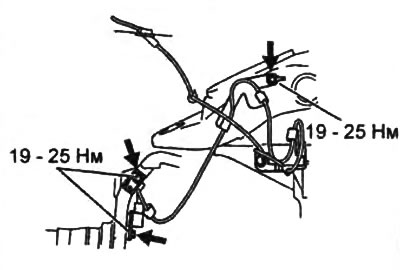
1. Remove the wheel speed sensor and sensor brackets.


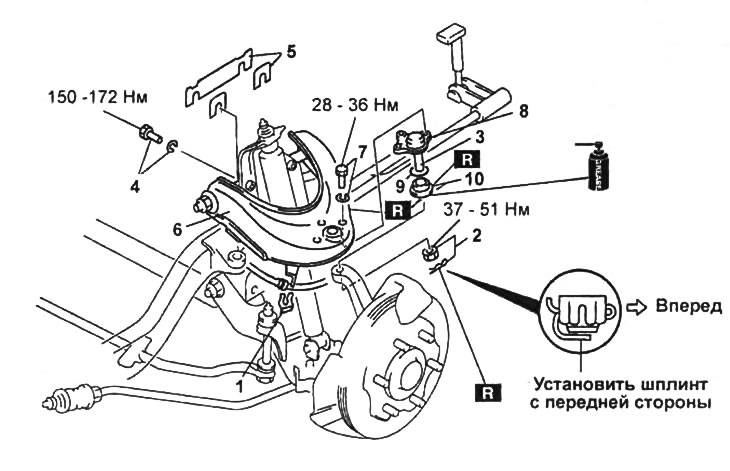
2. Remove the parts in the order they are numbered in the assembly drawing "Removing and installing the upper arm of the front suspension".

Note:
  • Installation is carried out in the reverse order of removal.
  • After installation:
  • check and, if necessary, adjust the height of the front suspension;
  • check and, if necessary, adjust the front suspension installation angles.


Notes on removal

1. Upper arm ball joint.

Using a puller, press the ball joint pin out of the steering knuckle.
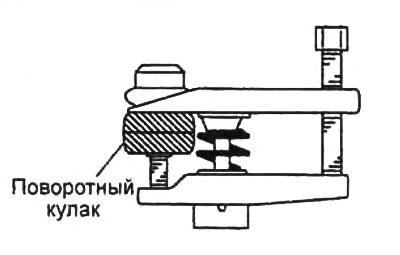
Using a puller, press the ball joint pin out of the steering knuckle.


2. Adjusting spacers.


When removing the adjusting shims, remember the number and location of the shims.

Installation Notes

1. Fixing ring.

a) Install the ball joint with the finger facing up. Install the special mandrel on the ball joint.

b) Install the retaining ring into the grooves of the ball joint using a mandrel.
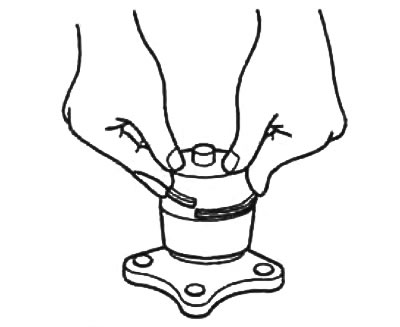
b) Install the retaining ring into the grooves of the ball joint using a mandrel.


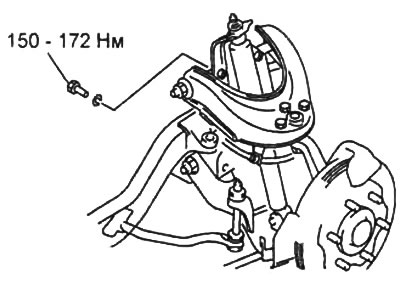
2. Lever mounting bolt and washer. Install the washer and tighten the bolt to the specified tightening torque.
  • Tightening torque - 150 - 176 Nm

Tightening torque - 150 - 176 Nm


Examination


1. Remove the front upper control arm from the vehicle.

2. Check the lever for damage, cracks or bends.

3. Make sure there is no excessive play in the ball joint of the lever.

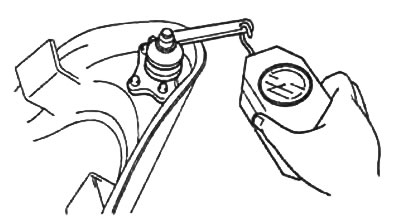
4. Check the moment of resistance to rotation of the ball joint pin.

a) Turn the ball joint pin five times.


b) Install a special device on the ball joint pin and measure the rotational resistance using a dynamometer.
  • Dynamometer readings: 5 - 25 N

Removal and installation the upper arm of the front suspension.

Removal and installation the upper arm of the front suspension.
1 - brake hose bracket,
2 - cotter pin and nut,
3 - ball joint of the upper arm,
4 - bolt and nut,
5 - adjusting spacer,
6 - upper arm of the front suspension,
7 - bolt and washer,
8 - ball joint of the upper arm,
9 - retaining ring,
10 - anther.

10 - anther.


If the measured resistance is not within the normal range, replace the control arm assembly.
This article is available at: russian, bulgarian, belarusian, ukrainian, serbian, croatian, romanian, polish, slovak, hungarian
This text was checked by: Vladimir Bazhenov
Share with friends on social networks:

Previous
Mazda BT-50 (1) » Front suspension
Next

Torsion bar and lower control arm front suspension
Front suspension anti-roll bar
Front Wheel Hub and Steering Knuckle — Installation
Front suspension shock absorber
Front Wheel Hub and Steering Knuckle — Removal
More articles on repairing other Mazda models
Detailed technical specifications of the front suspension Mazda Familia 5 (1985-1989)
Lower control arm of the front suspension Mazda Capella 3 and 4 (1982-1992)
Control and adjustment data for front wheel installation (vehicle… Mazda3 BK (2003-2009)
Removal, checking and installation the front upper arm Mazda6 GG (2002-2008)
Upper arm rear suspension — front wheel drive (2WD) versions Mazda CX-5KE (2012-2017)
Link in different formats to this article
Comments and feedback from visitors
No comments yet


How much will 23 + 44 ?


Mazda BT-50 (1) (2006-2011) 
  • General information
  • Introduction to guide
  • User manual
  • Maintenance
  • Power unit
  • Engine repair (diesel)
  • Cooling and lubrication system
  • Fuel injection system
  • Intake and exhaust system
  • Engine electrical equipment
  • Transmission
  • Clutch
  • Mechanical gearbox
  • All-wheel drive system
  • Transfer case and gearboxes
  • Chassis
  • Front suspension
  • Rear suspension
  • Steering
  • Brake system
  • Body
  • Exterior (external elements)
  • Interior (internal elements)
  • Heating and air conditioning
  • Security system SRS
  • Electrical equipment
  • Equipment and devices
  • Electrical circuits
Mazda 121 (3) (1996-2003) 
  • General information
  • User manual
  • Maintenance
  • Power unit
  • Petrol engine 1.3 l
  • Petrol engine 1.25/1.4 l
  • Diesel engine
  • Lubrication system
  • Cooling system
  • Ignition system
  • Supply system
  • Fuel injection (gasoline)
  • Fuel injection (diesel)
  • Exhaust system
  • Transmission
  • Clutch
  • Car gearbox
  • Chassis
  • Front suspension
  • Rear suspension
  • Steering
  • Brake system
  • Wheels and tires
  • Body
  • Exterior (external elements)
  • Interior (internal elements)
  • Doors, windows and locks
  • Heating system
  • Electrical equipment
  • Troubleshooting
  • Equipment and devices
  • Lighting system
  • Power devices
  • Electrical circuits
MazBook.ru © 2018–2026 · Mobile version · Articles and news · Sitemap: EN BG BY UA RS HR RO PL SK HU · Feedback · Site search · Add to bookmarks Familia 5 (BF) · Familia 6 (BG) · Capella 3 (GC) · Capella 3 and 4 (GC) · Capella 4 (GD) · Capella 5 (GE) · Capella 6 (GF) · Mazda3 BK · Mazda6 GG · CX-5KE · Mazda 121 (3) · Mazda BT-50 (1) ·
By continuing to use the site, you agree to the use of cookies 🔐