


Contents: Examination ⇓ Checking lateral and vertical runout ⇓ Elimination of lateral runout ⇓ Checking the height and lateral…⇓ Installing wheels on a car ⇓ Wheel balancing on a car ⇓
Vibration of the steering wheel at certain speeds usually indicates a wheel imbalance.
Examination
Check tire pressure and adjust it.
Take a test drive. Determine as precisely as possible the conditions under which the vibration occurs: speed range, road type, driving straight or turning.
Raise and support the vehicle.
Check the centering of the disk centers. The hub or brake drum should fit evenly on the disks. Replace the disk if necessary.
[The article is copied from the resource: Mazbook.ru]
Check the wheel suspension, for which inspect the rubber-metal supports (silent blocks), ball joints, shock absorbers and discs, check their condition.
Remove and clean the wheels, remove foreign objects from the tread pattern.
Check the tires on a brake test stand, since when braking with locked wheels, sections of the profile with a reduced tread height may appear.
Check the tread depth of individual tires and compare the values. If the tires are abnormally worn in front and/or behind, the wheel alignment angles must be measured and, if necessary, adjusted. The toe-in must be adjusted to the upper permissible value.
Please note: Measurements require complex instruments that are usually only available in workshops.
Perform a test drive and check if the faults persist.
Checking lateral and vertical runout
On a raised vehicle, install a dial indicator on the working surface (tread), and then on the sidewall of the tire. Slowly rotate the wheel by hand, check the dial indicator readings and mark the maximum runout height on the tire with chalk. Setting value: maximum runout height - 0.8 mm, maximum lateral runout - 1.2 mm.
If these values are not achieved, balance the wheels on a balancing machine. The wheels must be centered as they are on the car. Conical clamping devices that center the wheel in the middle hole are not allowed. The permissible residual imbalance in both planes is 5 grams.
Elimination of lateral runout
Release air from the tire and press the tire lip into the rim.
Rotate the tire on the rim by 120°.
Inflate the wheel and recheck the height runout.
If the maximum runout value is exceeded, rotate the tire on the rim another 120° and check the runout again.
If the runout value is within the maximum value, balance the wheel.
Checking the height and lateral runout of the disc
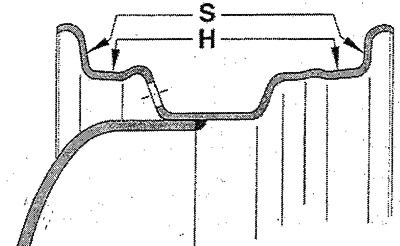
Center the disk without the tire on a balancing machine or on the car. Install a dial indicator.
Measure the runout in height and lateral runout of the disc. Runout in height (deviation of the disk shape from the circle) is measured on the disk shelf, and the lateral runout is measured on the side surface of the rim flange. In this case, you do not need to pay attention to the jumps of the indicator arrow caused by protrusions or depressions in the disk material. (S - places of lateral runout measurements; H - places of measurement of runout in height). Maximum runout in height - 0.5 mm; maximum lateral runout - 0.8 mm.
If the maximum values are exceeded, replace the disk.
Installing wheels on a car
On the raised vehicle, install the wheels so that the point of maximum runout in height is at the top. Tighten the wheel bolts crosswise with a torque wrench to 140 Nm.
Note: When the difference in wear between individual wheels is small, the wheels with the minimum height runout and the smallest balancing weights should be installed on the front axle.
Take a test drive. If there is still vibration in the front end or steering wheel, it may be due to residual imbalance that can be corrected by balancing the vehicle.
Wheel balancing on a car
When balancing the drive wheels, it is necessary to install both tires of the same axle on rollers.
The wheels must be driven by the car's engine so that the wheels rotate synchronously.
Take a test drive.
If there are still defects, this means that there is too much radial runout or runout due to skew on one or more wheels. This cannot be checked even in a workshop. In this case, the only option is to replace the front and/or rear tires (tires must be replaced in pairs).