
MazBook.ru
English Русский
Български
Беларускі
Український
Српски
Hrvatski
Română
Polski
Slovenský
Magyar
• Bookmark • Sitemap • Contacts •   
Cars Opel Cars Ford Cars Volkswagen Cars Audi Cars Kia Cars Renault Cars Peugeot


Familia Capella Mazda3 Mazda6 CX-? Others Articles
Capella 3 (1982-1992, petrol) Capella 3 and 4 (1982-1992) Capella 4 (1987-1992) Capella 5 (1991-1997) Capella 6 (1997-2005, petrol)

Installing the crankshaft (Mazda Capella GE)

  • Home
  • Mazda Capella
  • Capella GE (1991-1997)
  • Power unit
  • Overhaul engines 2.0 and 2.5
  • Installing the crankshaft
0
Contents: Checking the lubrication clearance…⇓ Final installation of the crankshaft ⇓

Main Bearing Cap Bolt Tightening Sequence (4-cylinder engines)
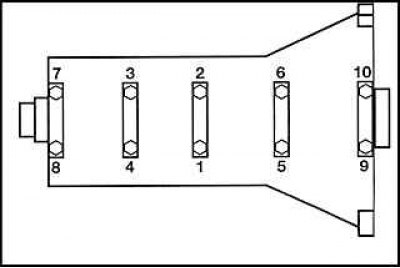


Main Bearing Cap Bolt Tightening Sequence (4-cylinder engines)


Main Bearing Cap Bolt Tightening Sequence (6-cylinder engines)
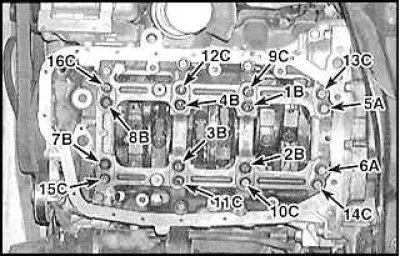


Main Bearing Cap Bolt Tightening Sequence (6-cylinder engines)


Checking the lubrication clearance of the main bearings


1. Install new main bearing shells.

Original material on the website: www.MAZbook.ru

2. To measure the lubrication gap, you can use an internal micrometer or other special device, but the most accurate and easiest method is to use a special plastic gauge.

3. Clean the crankshaft, bearings and oil holes, then carefully install the crankshaft onto the bearings.
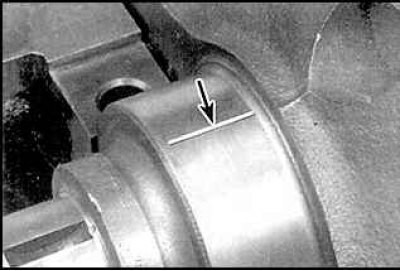
3. Clean the crankshaft, bearings and oil holes, then carefully install the crankshaft onto the…


4. Place a piece of plastic on each of the main bearings along the shaft axis.


5. Install the main bearing caps, being careful not to displace the plastic. Tighten the cover mounting bolts to the specified torque in the sequence shown. Do not turn the crankshaft.

6. Unscrew the bolts and carefully remove the covers.
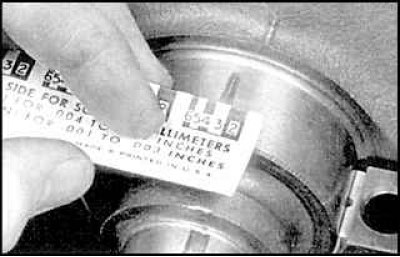
6. Unscrew the bolts and carefully remove the covers.


7. Compare the width of the crushed film with a special scale to determine the size of the lubrication gap.

8. If the gap size does not meet technical requirements, install liners of a different size. If necessary, bearings can be turned.

9. Carefully remove any traces of film from the shaft and bearings.

Final installation of the crankshaft


1. Carefully remove the crankshaft.
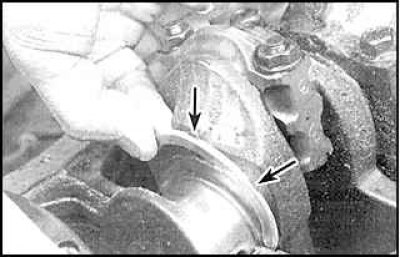
1. Carefully remove the crankshaft.


2. Install the upper thrust half ring with the slots facing outward.
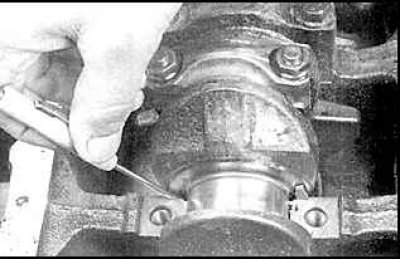
2. Install the upper thrust half ring with the slots facing outward.


3. Rotate the half ring around the crankshaft, thus installing it in place.


4. Clean the surface of the bearings and lubricate them with grease or motor oil.

5. Check that the crankshaft bearings are clean and install the crankshaft into place.

6. Lubricate and install the lower bearings.

7. On four-cylinder engines, install the main bearing caps. The arrows on the caps must point towards the front of the engine. Install and tighten all main bearing cap bolts to the specified torque in the sequence shown.

8. On six-cylinder engines, apply sealant to the mating surfaces of the block covers. Install the block. Insert and tighten the cover block bolts to the specified torque in the sequence shown.

9. Turn the crankshaft by hand several times and check for ease of movement.

10. Check the crankshaft axial play and install the rear oil seal.
This article is available at: russian, bulgarian, belarusian, ukrainian, serbian, croatian, romanian, polish, slovak, hungarian
This text was checked by: Evgeny Mereshnikov
Share with friends on social networks:

Previous
Capella 5 » Overhaul engines 2.0 and 2.5
Next

Installing piston rings
Checking camshafts and tappets
Checking and selecting main and connecting rod bearings
Checking the crankshaft
Checking pistons and connecting rods
Installing pistons and connecting rods
More articles on repairing other Mazda models
Installing the cylinder head Mazda Familia 5 (1985-1989)
Installing the front crankshaft oil seal Mazda3 BK (2003-2009)
Installing the front crankshaft oil seal Mazda6 GG (2002-2008)
Replacing the front crankshaft oil seal Mazda CX-5KE (2012-2017)
Installing a timing belt Mazda 121 (3) (1996-2003)
Link in different formats to this article
Comments and feedback from visitors
No comments yet


How much will 48 + 50 ?


Capella 6 (1997-2005, petrol) 
  • General information
  • Introduction to guide
  • User manual
  • Troubleshooting
  • Maintenance
  • Power unit
  • 4-cylinder engines
  • 6-cylinder engines
  • Engine overhaul
  • Cooling and ventilation
  • Power and exhaust systems
  • Engine electrics
  • Control system
  • Transmission
  • Mechanical gearbox
  • Automatic gearbox
  • Clutch and drive shafts
  • Chassis
  • Brake system
  • Car suspension
  • Steering
  • Body
  • Exterior (external elements)
  • Interior (internal elements)
  • Doors, windows and locks
  • Electrical equipment
  • Equipment and devices
  • Electrical circuits
Capella 5 (1991-1997) 
  • General information
  • User manual
  • Maintenance
  • Helpful hints
  • Power unit
  • Petrol engines 1.6 and 1.8
  • Petrol engines 2.0
  • 2.5 petrol engines
  • Overhaul engines 1.6 and 1.8
  • Overhaul engines 2.0 and 2.5
  • Diesel engine 2.0
  • Engine electrics
  • Cooling system
  • Air conditioner
  • Carburetor Nikki 30/34
  • Power system (1.6 and 1.8)
  • Power system (2.0 and 2.5)
  • Control system
  • Transmission
  • Mechanical gearbox
  • Automatic gearbox
  • Clutch and axles
  • Chassis
  • Brake system
  • Suspension and wheels
  • Steering
  • Body
  • Exterior (external elements)
  • Interior (internal elements)
  • Doors and windows
  • Electrical equipment
  • Equipment and devices
  • Electrical circuits
Capella 4 (1987-1992) 
  • General information
  • Introduction to manual
  • Vehicle specifications
  • Power unit
  • Engine repair
  • Lubrication system
  • Cooling system
  • Fuel system (carburetor)
  • Fuel injection (FE)
  • Fuel injection (DOHC)
  • Fuel system (diesel)
  • Ignition system
  • Transmission
  • Clutch
  • Gearbox
  • Drive shafts
  • Chassis
  • Front suspension
  • Rear suspension
  • Steering system
  • Brake system
  • Electrical equipment
  • Equipment and devices
  • Electrical circuits
Capella 3 and 4 (1982-1992) 
  • General information
  • User manual
  • Maintenance
  • Power unit
  • Gasoline engine
  • Engine overhaul (gasoline)
  • Diesel engine
  • Cooling and heating
  • Supply system
  • Ignition system
  • Emission reduction
  • Transmission
  • Clutch
  • Mechanical gearbox
  • Automatic gearbox
  • Drive shafts
  • Chassis
  • Brake system
  • Suspension and wheels
  • Steering
  • Body
  • Exterior (external elements)
  • Interior (internal elements)
  • Electrical equipment
  • Equipment and devices
  • Power devices
  • Electrical circuits
Capella 3 (1982-1992, petrol) 
  • General information
  • User manual
  • Maintenance
  • Troubleshooting
  • Late models
  • Power unit
  • Engine in car
  • Engine overhaul
  • Cooling and heating system
  • Fuel and exhaust system
  • Engine electrical system
  • Emission control system
  • Transmission
  • Mechanical gearbox
  • Automatic gearbox
  • Clutch and drive shafts
  • Chassis
  • Brake system
  • Suspension and wheels
  • Steering
  • Body
  • Exterior (external elements)
  • Interior (internal elements)
  • Electrical equipment
  • Equipment and devices
  • Lighting and lamps
  • Electrical circuits
MazBook.ru © 2018–2026 · Mobile version · Articles and news · Sitemap: EN BG BY UA RS HR RO PL SK HU · Feedback · Site search · Add to bookmarks Familia 5 (BF) · Familia 6 (BG) · Capella 3 (GC) · Capella 3 and 4 (GC) · Capella 4 (GD) · Capella 5 (GE) · Capella 6 (GF) · Mazda3 BK · Mazda6 GG · CX-5KE · Mazda 121 (3) · Mazda BT-50 (1) ·
By continuing to use the site, you agree to the use of cookies 🔐