
MazBook.ru
English Русский
Български
Беларускі
Український
Српски
Hrvatski
Română
Polski
Slovenský
Magyar
• Bookmark • Sitemap • Contacts •   
Cars Opel Cars Ford Cars Volkswagen Cars Audi Cars Kia Cars Renault Cars Peugeot


Familia Capella Mazda3 Mazda6 CX-? Others Articles
Mazda 121 (3) (1996-2003) Mazda BT-50 (1) (2006-2011)

Installing a timing belt (Mazda 121 (3))

  • Home
  • Mazda
  • 121 JASM (1996-2003)
  • Power unit
  • Petrol engine 1.25/1.4 l
  • Installing a timing belt
0
Place the toothed belt on the sprockets.

Install the engine mount bracket onto the cylinder block and tighten the bolts to 55 Nm.
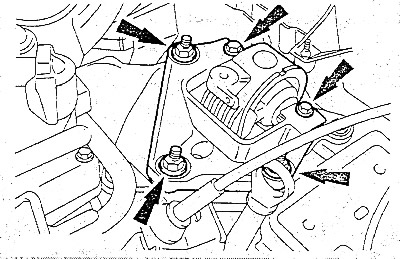
Secure the right engine mount with new nuts, tightening them to a torque of 70 Nm.


Secure the right engine mount with new nuts, tightening them to a torque of 70 Nm.

Unhook the lift or remove the jack from under the engine.
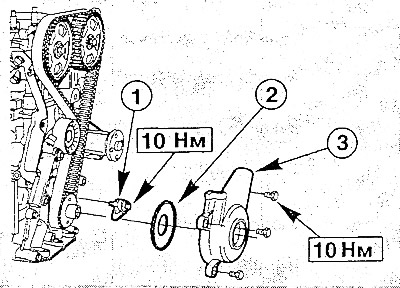
Install the anti-skid device (1) and tighten its bolt to a torque of 10 Nm.


Install the anti-skid device (1) and tighten its bolt to a torque of 10 Nm.

Tighten the toothed belt. To do this, pull the drill out of the tensioner and then loosen the clamp. This will tighten the toothed belt correctly.

Place the washer (2) and install the lower timing belt cover (3), tightening the bolts to a torque of 10 Nm.

Hold the vibration damper with a suitable wrench and place it on the crankshaft using a special tool. The thread for the mounting bolt is used for this.


Caution! The vibration damper must not be tightened by the mounting bolt, and the specified tightening torque must not be achieved.


Tighten the new vibration damper central bolt to 40 Nm. Finally, tighten the bolt to 90° with a rigid wrench. You can use a paper template or a protractor to determine the angle precisely.

Set the engine to the TDC position of the first cylinder:

(The original text can be found on MAZBOOK.ru)
  • Both camshaft sprockets must be movable on the camshafts.
  • The adjustment ruler must be located in the grooves of the camshafts.
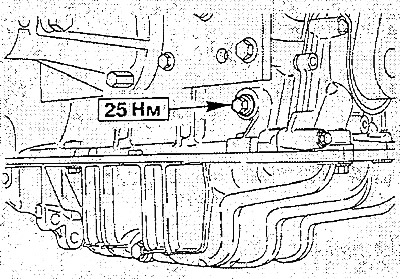
At the height of the crankshaft there is a plug bolt in the cylinder block. Unscrew the bolt.

  • At the height of the crankshaft there is a plug bolt in the cylinder block. Unscrew the bolt.
  • Insert the TDC adjusting pin instead of the plug bolt. This adjusting pin can be made by yourself.
  • If it is impossible to screw in the pin, then turn the crankshaft slightly to the left by the vibration damper.
  • Turn the crankshaft clockwise by the vibration damper until the cheek (counterweight) will not rest against the adjusting pin. The crankshaft will not be able to turn further.
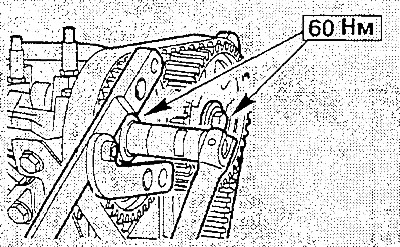
In this position of the engine, tighten the bolts of both camshaft sprockets to a torque of 60 Nm,…

  • In this position of the engine, tighten the bolts of both camshaft sprockets to a torque of 60 Nm, while holding the sprockets with a special key.

Caution: When tightening, remove the adjustment ruler.


Caution: Remove the TDC position adjusting pin from the crankshaft.


Turn the crankshaft two turns clockwise to the TDC position and check the valve timing again. To do this, screw the adjusting pin for the TDC position into the hole and turn the crankshaft until it rests against this pin. In this position, the adjusting ruler should be inserted into the camshafts. Otherwise, loosen the camshaft sprockets and repeat the adjustment.

Screw the plug bolt into the cylinder block and tighten it to a torque of 25 Nm.

Lower the car.

Install the upper timing belt cover.

Tighten the V-belt roller mounting bolt to 25 Nm.

Install the pulley on the water pump and tighten the four bolts securing it to a torque of 25 Nm.

Install the valve cover and tighten its four nuts to a torque of 10 Nm.

Caution: The valve cover gasket cannot be replaced separately, and if damaged, the cover must be replaced together with the gasket.


Install the spark plugs and housing.

Install the poly V-belt.

Connect the negative cable to the battery. Set the clock and enter all necessary codes.
This article is available at: russian, bulgarian, belarusian, ukrainian, serbian, croatian, romanian, polish, slovak, hungarian
This text was checked by: Evgeny Mereshnikov
Share with friends on social networks:

Previous
Mazda 121 (3) » Petrol engine 1.25/1.4 l
Next

Setting the engine to the TDC position of the first cylinder
Removal the timing belt
Removal and installation camshafts
Removal and installation the cylinder head
Removal, installation and tensioning the poly V-belt
More articles on repairing other Mazda models
Removal and installation the timing belt (DOHC) Mazda Familia 6 (1989-1994)
Rear timing belt cover — removal and installation Mazda Capella 3 and 4 (1982-1992)
Installing the timing chain Mazda3 BK (2003-2009)
Installing the timing chain Mazda6 GG (2002-2008)
Installing the timing chain Mazda CX-5KE (2012-2017)
Link in different formats to this article
Comments and feedback from visitors
No comments yet


How much will 49 + 12 ?


Mazda BT-50 (1) (2006-2011) 
  • General information
  • Introduction to guide
  • User manual
  • Maintenance
  • Power unit
  • Engine repair (diesel)
  • Cooling and lubrication system
  • Fuel injection system
  • Intake and exhaust system
  • Engine electrical equipment
  • Transmission
  • Clutch
  • Mechanical gearbox
  • All-wheel drive system
  • Transfer case and gearboxes
  • Chassis
  • Front suspension
  • Rear suspension
  • Steering
  • Brake system
  • Body
  • Exterior (external elements)
  • Interior (internal elements)
  • Heating and air conditioning
  • Security system SRS
  • Electrical equipment
  • Equipment and devices
  • Electrical circuits
Mazda 121 (3) (1996-2003) 
  • General information
  • User manual
  • Maintenance
  • Power unit
  • Petrol engine 1.3 l
  • Petrol engine 1.25/1.4 l
  • Diesel engine
  • Lubrication system
  • Cooling system
  • Ignition system
  • Supply system
  • Fuel injection (gasoline)
  • Fuel injection (diesel)
  • Exhaust system
  • Transmission
  • Clutch
  • Car gearbox
  • Chassis
  • Front suspension
  • Rear suspension
  • Steering
  • Brake system
  • Wheels and tires
  • Body
  • Exterior (external elements)
  • Interior (internal elements)
  • Doors, windows and locks
  • Heating system
  • Electrical equipment
  • Troubleshooting
  • Equipment and devices
  • Lighting system
  • Power devices
  • Electrical circuits
MazBook.ru © 2018–2026 · Mobile version · Articles and news · Sitemap: EN BG BY UA RS HR RO PL SK HU · Feedback · Site search · Add to bookmarks Familia 5 (BF) · Familia 6 (BG) · Capella 3 (GC) · Capella 3 and 4 (GC) · Capella 4 (GD) · Capella 5 (GE) · Capella 6 (GF) · Mazda3 BK · Mazda6 GG · CX-5KE · Mazda 121 (3) · Mazda BT-50 (1) ·
By continuing to use the site, you agree to the use of cookies 🔐