MazBook.ru
English Русский
Български
Беларускі
Український
Српски
Hrvatski
Română
Polski
Slovenský
Magyar
• Bookmark • Sitemap • Contacts •   
Cars Opel Cars Ford Cars Volkswagen Cars Audi Cars Kia Cars Renault Cars Peugeot


Familia Capella Mazda3 Mazda6 CX-? Others Articles
Mazda 121 (3) (1996-2003) Mazda BT-50 (1) (2006-2011)

Removal and installation the cylinder head (Mazda 121 (3))

  • Home
  • Mazda
  • 121 JASM (1996-2003)
  • Power unit
  • Petrol engine 1.25/1.4 l
  • Removal and installation the cylinder head
0
Contents: Removal ⇓ Installation ⇓
Note: Operations and instructions applicable to all engines are given in the section dedicated to the 1.3L engine. This section describes only the differences.


Removal


Remove the timing belt and camshafts.

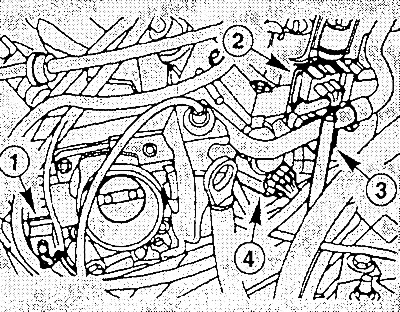
Disconnect the following plugs from the engine: throttle position sensor (1), DIS ignition coil…


Disconnect the following plugs from the engine: throttle position sensor (1), DIS ignition coil (distributorless ignition system) (2), coolant temperature sensor (3), engine wiring harness (4).

Remove the generator.

Unscrew the bolts of the oil dipstick tube from the intake manifold and pull it out together with the dipstick from the oil pan upwards.

Mark and disconnect all wires from the cylinder head and intake manifold.

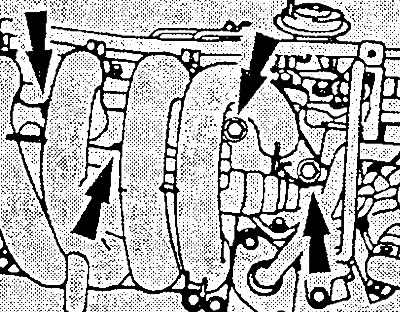
Loosen the bolts and remove the intake manifold from the cylinder head.

Loosen the bolts and remove the intake manifold from the cylinder head.


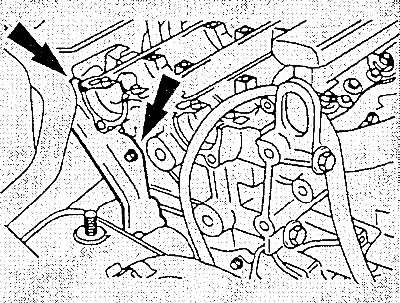
Loosen the bolts and remove the timing belt cover holder.


Loosen the bolts and remove the timing belt cover holder.

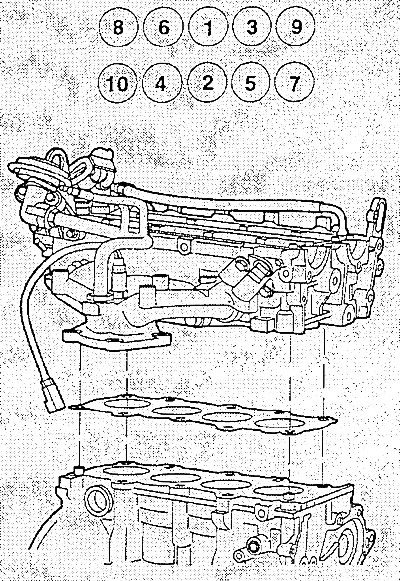
Unscrew the cylinder head bolts in reverse order of numbering, i.e. from 10 to 1.
Installation


Installation


The sealing surfaces and threads or valve guides/seats on the cylinder head must not be machined. The sealing surface of the head must be off-plane by no more than 0.05 mm, otherwise the head must be replaced.

Pay attention to the correct fit of both guide bushings in the cylinder block. The guide bushings should fit tightly in the holes for bolts number 10 and 7.

Position the new cylinder head gasket so that no holes are blocked.

Caution: To prevent damage to the valves and pistons, before installing the head, turn the crankshaft so that the piston of the first cylinder is approximately 20 mm before TDC.


Install the cylinder head and screw in the ungreased cylinder head bolts. Used cylinder head bolts can be reused if they are not visibly damaged.

Tighten the cylinder head bolts in sequence from 1 to 10 in three stages.
  • Stage 1: tightening torque 15 Nm.
  • Stage 2: tightening torque 30 Nm.
  • Step 3: tighten with a regular wrench by 90°.

Caution: Tightening the cylinder head bolts when the engine is warm during maintenance or after repairs is not permitted.
This article is available at: russian, bulgarian, belarusian, ukrainian, serbian, croatian, romanian, polish, slovak, hungarian
This text was checked by: Evgeny Mereshnikov
Share with friends on social networks:

Previous
Mazda 121 (3) » Petrol engine 1.25/1.4 l
Next

Removal and installation camshafts
Installing a timing belt
Setting the engine to the TDC position of the first cylinder
Removal the timing belt
Removal, installation and tensioning the poly V-belt
More articles on repairing other Mazda models
Removal the cylinder head Mazda Familia 5 (1985-1989)
Adjusting the valves and checking the tightness of the cylinder head… Mazda Capella 3 (1982-1992, petrol)
Cylinder Head Cover — Description Mazda3 BK (2003-2009)
Cylinder head cover Mazda6 GG (2002-2008)
Removal and installation the cylinder head Mazda CX-5KE (2012-2017)
Link in different formats to this article
Comments and feedback from visitors
No comments yet


How much will 38 + 34 ?


Mazda BT-50 (1) (2006-2011) 
  • General information
  • Introduction to guide
  • User manual
  • Maintenance
  • Power unit
  • Engine repair (diesel)
  • Cooling and lubrication system
  • Fuel injection system
  • Intake and exhaust system
  • Engine electrical equipment
  • Transmission
  • Clutch
  • Mechanical gearbox
  • All-wheel drive system
  • Transfer case and gearboxes
  • Chassis
  • Front suspension
  • Rear suspension
  • Steering
  • Brake system
  • Body
  • Exterior (external elements)
  • Interior (internal elements)
  • Heating and air conditioning
  • Security system SRS
  • Electrical equipment
  • Equipment and devices
  • Electrical circuits
Mazda 121 (3) (1996-2003) 
  • General information
  • User manual
  • Maintenance
  • Power unit
  • Petrol engine 1.3 l
  • Petrol engine 1.25/1.4 l
  • Diesel engine
  • Lubrication system
  • Cooling system
  • Ignition system
  • Supply system
  • Fuel injection (gasoline)
  • Fuel injection (diesel)
  • Exhaust system
  • Transmission
  • Clutch
  • Car gearbox
  • Chassis
  • Front suspension
  • Rear suspension
  • Steering
  • Brake system
  • Wheels and tires
  • Body
  • Exterior (external elements)
  • Interior (internal elements)
  • Doors, windows and locks
  • Heating system
  • Electrical equipment
  • Troubleshooting
  • Equipment and devices
  • Lighting system
  • Power devices
  • Electrical circuits
MazBook.ru © 2018–2026 · Mobile version · Articles and news · Sitemap: EN BG BY UA RS HR RO PL SK HU · Feedback · Site search · Add to bookmarks Familia 5 (BF) · Familia 6 (BG) · Capella 3 (GC) · Capella 3 and 4 (GC) · Capella 4 (GD) · Capella 5 (GE) · Capella 6 (GF) · Mazda3 BK · Mazda6 GG · CX-5KE · Mazda 121 (3) · Mazda BT-50 (1) ·
By continuing to use the site, you agree to the use of cookies 🔐