


Contents: Examination ⇓ Replacement ⇓
Attention:
- The motor has many parts made of aluminum alloys. These parts can be damaged by contact with coolant made with alcohol or methanol. Do not use coolants made with alcohol or methanol. Use only coolants made with ethylene glycol.
- Use only soft (demineralized) water to prepare the coolant from a concentrated solution. Water containing mineral salts reduces the cooling efficiency.
- If the filler cap is marked "FL22", then only "FL22" type coolant (55% antifreeze to 45% distilled water) should be used for this cooling system.
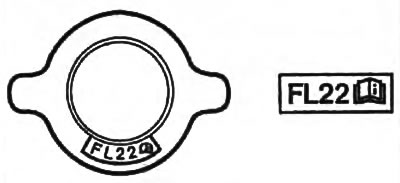
Examination
1. Check the quality of the coolant.
Warning: Never open the radiator cap on a hot engine. Before opening the radiator cap, cover it with a thick cloth. When removing the radiator cap, first turn it slightly until it locks for the first time, then remove the cap completely after releasing the pressure from the system.
For details, see the website: MAZBOOK.RU
a) Make sure there is no corrosion or deposits around the radiator cap and inlet pipe.
b) Make sure that there is no oil contamination in the coolant.
2. Check the coolant level.
a) Make sure the coolant level is at the filler neck level.
b) Make sure that the coolant level in the expansion tank on a cold engine is between the "FULL" and "LOW" marks. If the level is below the "LOW" mark, add coolant.
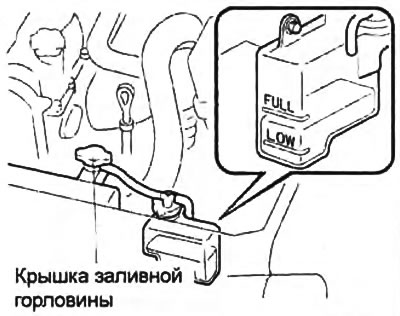
3. Check for coolant leaks.
a) Using a special adapter, connect a standard cooling system tester to the coolant filler neck.
Note: Creating pressure in the cooling system above 122 kPa (1.25 kg/cm²) may cause damage to cooling system components and coolant leaks.
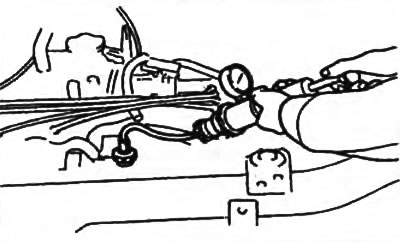
b) Create excess pressure in the cooling system.
- Pressure - 122 kPa
c) Make sure that the pressure does not drop. If the pressure drops, check the cooling system for coolant leaks.
Replacement
Attention:
- Changing the coolant or performing repair work that requires draining the coolant must be done on a cold engine. Draining the coolant on a hot engine can cause warping of aluminum parts (incl. cylinder heads).
- Please note that the procedure below is for a partial coolant change as some coolant remains in the cylinder block.
1. Remove the expansion tank of the cooling system without disconnecting the hoses.
2. Remove the expansion tank cap and drain the coolant from the expansion tank into a suitable container.
3. Remove the filler cap.
4. Loosen the radiator drain plug and drain the coolant from the radiator into a suitable container through the radiator drain hole.
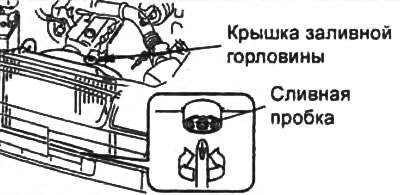
5. After the fluid has drained, tighten the radiator drain plug.
6. Fill the cooling system with coolant through the filler neck to the brim of the filler neck.
- Cooling system volume - 9.4 l
- Recommended coolant - FL22
Note: If necessary, flush the cooling system at this stage. Use distilled water.
7. Fill the expansion tank with coolant up to the "FULL" mark on the tank wall.
8. Install the filler cap.
9. Start the engine and warm it up to normal operating temperature at idle speed.
Caution: If the temperature in the cooling system has increased above the norm, then to prevent overheating, stop the engine and let it cool down. Repair the cooling system.
10. After warming up the engine, do the following:
a) Increase engine speed to 2500 rpm for 5 minutes.
b) Increase engine speed to 3000 rpm for 5 seconds.
c) Repeat the procedure specified in subparagraph "b" five times.
11. Check the amount of coolant in the radiator.
If necessary, add coolant to the radiator and repeat the procedures from point "7".
Note: If the cooling system contains flushing fluid, it is necessary to fill the system with the recommended coolant, following the procedures in points 1-12. Do not forget that the coolant is replaced on a cooled engine.
12. Check the cooling system for leaks.
Table: Percentage ratio of coolant solution.
