
MazBook.ru
English Русский
Български
Беларускі
Український
Српски
Hrvatski
Română
Polski
Slovenský
Magyar
• Bookmark • Sitemap • Contacts •   
Cars Opel Cars Ford Cars Volkswagen Cars Audi Cars Kia Cars Renault Cars Peugeot


Familia Capella Mazda3 Mazda6 CX-? Others Articles
Mazda 121 (3) (1996-2003) Mazda BT-50 (1) (2006-2011)

Engine oil and filter (Mazda BT-50 (1))

  • Home
  • Mazda
  • BT-50 J97M (2006-2011)
  • General information
  • Maintenance
  • Engine oil and filter
0
Contents: Checking the engine oil level ⇓ Selecting motor oil ⇓ Changing engine oil and filter ⇓

Checking the engine oil level


1. Warm up the engine to normal operating temperature.

Note: If the car has been parked for a long time, warm up the engine for approximately 20 minutes.


2. Place the vehicle on a flat, horizontal surface.

3. Turn off the engine and wait five minutes.

4. Remove the dipstick and wipe it with a rag.
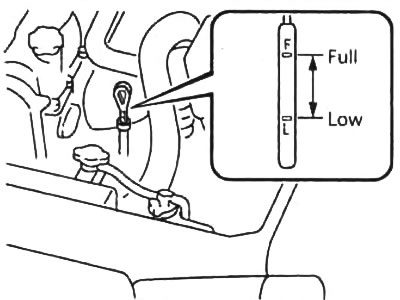
4. Remove the dipstick and wipe it with a rag.


5. Install the oil dipstick.

6. Remove the dipstick and check the oil level in the engine crankcase. The oil level should be between the "F" and "L" marks.

The volume of oil between the marks on the dipstick is approximately 2 liters.
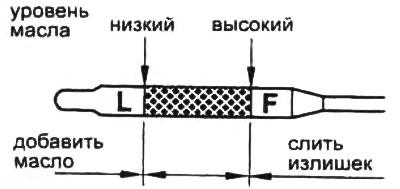
The volume of oil between the marks on the dipstick is approximately 2 liters.


If the oil level is below the "L" mark, check for leaks and add oil of the same type that was filled into the engine up to the "F" mark through the oil filler neck.


7. Check the O-ring on the dipstick. If the O-ring is damaged, replace it.

Note:
  • Avoid overfilling the oil, otherwise the engine may be damaged.
  • Always check the oil level after adding oil.
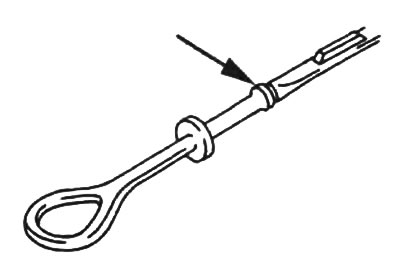

Always check the oil level after adding oil.


Selecting motor oil


1. Use oil recommended by the manufacturer.

Oil quality:
  • for AP1 - CD and above
  • according to ACEA - B1, VZ, 35
  • according to Ford specification - WSS-M2C913-B

Note: in the AP1 classification, the first letter indicates the type of engine for which the oil is intended: C - for diesel engines, S - for gasoline engines. Oil quality (oil class) the higher, the further from the beginning of the English alphabet the second letter is located.


2. Select viscosity (SAE) according to the temperature range diagram corresponding to the vehicle operating conditions until the next oil change.
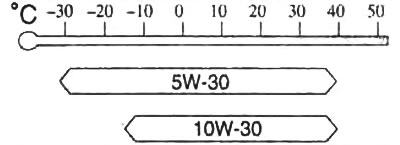
2. Select viscosity (SAE) according to the temperature range diagram corresponding to the vehicle…


Changing engine oil and filter


Caution: To avoid burns, change the engine oil when the engine has cooled down.


Note:
  • when changing the engine oil, it is also recommended to replace the oil filter with a new one.
  • although the engine oil change interval specified by the manufacturer is 20,000 km, it is recommended to change the engine oil more often.
  • the frequency of engine oil replacement for turbocharged engines for Russian operating conditions is 7500-10000 km.


1. Warm up the engine to operating temperature and turn it off.

2. Remove the engine oil filler cap.

3. Unscrew the drain plug on the oil pan.
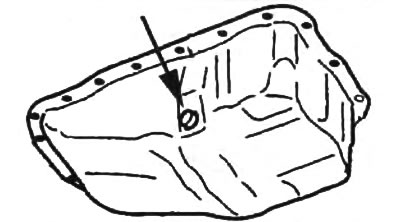
3. Unscrew the drain plug on the oil pan.


4. Drain the oil into a suitable container.

5. Using a puller, remove the oil filter.
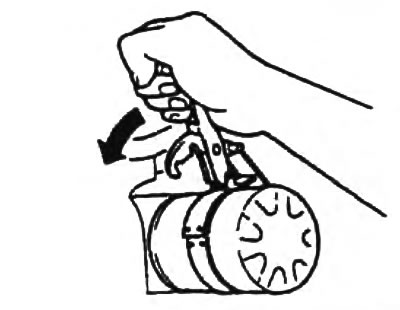
5. Using a puller, remove the oil filter.


6. Wipe the filter mating surface of the oil cooler with a clean cloth.


7. Apply a small amount of engine oil to the rubber sealing ring of the new filter.
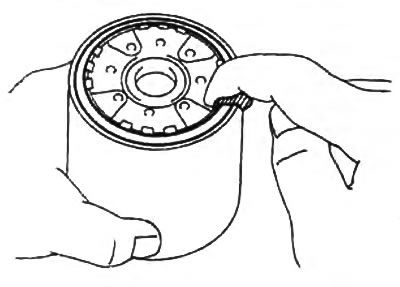
7. Apply a small amount of engine oil to the rubber sealing ring of the new filter.


8. Install the new filter and tighten it by hand until the sealing ring is fully seated against the mating surface of the oil cooler.

9. Using a puller, tighten the oil filter 3/4 turn.
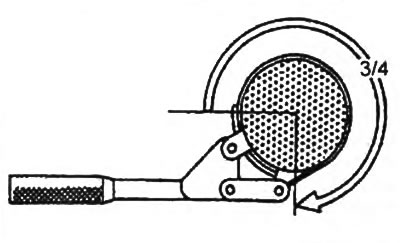
9. Using a puller, tighten the oil filter 3/4 turn.


Note: if you don't have a puller, you can tighten the filter by hand, after putting on a rubber or leather glove.

  • Tightening torque - 18-21 Nm

Oil filter parameters:
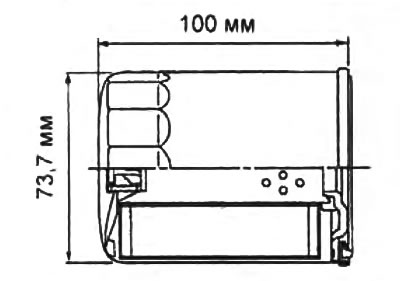
Oil filter parameters:


10. Install a new drain plug gasket and tighten the oil pan drain plug.


  • Tightening torque: 30-41 Nm

11. Fill the engine with new oil.

Note:
  • For the type and recommended viscosity of oil, see the subsection "Choosing motor oil".
  • When adding oil to the engine, always check the oil level using the dipstick. Do not allow the oil level to exceed the maximum (the "FULL" mark on the dipstick).

Filling capacity:
  • dry engine - 8.0 l
  • with filter replacement - 7.0 l
  • without filter replacement - 6.8 l


12. Install the oil filler cap.

13. Check the oil level and ensure there are no leaks with the engine stopped and running.
This article is available at: russian, bulgarian, belarusian, ukrainian, serbian, croatian, romanian, polish, slovak, hungarian
This text was checked by: Vladimir Bazhenov
Share with friends on social networks:

Previous
Mazda BT-50 (1) » Maintenance
Next

Layout of components in the engine compartment
Service intervals
Cooling liquid
Fuel system
Checking and replacing the air filter
Checking the battery status
Checking the end of compression stroke pressure
More articles on repairing other Mazda models
Draining diesel engine fuel filter sediment / replacing fuel filter Mazda Familia 6 (1989-1994)
Changing engine oil and filter Mazda Capella 3 (1982-1992, petrol)
Engine number Mazda3 BK (2003-2009)
Engine number Mazda6 GG (2002-2008)
Emergency engine start Mazda CX-5KE (2012-2017)
Link in different formats to this article
Comments and feedback from visitors
No comments yet


How much will 37 + 48 ?


Mazda BT-50 (1) (2006-2011) 
  • General information
  • Introduction to guide
  • User manual
  • Maintenance
  • Power unit
  • Engine repair (diesel)
  • Cooling and lubrication system
  • Fuel injection system
  • Intake and exhaust system
  • Engine electrical equipment
  • Transmission
  • Clutch
  • Mechanical gearbox
  • All-wheel drive system
  • Transfer case and gearboxes
  • Chassis
  • Front suspension
  • Rear suspension
  • Steering
  • Brake system
  • Body
  • Exterior (external elements)
  • Interior (internal elements)
  • Heating and air conditioning
  • Security system SRS
  • Electrical equipment
  • Equipment and devices
  • Electrical circuits
Mazda 121 (3) (1996-2003) 
  • General information
  • User manual
  • Maintenance
  • Power unit
  • Petrol engine 1.3 l
  • Petrol engine 1.25/1.4 l
  • Diesel engine
  • Lubrication system
  • Cooling system
  • Ignition system
  • Supply system
  • Fuel injection (gasoline)
  • Fuel injection (diesel)
  • Exhaust system
  • Transmission
  • Clutch
  • Car gearbox
  • Chassis
  • Front suspension
  • Rear suspension
  • Steering
  • Brake system
  • Wheels and tires
  • Body
  • Exterior (external elements)
  • Interior (internal elements)
  • Doors, windows and locks
  • Heating system
  • Electrical equipment
  • Troubleshooting
  • Equipment and devices
  • Lighting system
  • Power devices
  • Electrical circuits
MazBook.ru © 2018–2026 · Mobile version · Articles and news · Sitemap: EN BG BY UA RS HR RO PL SK HU · Feedback · Site search · Add to bookmarks Familia 5 (BF) · Familia 6 (BG) · Capella 3 (GC) · Capella 3 and 4 (GC) · Capella 4 (GD) · Capella 5 (GE) · Capella 6 (GF) · Mazda3 BK · Mazda6 GG · CX-5KE · Mazda 121 (3) · Mazda BT-50 (1) ·
By continuing to use the site, you agree to the use of cookies 🔐