


Contents: Removal and installation ⇓ Check on the car ⇓
Note: these vehicles are equipped with a generator with a current of 70A (at 12 V).
Removal and installation
Warning: When the battery is connected, a breakdown may occur between the car body and the "B" terminal. This may result in injury, fire, or damage to the electronic components of the car. When removing the alternator, always disconnect the wire from the negative terminal of the battery.
1. Disconnect the cable from the negative terminal of the battery.
2. Remove the parts in the order they are numbered in the figure "Removing and installing the generator".
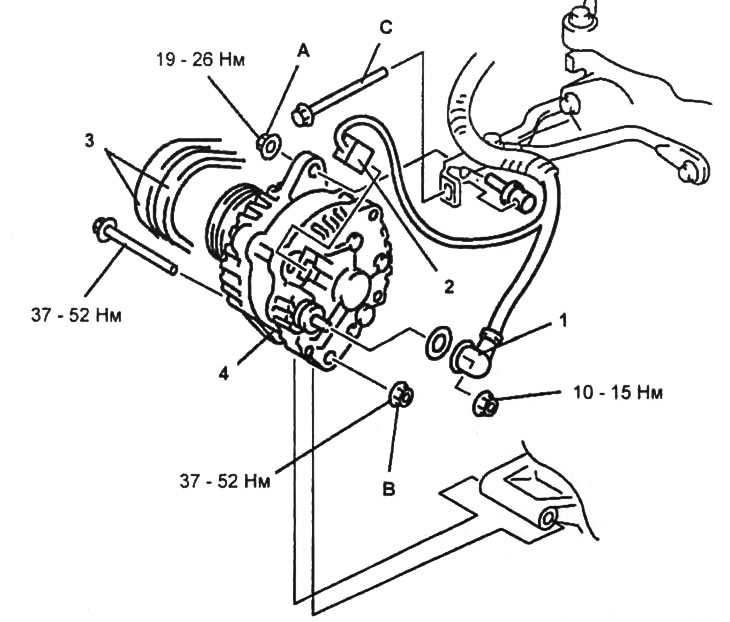
Removal and installation the generator.
1 - wire from the "B" terminal of the generator,
2 - generator connector,
3 - drive belt for attachments,
4 - generator.
3. Installation of parts during assembly is carried out in the reverse order of removal.
4. Make sure that the alternator belt deflection and tension correspond to the nominal values (see chapter "Maintenance and general check and adjustment procedures").
Note on Generator Installation
1. Lightly tighten the nut (A).
2. Tighten the fastening nut (B).
- Tightening torque: 12-25 Nm
3. Adjust the tension and deflection of the accessory drive belt by turning the adjusting bolt (C).
4. Tighten the nuts (A and B).
Check on the car
1. Check the battery charge indicator.
a) Make sure the battery is fully charged.
b) Make sure that the alternator belt deflection and tension correspond to the nominal values.
c) Turn the ignition switch to the "ON" position and make sure that the battery charge indicator lights up.
d) If this does not happen, check the circuit between the battery, the battery charge indicator and the corresponding terminals of the electronic control unit. If necessary, replace the control unit.
d) Start the engine and make sure the indicator goes out. If it does not, check the fault codes.
2. Check the voltage at the generator terminals.
a) Make sure the battery is fully charged.
b) Make sure that the alternator belt deflection and tension correspond to the nominal values (see chapter "Maintenance and general check and adjustment procedures").
c) Turn off all electrical consumers.
d) Turn the ignition switch to the "START" position and make sure that the generator rotates smoothly and does not make noise while the engine is running.
d) Measure the voltage between the generator terminals.
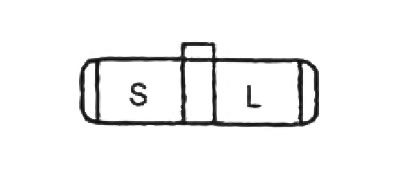
Table. Checking the voltage at the generator terminals
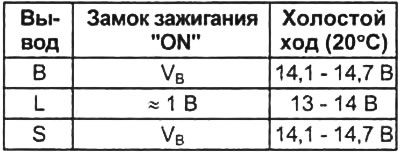
If the voltage is not as described, repair or replace the generator.
[Article is based on website data mazbook]
3. Check the current strength at the generator terminals.
a) Make sure the battery is fully charged.
b) Make sure that the alternator belt deflection and tension correspond to the nominal values (see chapter "Maintenance and general check and adjustment procedures").
c) Disconnect the cable from the negative terminal of the battery.
d) Install the ammeter between terminal "B" and the terminal.
d) Connect the wire to the negative terminal of the battery.
e) Turn off all electrical consumers.
g) Start the engine and set the crankshaft speed to 2000-2500 rpm.
h) Measure the current at the generator output. Measurements are taken on a "hot" engine at an air temperature of 20°C and a voltage at the generator terminals of 13.5 V.
Current strength:
- at 1000 rpm - 0-55 A
- at 2000 rpm - 0-70 A
i) Turn on the following power consumers one by one:
- headlights;
- heater fan motor;
- rear window heater.
j) Check that the current at the "B" terminal of the generator increases gradually. If the current does not increase, repair or replace the generator.