
MazBook.ru
English Русский
Български
Беларускі
Український
Српски
Hrvatski
Română
Polski
Slovenský
Magyar
• Bookmark • Sitemap • Contacts •   
Cars Opel Cars Ford Cars Volkswagen Cars Audi Cars Kia Cars Renault Cars Peugeot


Familia Capella Mazda3 Mazda6 CX-? Others Articles
Capella 3 (1982-1992, petrol) Capella 3 and 4 (1982-1992) Capella 4 (1987-1992) Capella 5 (1991-1997) Capella 6 (1997-2005, petrol)

Air conditioning system expansion nozzle (diffuser) — removal and installation (Mazda Capella GF)

  • Home
  • Mazda Capella
  • Capella GF (1997-2005)
  • Power unit
  • Cooling and ventilation
  • Air conditioning system expansion nozzle (diffuser) — removal and installation
0
Contents: Removal ⇓ Installation ⇓
Caution! The air conditioning system is under excess pressure. Do not disconnect the system lines until the system is discharged. The refrigerant must be properly removed and sent for regeneration to a service station or to a specialized station with the appropriate equipment. Protect your eyes when disconnecting refrigerant lines.


Note: The expansion nozzle is installed on all Probe models and on Mazda models produced since 1998.


Removal


1. Discharge the air conditioning system (to do this, contact a specialized station). Disconnect the negative cable from the battery.

Caution: If your vehicle's audio system is equipped with an anti-theft device, make sure you know the unlock code before disconnecting the battery.


2. On 4-cylinder models, remove the power steering pump mounting bolts and move the pump to the side to access the A/C line. Disconnect the line from the condenser to the evaporator (figure 20.2).
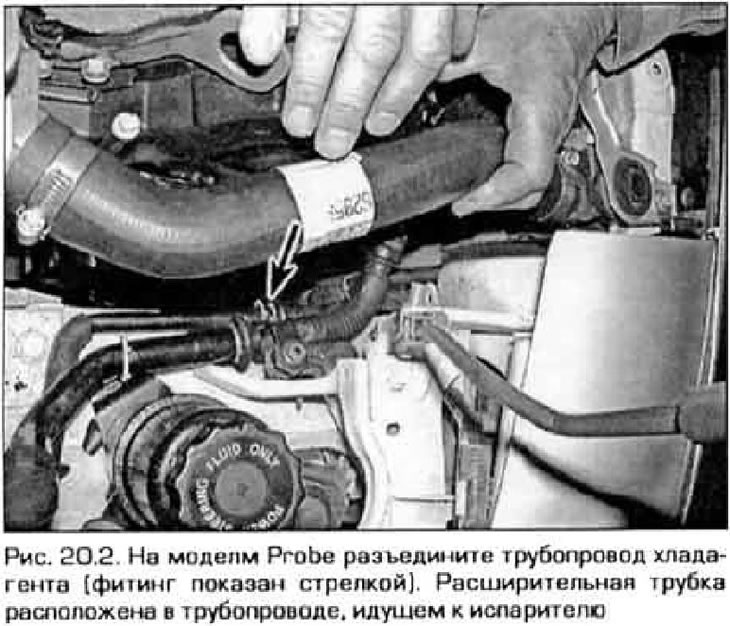
2. On 4-cylinder models, remove the power steering pump mounting bolts and move the pump to the…


3. The expansion nozzle (diffuser) is a tube of constant diameter with mesh filters at the ends (figure 20.3). Once the line is disconnected, you will see one end of this tube inside the pipe leading to the evaporator. Using pliers, carefully remove the nozzle, remembering which side it is installed inward.
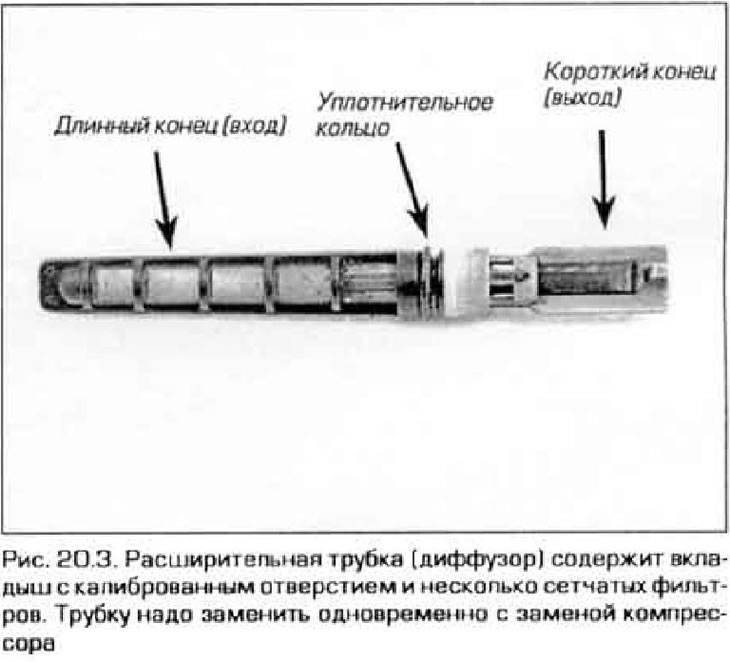


3. The expansion nozzle (diffuser) is a tube of constant diameter with mesh filters at the ends…


4. The expansion nozzle separates the high and low pressure cavities of the liquid refrigerant. The attachment can be installed for further use if the following conditions are met.
  • a) The nets on both sides of the hen are not clogged.
  • 6) The grids have no gaps.
  • c) The plastic body of the nozzle is not damaged.
  • d) The hole in the brass insert inside the plastic body of the nozzle is not clogged.

Installation


5. Install the attachment in the reverse order of removal. Insert the nozzle with the short end towards the evaporator.

Note: Always replace the O-ring when installing the nozzle.


6. Tighten the connection, then transfer the system to a specialized station for filling and testing.
This article is available at: russian, bulgarian, belarusian, ukrainian, serbian, croatian, romanian, polish, slovak, hungarian
This text was checked by: German Vorobyov
Share with friends on social networks:

Previous
Capella 6 » Cooling and ventilation
Next

Air conditioning evaporator — removal and installation
Air conditioning condenser — removal and installation
Air conditioning compressor — removal and installation
Air Conditioning Receiver/Dryer — removal and installation
Air Conditioning Compressor Clutch Circuit — check
More articles on repairing other Mazda models
Technical characteristics of the lubrication system Mazda Familia 5 (1985-1989)
Manual air conditioning system Mazda3 BK (2003-2009)
Manual air conditioning system Mazda6 GG (2002-2008)
Removal and installation the expansion tank of the cooling system Mazda CX-5KE (2012-2017)
Location of air conditioning, heating and ventilation system… Mazda BT-50 (1) (2006-2011)
Link in different formats to this article
Comments and feedback from visitors
No comments yet


How much will 20 + 33 ?


Capella 6 (1997-2005, petrol) 
  • General information
  • Introduction to guide
  • User manual
  • Troubleshooting
  • Maintenance
  • Power unit
  • 4-cylinder engines
  • 6-cylinder engines
  • Engine overhaul
  • Cooling and ventilation
  • Power and exhaust systems
  • Engine electrics
  • Control system
  • Transmission
  • Mechanical gearbox
  • Automatic gearbox
  • Clutch and drive shafts
  • Chassis
  • Brake system
  • Car suspension
  • Steering
  • Body
  • Exterior (external elements)
  • Interior (internal elements)
  • Doors, windows and locks
  • Electrical equipment
  • Equipment and devices
  • Electrical circuits
Capella 5 (1991-1997) 
  • General information
  • User manual
  • Maintenance
  • Helpful hints
  • Power unit
  • Petrol engines 1.6 and 1.8
  • Petrol engines 2.0
  • 2.5 petrol engines
  • Overhaul engines 1.6 and 1.8
  • Overhaul engines 2.0 and 2.5
  • Diesel engine 2.0
  • Engine electrics
  • Cooling system
  • Air conditioner
  • Carburetor Nikki 30/34
  • Power system (1.6 and 1.8)
  • Power system (2.0 and 2.5)
  • Control system
  • Transmission
  • Mechanical gearbox
  • Automatic gearbox
  • Clutch and axles
  • Chassis
  • Brake system
  • Suspension and wheels
  • Steering
  • Body
  • Exterior (external elements)
  • Interior (internal elements)
  • Doors and windows
  • Electrical equipment
  • Equipment and devices
  • Electrical circuits
Capella 4 (1987-1992) 
  • General information
  • Introduction to manual
  • Vehicle specifications
  • Power unit
  • Engine repair
  • Lubrication system
  • Cooling system
  • Fuel system (carburetor)
  • Fuel injection (FE)
  • Fuel injection (DOHC)
  • Fuel system (diesel)
  • Ignition system
  • Transmission
  • Clutch
  • Gearbox
  • Drive shafts
  • Chassis
  • Front suspension
  • Rear suspension
  • Steering system
  • Brake system
  • Electrical equipment
  • Equipment and devices
  • Electrical circuits
Capella 3 and 4 (1982-1992) 
  • General information
  • User manual
  • Maintenance
  • Power unit
  • Gasoline engine
  • Engine overhaul (gasoline)
  • Diesel engine
  • Cooling and heating
  • Supply system
  • Ignition system
  • Emission reduction
  • Transmission
  • Clutch
  • Mechanical gearbox
  • Automatic gearbox
  • Drive shafts
  • Chassis
  • Brake system
  • Suspension and wheels
  • Steering
  • Body
  • Exterior (external elements)
  • Interior (internal elements)
  • Electrical equipment
  • Equipment and devices
  • Power devices
  • Electrical circuits
Capella 3 (1982-1992, petrol) 
  • General information
  • User manual
  • Maintenance
  • Troubleshooting
  • Late models
  • Power unit
  • Engine in car
  • Engine overhaul
  • Cooling and heating system
  • Fuel and exhaust system
  • Engine electrical system
  • Emission control system
  • Transmission
  • Mechanical gearbox
  • Automatic gearbox
  • Clutch and drive shafts
  • Chassis
  • Brake system
  • Suspension and wheels
  • Steering
  • Body
  • Exterior (external elements)
  • Interior (internal elements)
  • Electrical equipment
  • Equipment and devices
  • Lighting and lamps
  • Electrical circuits
MazBook.ru © 2018–2026 · Mobile version · Articles and news · Sitemap: EN BG BY UA RS HR RO PL SK HU · Feedback · Site search · Add to bookmarks Familia 5 (BF) · Familia 6 (BG) · Capella 3 (GC) · Capella 3 and 4 (GC) · Capella 4 (GD) · Capella 5 (GE) · Capella 6 (GF) · Mazda3 BK · Mazda6 GG · CX-5KE · Mazda 121 (3) · Mazda BT-50 (1) ·
By continuing to use the site, you agree to the use of cookies 🔐