
Disc brakes
1. Mark the position of the wheel disk relative to the hub so that the balanced wheel can be installed in its original place. Loosen wheel bolts.
2. Raise the car, remove the wheels.
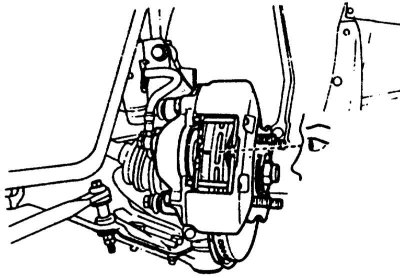
3. Visually check the thickness of the brake linings - without the main metal plate - from the front through the brake piston housing. If in doubt, remove the brake pads and measure the thickness with a vernier caliper.
4. The wear limit of disc brake pads is reached when the lining has a thickness of 1 mm (until 9/89 issue.) or 2 mm (since 10/89 issue.). The value applies only to the overlay without base.
5. If the wear limit is reached, replace the brake pads. Be sure to replace all pads on the same axle.
Note. According to the unspoken rule, 1 mm of brake pad thickness corresponds to a distance of 1000 km. This rule applies to severe operating conditions. Under normal conditions, pads last much longer. With disc brake lining thickness of 5.0 mm (not counting the back plate) its resource is at least another 4000 km.
5. Install the wheels, taking into account the mark on the hub, lower the car and tighten the wheel nuts crosswise with force 100 Nm.
Drum brakes
1. Raise the rear of the car.
2. Remove the brake drum, see Chapter Brake system, Sections Removal and installation of rear brake pads / brake drum, Removal and installation of the wheel brake cylinder.
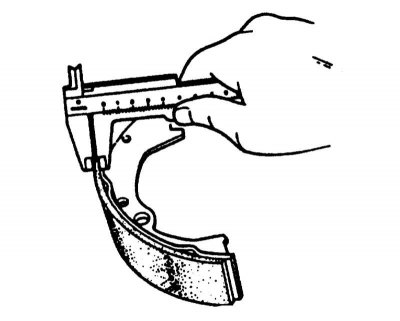
3. Measure the thickness of the pads with a caliper. The wear limit has been reached if the lining is 1 mm thick (without metal block).
4. If the wear limit is reached, the brake pads should be replaced. Be sure to replace all pads on the same axle.
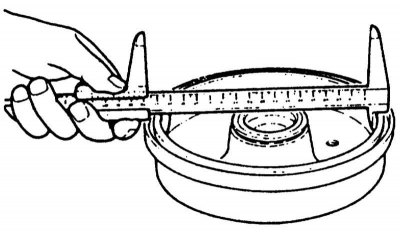
5. Measure the inner diameter of the brake drum with a caliper. The boundary is worn if the inner diameter of the drum exceeds 201 mm.
6. Install the brake drum, see Chapter Brake system, Sections Removal and installation of rear brake pads / brake drum, Removal and installation of the wheel brake cylinder.
7. Install the rear wheels, taking into account the marks on the hubs. Lower the vehicle and tighten the wheel nuts crosswise with force 100 Nm.
Visual inspection of the brake lines
1. Raise the car.
2. Clean the brake pipes with a cold cleaner.
Attention! For protection against corrosion brake pipelines are covered with a polymeric layer. Damage to this layer can lead to pipeline corrosion. Therefore, brake lines should not be cleaned with a wire brush, sandpaper or a screwdriver.
3. Check the pipelines from the main brake to the wheel brake cylinders using a lamp. The master brake cylinder is located in the engine compartment under the brake fluid reservoir.
4. Brake lines must not be bent or flattened. Also, they should not have rusty or worn places. Otherwise, the piping must be replaced up to the next connection point.
5. Brake hoses connect the brake lines to the wheel cylinders on the vehicle's moving parts. They are made of high-strength material, but over time they can crack, fray or cut themselves on sharp objects. In this case, they should be replaced.
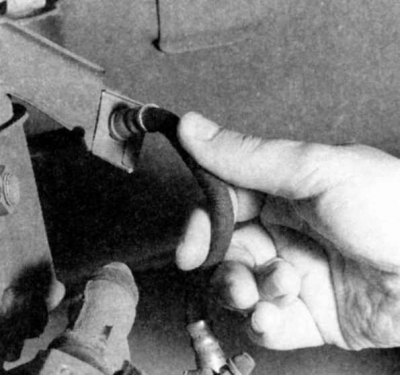
6. Bend the brake hoses from side to side and check for damage. The hoses must not be twisted, pay attention to the colored lines, if any.
7. Turn the steering wheel from side to side. The brake hoses must not touch vehicle parts in any position.
8. The connection points of the brake lines and hoses must not be wet due to escaping brake fluid.
Attention! If the expansion tank and gaskets are wet due to brake fluid, this is not necessarily an indication of a bad brake master cylinder. Most often, brake fluid leaks through a hole or gasket in the reservoir cap.
9. Lower the car.