
MazBook.ru
English Русский
Български
Беларускі
Український
Српски
Hrvatski
Română
Polski
Slovenský
Magyar
• Bookmark • Sitemap • Contacts •   
Cars Opel Cars Ford Cars Volkswagen Cars Audi Cars Kia Cars Renault Cars Peugeot


Familia Capella Mazda3 Mazda6 CX-? Others Articles
Mazda 121 (3) (1996-2003) Mazda BT-50 (1) (2006-2011)

Removal and installation the engine control unit (Mazda 121 (3))

  • Home
  • Mazda
  • 121 JASM (1996-2003)
  • Power unit
  • Ignition system
  • Removal and installation the engine control unit
0
Contents: Removal ⇓ Installation ⇓
Note: The control unit is programmed with basic values for the individual sensors. During operation, the control unit receives signals from the sensors that, due to manufacturing tolerances and the engine condition, differ slightly from the programmed values. The new values are stored and they change the control commands accordingly. This corresponds to the "learning" process.


When re-enabling a control unit with "erased" data or installing a new control unit, the engine data must be re-entered into the system. This process can result in uneven idling and interruptions in forced idle mode after starting. The car must be driven for several minutes at various speeds until all values correspond to the engine condition.

After installing a new control unit, it must be programmed by specialists at a service station. This requires a diagnostic/programming device.

Removal


Before removing the control unit, it is recommended to read the contents of the diagnostic device memory block in the workshop. This will help to determine what faults there are.

Disconnect the negative cable from the battery with the ignition off.

Note: This will erase data from electronic memory blocks, such as radio codes.


Remove the side footwell trim and fuel shut-off switch.
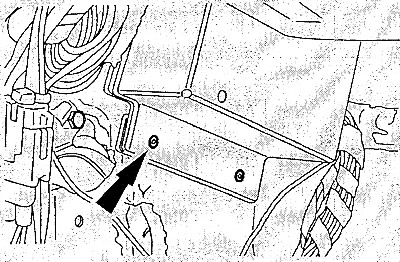
Drill out two or three rivets and remove the protective cover of the control unit.

Drill out two or three rivets and remove the protective cover of the control unit.


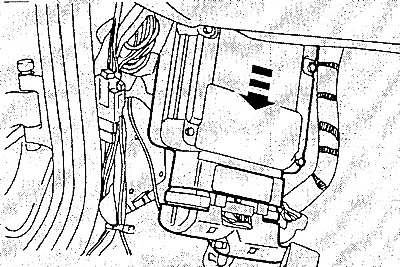
Remove the control unit from the mount.

Remove the control unit from the mount.

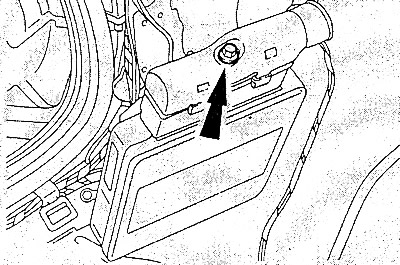
Unscrew the bolt of the connecting plug and remove the plug.


Unscrew the bolt of the connecting plug and remove the plug.

Installation


When buying a new unit, you need to know the control unit number and coding. For identification, it is recommended to take the removed control unit with you.

Insert the plug. Tighten the screw on the plug first by hand and then with a wrench, so as not to damage the sensitive contacts of the plug.

Original material on the website mazbook

Push the control unit in. Install the steel cover with new rivets. This cover serves as a safety feature to prevent the immobilizer from being triggered by mistake.

Install footwell trim.

Connect the negative cable to the battery. Set the clock, program the radio.

Perform a 10-minute test drive at different speeds. In this case, the control unit "learns" new engine characteristic values.
This article is available at: russian, bulgarian, belarusian, ukrainian, serbian, croatian, romanian, polish, slovak, hungarian
This text was checked by: Evgeny Mereshnikov
Share with friends on social networks:

Previous
Mazda 121 (3) » Ignition system
Next

Checking and replacing the ignition coil
Checking high voltage wires
Precautions when working with an electronic ignition system
The way the ignition system works
Ignition system — general information
Spark Plugs — General Information and Specifications
More articles on repairing other Mazda models
Heater control unit Mazda Familia 6 (1989-1994)
Control unit of the RVT system (since 1984) Mazda Capella 3 and 4 (1982-1992)
DSC HU/CM Dynamic Stability Control Unit Mazda3 BK (2003-2009)
DSC HU/CM Dynamic Stability Control Unit Mazda6 GG (2002-2008)
Configuration of the electronic engine control unit Mazda CX-5KE (2012-2017)
Link in different formats to this article
Comments and feedback from visitors
No comments yet


How much will 10 + 38 ?


Mazda BT-50 (1) (2006-2011) 
  • General information
  • Introduction to guide
  • User manual
  • Maintenance
  • Power unit
  • Engine repair (diesel)
  • Cooling and lubrication system
  • Fuel injection system
  • Intake and exhaust system
  • Engine electrical equipment
  • Transmission
  • Clutch
  • Mechanical gearbox
  • All-wheel drive system
  • Transfer case and gearboxes
  • Chassis
  • Front suspension
  • Rear suspension
  • Steering
  • Brake system
  • Body
  • Exterior (external elements)
  • Interior (internal elements)
  • Heating and air conditioning
  • Security system SRS
  • Electrical equipment
  • Equipment and devices
  • Electrical circuits
Mazda 121 (3) (1996-2003) 
  • General information
  • User manual
  • Maintenance
  • Power unit
  • Petrol engine 1.3 l
  • Petrol engine 1.25/1.4 l
  • Diesel engine
  • Lubrication system
  • Cooling system
  • Ignition system
  • Supply system
  • Fuel injection (gasoline)
  • Fuel injection (diesel)
  • Exhaust system
  • Transmission
  • Clutch
  • Car gearbox
  • Chassis
  • Front suspension
  • Rear suspension
  • Steering
  • Brake system
  • Wheels and tires
  • Body
  • Exterior (external elements)
  • Interior (internal elements)
  • Doors, windows and locks
  • Heating system
  • Electrical equipment
  • Troubleshooting
  • Equipment and devices
  • Lighting system
  • Power devices
  • Electrical circuits
MazBook.ru © 2018–2026 · Mobile version · Articles and news · Sitemap: EN BG BY UA RS HR RO PL SK HU · Feedback · Site search · Add to bookmarks Familia 5 (BF) · Familia 6 (BG) · Capella 3 (GC) · Capella 3 and 4 (GC) · Capella 4 (GD) · Capella 5 (GE) · Capella 6 (GF) · Mazda3 BK · Mazda6 GG · CX-5KE · Mazda 121 (3) · Mazda BT-50 (1) ·
By continuing to use the site, you agree to the use of cookies 🔐