
MazBook.ru
English Русский
Български
Беларускі
Український
Српски
Hrvatski
Română
Polski
Slovenský
Magyar
• Bookmark • Sitemap • Contacts •   
Cars Opel Cars Ford Cars Volkswagen Cars Audi Cars Kia Cars Renault Cars Peugeot


Familia Capella Mazda3 Mazda6 CX-? Others Articles
Mazda 121 (3) (1996-2003) Mazda BT-50 (1) (2006-2011)

Checking and replacing the ignition coil (Mazda 121 (3))

  • Home
  • Mazda
  • 121 JASM (1996-2003)
  • Power unit
  • Ignition system
  • Checking and replacing the ignition coil
0
Contents: Examination ⇓ Replacing the ignition coil ⇓
The ignition coil should be checked when there is no spark from the spark plugs when the engine is cranked by the starter.

The ignition coil is checked using an ohmmeter.

Turn off the ignition.
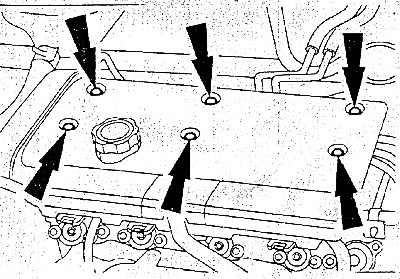
1.25/1.4L Engine: Remove six bolts and engine cover.


1.25/1.4L Engine: Remove six bolts and engine cover.

Note: On the 1.3L engine, the ignition coil is located on the rear side of the cylinder block.


Examination
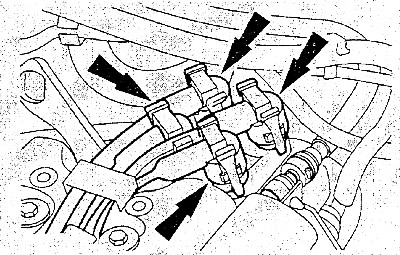


Disconnect all four high-voltage wires from the ignition coil by squeezing the two tabs on each…


Disconnect all four high-voltage wires from the ignition coil by squeezing the two tabs on each plug.
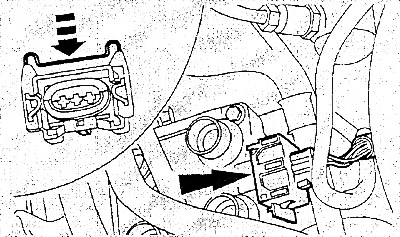
Check the resistance of the primary winding: to do this, remove the plug by pressing the metal…


Check the resistance of the primary winding: to do this, remove the plug by pressing the metal bracket.
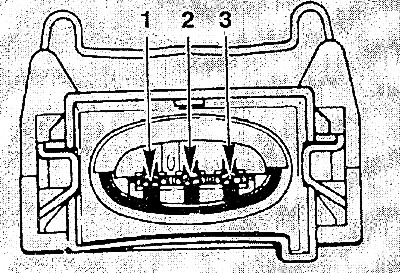


The figure shows the plug (1) of the ignition coil. Connect the ohmmeter to the corresponding…


The figure shows the plug (1) of the ignition coil. Connect the ohmmeter to the corresponding contacts of the ignition coil and measure the resistance between the following contacts in turn:
  • between contacts 1 and 2;
  • between contacts 3 and 2.

The resistance value for both measurements (resistance of primary windings of ignition coils) equals 0.4 - 0.6 Ohm.

If the value differs significantly from the specified values, replace the ignition coil.

Note: The resistance of the secondary winding (between the spark plug contact and ground) is not measured.


Replacing the ignition coil


Unscrew the mounting bolts and remove the ignition coil.

Install a new ignition coil, tighten the bolts to 6 Nm, insert the side plug.

[Original material on the website Mazbook]

Place the high-voltage wires on the ignition coil, making sure that the fastening tabs snap into place.

Note: The high-voltage wire bushings on the ignition coil are marked with numbers from 1 to 4. The wires must be installed in the correct order: 1-3-4-2 (1.3L engine: 1-2-4-3). The first cylinder is located next to the poly V-belt.


1.25/1.4L Engine: Install the engine cover and secure it with six bolts.
This article is available at: russian, bulgarian, belarusian, ukrainian, serbian, croatian, romanian, polish, slovak, hungarian
This text was checked by: Evgeny Mereshnikov
Share with friends on social networks:

Previous
Mazda 121 (3) » Ignition system
Next

Checking high voltage wires
Precautions when working with an electronic ignition system
The way the ignition system works
Ignition system — general information
Removal and installation the engine control unit
Spark Plugs — General Information and Specifications
More articles on repairing other Mazda models
Checking the ignition coil Mazda Familia 6 (1989-1994)
Ignition coil — checking, removal and installation Mazda Capella 3 and 4 (1982-1992)
Checking the ignition coil with built-in power switch Mazda3 BK (2003-2009)
Ignition Coil — General Information Mazda6 GG (2002-2008)
Checking the ignition timing Mazda CX-5KE (2012-2017)
Link in different formats to this article
Comments and feedback from visitors
No comments yet


How much will 44 + 47 ?


Mazda BT-50 (1) (2006-2011) 
  • General information
  • Introduction to guide
  • User manual
  • Maintenance
  • Power unit
  • Engine repair (diesel)
  • Cooling and lubrication system
  • Fuel injection system
  • Intake and exhaust system
  • Engine electrical equipment
  • Transmission
  • Clutch
  • Mechanical gearbox
  • All-wheel drive system
  • Transfer case and gearboxes
  • Chassis
  • Front suspension
  • Rear suspension
  • Steering
  • Brake system
  • Body
  • Exterior (external elements)
  • Interior (internal elements)
  • Heating and air conditioning
  • Security system SRS
  • Electrical equipment
  • Equipment and devices
  • Electrical circuits
Mazda 121 (3) (1996-2003) 
  • General information
  • User manual
  • Maintenance
  • Power unit
  • Petrol engine 1.3 l
  • Petrol engine 1.25/1.4 l
  • Diesel engine
  • Lubrication system
  • Cooling system
  • Ignition system
  • Supply system
  • Fuel injection (gasoline)
  • Fuel injection (diesel)
  • Exhaust system
  • Transmission
  • Clutch
  • Car gearbox
  • Chassis
  • Front suspension
  • Rear suspension
  • Steering
  • Brake system
  • Wheels and tires
  • Body
  • Exterior (external elements)
  • Interior (internal elements)
  • Doors, windows and locks
  • Heating system
  • Electrical equipment
  • Troubleshooting
  • Equipment and devices
  • Lighting system
  • Power devices
  • Electrical circuits
MazBook.ru © 2018–2026 · Mobile version · Articles and news · Sitemap: EN BG BY UA RS HR RO PL SK HU · Feedback · Site search · Add to bookmarks Familia 5 (BF) · Familia 6 (BG) · Capella 3 (GC) · Capella 3 and 4 (GC) · Capella 4 (GD) · Capella 5 (GE) · Capella 6 (GF) · Mazda3 BK · Mazda6 GG · CX-5KE · Mazda 121 (3) · Mazda BT-50 (1) ·
By continuing to use the site, you agree to the use of cookies 🔐