
MazBook.ru
English Русский
Български
Беларускі
Український
Српски
Hrvatski
Română
Polski
Slovenský
Magyar
• Bookmark • Sitemap • Contacts •   
Cars Opel Cars Ford Cars Volkswagen Cars Audi Cars Kia Cars Renault Cars Peugeot


Familia Capella Mazda3 Mazda6 CX-? Others Articles
Mazda 121 (3) (1996-2003) Mazda BT-50 (1) (2006-2011)

Removal and installation the oil pan (Mazda 121 (3))

  • Home
  • Mazda
  • 121 JASM (1996-2003)
  • Power unit
  • Lubrication system
  • Removal and installation the oil pan
0
Contents: Removal ⇓ Installation ⇓ Specially for 1.25/1.4L engine ⇓ Specially for diesel engine ⇓
This operation is described for a 1.3L engine. Instructions for other engines are given at the end of the section. The oil pan is made of aluminum and is fixed to the gearbox flange. The oil pan gasket must always be replaced; only for 1.3L engines can the gasket be reused if it is not visibly damaged. In addition, liquid sealant should always be applied to the base of the cylinder block.

Removal


Disconnect the negative cable from the battery with the ignition off. This will erase the data from the electronic memory units, such as the radio codes. See Chapter. "Electrical equipment".

If present, remove the lower engine compartment cover.

Drain the engine oil.

Remove the front exhaust pipe.

Unscrew the two fasteners of the oil pan to the gearbox flange.

Unscrew the bolts and remove the pan from the cylinder block (1.3L engine - 18 bolts, 1.25/1.4L engine - 13 bolts, diesel - 14 bolts).

Pull the oil pan downwards. If it is stuck, carefully pry the pan off with a screwdriver.

Installation


Clean the oil pan inside.

Clean the sealing surfaces of the sump and cylinder block with alcohol - they must be degreased and clean.
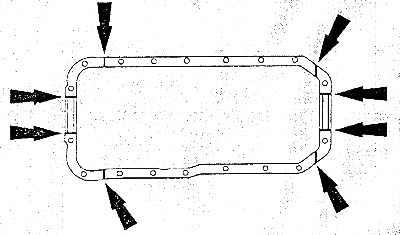
1.3L Engine: Lubricate the marked areas with sealant.


1.3L Engine: Lubricate the marked areas with sealant.


Caution: The oil pan bolts must be tightened no later than 20 minutes after applying the sealant.


Install the oil pan with a new gasket and tighten its bolts by hand.
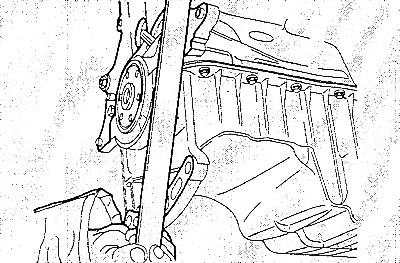
With the gearbox removed, align the oil pan using a steel ruler so that the gearbox flange on the…


With the gearbox removed, align the oil pan using a steel ruler so that the gearbox flange on the cylinder block and the oil pan are on the same plane.

With the gearbox installed, move the pan until it stops against the gearbox housing.
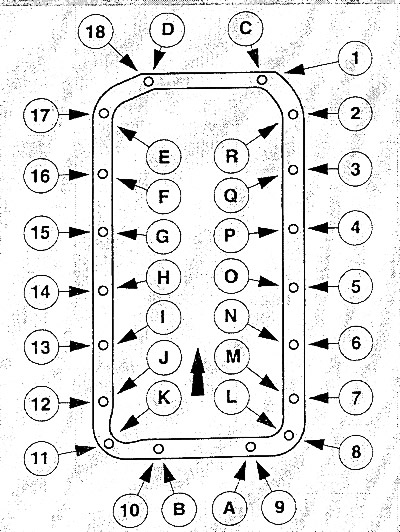
Tighten the oil pan bolts in two passes:


Tighten the oil pan bolts in two passes:
  • Stage 1: in alphabetical order with a torque of 7 Nm.
  • Stage 2: in numerical order with a moment of 10 Nm.

Note: After the engine has warmed up, the bolts are tightened again in alphabetical order.


Note: The arrow points towards the gearbox.


Fill with engine oil.

Install the front exhaust pipe with the catalytic converter.


Lower the car.

Connect the negative cable to the battery. Set the clock, enter the required codes.

Warm up the engine for 15 minutes and tighten the oil pan bolts to 10 Nm in alphabetical order.

If present, remove the lower engine compartment cover.

Specially for 1.25/1.4L engine


Note: This section only describes the differences that you need to pay attention to when removing the oil pan.


Installation
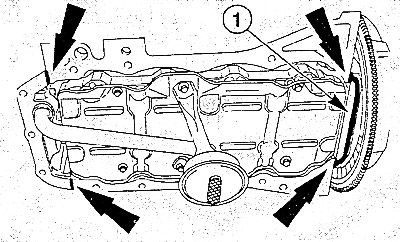


Apply a thin layer of sealant to the areas shown.


Apply a thin layer of sealant to the areas shown.

Note: The seal mount on the flywheel must also be lubricated with sealant (1).
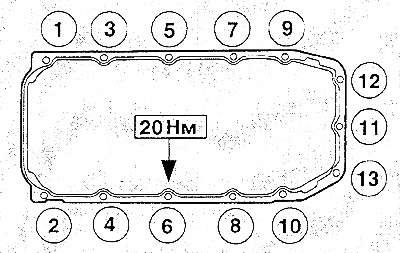

Position the oil pan so that it rests against the gearbox flange, then tighten the bolts in the…


Position the oil pan so that it rests against the gearbox flange, then tighten the bolts in the order shown in several passes to a torque of 20 Nm.

Specially for diesel engine


Note: These are just the differences you need to be aware of when removing the oil pan.


Removal


Loosen the mounting bolts at the bottom of the vehicle, remove the V-belt cover and the lower timing belt cover.

Remove the crankshaft speed sensor wire plug. Unscrew the sensor and pull it out of the bushing on…


Remove the crankshaft speed sensor wire plug. Unscrew the sensor and pull it out of the bushing on the oil pan.

Installation
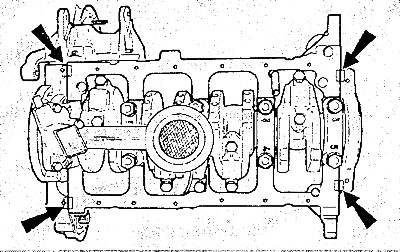


Lubricate the sealing surface of the cylinder block at the junction of the front and rear covers…


Lubricate the sealing surface of the cylinder block at the junction of the front and rear covers with sealant.

Caution: The oil pan bolts must be tightened no later than 20 minutes after applying the sealant.


Install the oil pan with a new gasket and tighten the bolts.

Secure the oil pan with two bolts at the bottom of the gearbox flange.

Lightly tighten all bolts, i.e. 10 Nm. First tighten all bolts except the corner bolts in a counterclockwise direction. Then tighten the four corner bolts.


Insert and tighten the crankshaft speed sensor. Put the plug on the sensor - it should click into place.

Install the toothed belt cover and V-belt cover from below and secure them with bolts. Fill with engine oil.
This article is available at: russian, bulgarian, belarusian, ukrainian, serbian, croatian, romanian, polish, slovak, hungarian
This text was checked by: Evgeny Mereshnikov
Share with friends on social networks:

Previous
Mazda 121 (3) » Lubrication system
Next

Checking the oil pressure and warning light switch
Engine oil consumption
Oil line — design description
Application areas and viscosity classes of motor oils
Engine lubrication system — general information
Diagnostics of lubrication system faults
Link in different formats to this article
Comments and feedback from visitors
No comments yet


How much will 47 + 40 ?


Mazda BT-50 (1) (2006-2011) 
  • General information
  • Introduction to guide
  • User manual
  • Maintenance
  • Power unit
  • Engine repair (diesel)
  • Cooling and lubrication system
  • Fuel injection system
  • Intake and exhaust system
  • Engine electrical equipment
  • Transmission
  • Clutch
  • Mechanical gearbox
  • All-wheel drive system
  • Transfer case and gearboxes
  • Chassis
  • Front suspension
  • Rear suspension
  • Steering
  • Brake system
  • Body
  • Exterior (external elements)
  • Interior (internal elements)
  • Heating and air conditioning
  • Security system SRS
  • Electrical equipment
  • Equipment and devices
  • Electrical circuits
Mazda 121 (3) (1996-2003) 
  • General information
  • User manual
  • Maintenance
  • Power unit
  • Petrol engine 1.3 l
  • Petrol engine 1.25/1.4 l
  • Diesel engine
  • Lubrication system
  • Cooling system
  • Ignition system
  • Supply system
  • Fuel injection (gasoline)
  • Fuel injection (diesel)
  • Exhaust system
  • Transmission
  • Clutch
  • Car gearbox
  • Chassis
  • Front suspension
  • Rear suspension
  • Steering
  • Brake system
  • Wheels and tires
  • Body
  • Exterior (external elements)
  • Interior (internal elements)
  • Doors, windows and locks
  • Heating system
  • Electrical equipment
  • Troubleshooting
  • Equipment and devices
  • Lighting system
  • Power devices
  • Electrical circuits
MazBook.ru © 2018–2026 · Mobile version · Articles and news · Sitemap: EN BG BY UA RS HR RO PL SK HU · Feedback · Site search · Add to bookmarks Familia 5 (BF) · Familia 6 (BG) · Capella 3 (GC) · Capella 3 and 4 (GC) · Capella 4 (GD) · Capella 5 (GE) · Capella 6 (GF) · Mazda3 BK · Mazda6 GG · CX-5KE · Mazda 121 (3) · Mazda BT-50 (1) ·
By continuing to use the site, you agree to the use of cookies 🔐