MazBook.ru
English Русский
Български
Беларускі
Український
Српски
Hrvatski
Română
Polski
Slovenský
Magyar
• Bookmark • Sitemap • Contacts •   
Cars Opel Cars Ford Cars Volkswagen Cars Audi Cars Kia Cars Renault Cars Peugeot


Familia Capella Mazda3 Mazda6 CX-? Others Articles
Mazda 121 (3) (1996-2003) Mazda BT-50 (1) (2006-2011)

Injectors — removal and installation (Mazda BT-50 (1))

  • Home
  • Mazda
  • BT-50 J97M (2006-2011)
  • Power unit
  • Fuel injection system
  • Injectors — removal and installation
0
Attention:
  • Cover all adjacent parts with rags to prevent fuel from spilling on them.
  • After removing the high-pressure fuel pipes, do not allow dirt or foreign materials to enter them. When installing the fuel pipes, tighten the nuts to the specified torque.
  • Remove and install parts strictly in the sequence shown below to avoid fuel leaks.
  • The number of times high-pressure fuel pipes can be reused without losing their reliability is limited. Only five times are old high-pressure pipes allowed to be reinstalled after they have been removed. After the sixth removal of high-pressure pipes, they must be replaced.
  • When connecting the fuel hoses, refer to the figure "Location of fuel system components in the engine compartment".
  • If the injector has been replaced, the identification code of the new injector should be programmed into the engine control unit memory.


1. Disconnect the cable from the negative terminal of the battery.

2. Follow the procedures in the "Before Repairing" section.

3. Disconnect the connectors of the following items:
  • Camshaft position sensor.
  • Coolant temperature sensor.
  • Fuel accumulator pressure sensor.
  • Injectors.

4. Remove the parts in the numbering sequence shown in the assembly drawing "Removing and installing injectors".

5. Installation of parts is carried out in the reverse order of removal.

6. Perform the procedures specified in the "After Repair Work" section.

Checking the injector


1. Disconnect the cable from the negative terminal of the battery.

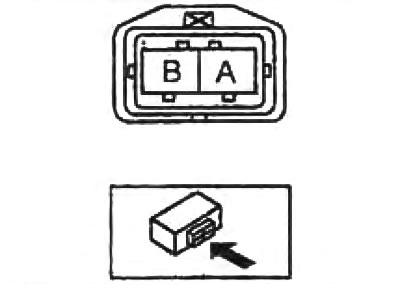
2. Disconnect the connector from the injector and, using an ohmmeter, check the resistance between the injector terminals (at a temperature of 20°C).


  • Resistance - 0.225 Ohm

Resistance - 0.225 Ohm


If the resistance between the injector terminals differs from the specified value, replace the injector.
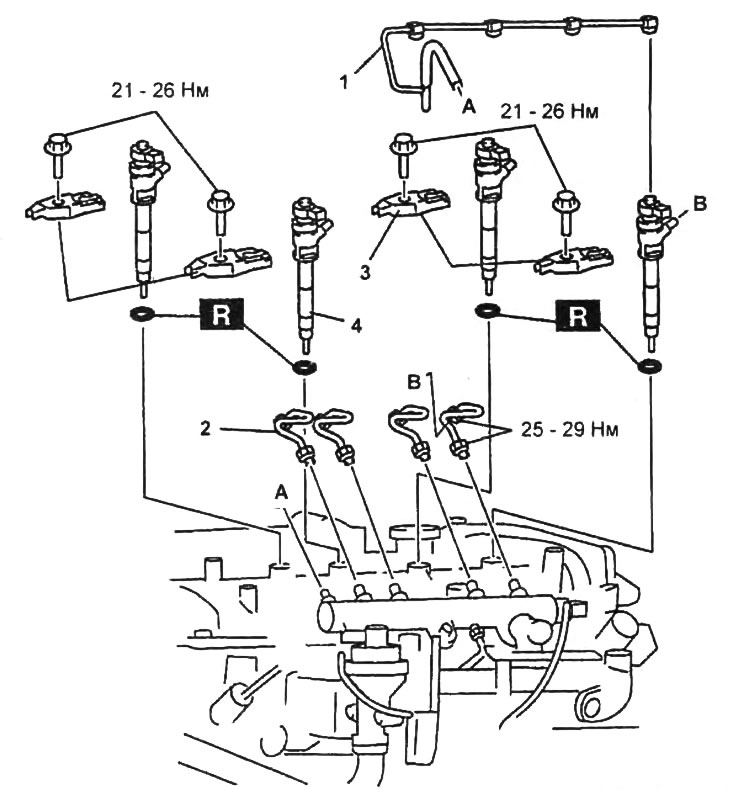
Removal and installation of injectors.

Removal and installation of injectors.
1 - fuel return hose,
2 - high pressure fuel pipes,
3 - nozzle holder,
4 - nozzle.
This article is available at: russian, bulgarian, belarusian, ukrainian, serbian, croatian, romanian, polish, slovak, hungarian
This text was checked by: Vladimir Bazhenov
Share with friends on social networks:

Previous
Mazda BT-50 (1) » Fuel injection system
Next

Fuel accumulator
Checking the fuel temperature sensor of the injection pump
Checking the fuel pressure control valve of the high-pressure fuel…
Removal and installation an additional fuel filter (on the…
High pressure fuel pump — removal and installation
Crankshaft position sensor
Camshaft Position Sensor
Fuel filter water presence sensor
Mass Air Flow Sensor / Intake Air Temperature Sensor #2
Intake Air Temperature Sensor #1 / Boost Pressure Sensor
More articles on repairing other Mazda models
Removal and installation injectors Mazda Familia 6 (1989-1994)
Fuel Injectors (EGI) — checking, removing and installing Mazda Capella 3 (1982-1992, petrol)
Diagnostics and cleaning of fuel injectors Mazda CX-5KE (2012-2017)
Link in different formats to this article
Comments and feedback from visitors
No comments yet


How much will 49 + 23 ?


Mazda BT-50 (1) (2006-2011) 
  • General information
  • Introduction to guide
  • User manual
  • Maintenance
  • Power unit
  • Engine repair (diesel)
  • Cooling and lubrication system
  • Fuel injection system
  • Intake and exhaust system
  • Engine electrical equipment
  • Transmission
  • Clutch
  • Mechanical gearbox
  • All-wheel drive system
  • Transfer case and gearboxes
  • Chassis
  • Front suspension
  • Rear suspension
  • Steering
  • Brake system
  • Body
  • Exterior (external elements)
  • Interior (internal elements)
  • Heating and air conditioning
  • Security system SRS
  • Electrical equipment
  • Equipment and devices
  • Electrical circuits
Mazda 121 (3) (1996-2003) 
  • General information
  • User manual
  • Maintenance
  • Power unit
  • Petrol engine 1.3 l
  • Petrol engine 1.25/1.4 l
  • Diesel engine
  • Lubrication system
  • Cooling system
  • Ignition system
  • Supply system
  • Fuel injection (gasoline)
  • Fuel injection (diesel)
  • Exhaust system
  • Transmission
  • Clutch
  • Car gearbox
  • Chassis
  • Front suspension
  • Rear suspension
  • Steering
  • Brake system
  • Wheels and tires
  • Body
  • Exterior (external elements)
  • Interior (internal elements)
  • Doors, windows and locks
  • Heating system
  • Electrical equipment
  • Troubleshooting
  • Equipment and devices
  • Lighting system
  • Power devices
  • Electrical circuits
MazBook.ru © 2018–2026 · Mobile version · Articles and news · Sitemap: EN BG BY UA RS HR RO PL SK HU · Feedback · Site search · Add to bookmarks Familia 5 (BF) · Familia 6 (BG) · Capella 3 (GC) · Capella 3 and 4 (GC) · Capella 4 (GD) · Capella 5 (GE) · Capella 6 (GF) · Mazda3 BK · Mazda6 GG · CX-5KE · Mazda 121 (3) · Mazda BT-50 (1) ·
By continuing to use the site, you agree to the use of cookies 🔐