
MazBook.ru
English Русский
Български
Беларускі
Український
Српски
Hrvatski
Română
Polski
Slovenský
Magyar
• Bookmark • Sitemap • Contacts •   
Cars Opel Cars Ford Cars Volkswagen Cars Audi Cars Kia Cars Renault Cars Peugeot


Familia Capella Mazda3 Mazda6 CX-? Others Articles
Mazda 121 (3) (1996-2003) Mazda BT-50 (1) (2006-2011)

Fuel tank (Mazda BT-50 (1))

  • Home
  • Mazda
  • BT-50 J97M (2006-2011)
  • Power unit
  • Fuel injection system
  • Fuel tank
0
Contents: Removal and installation ⇓ Note on installing the fuel filler…⇓ Note on installing the vent hose,…⇓ Examination ⇓

Removal and installation


Warning: Repairing a fuel tank that has not been properly steam cleaned can be dangerous. A tank explosion or fire can cause serious injury or death.


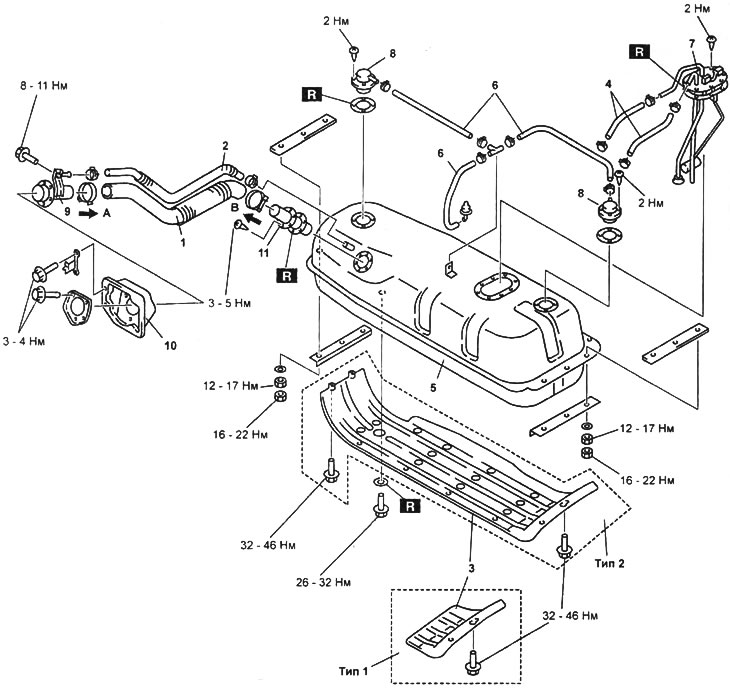
Note: see picture "Removal and installation the fuel tank".


1. Place the vehicle on a level, horizontal surface.

2. Disconnect the cable from the negative terminal of the battery.

3. Follow the procedures described in the section "Before carrying out repair work".

4. Unscrew the drain plug and drain the fuel into a suitable container.

5. Remove the tailgate.

6. Remove the parts in the order they are numbered in the figure "Removal and installation the fuel tank".

7. Installation of parts during assembly is carried out in the reverse order of removal.

8. Follow the procedures described in the section "After the repair work has been completed".

Note on installing the fuel filler pipe connecting hose


1. Push the hose until it touches the side of the fuel tank, then insert the tube into the hose to a distance of 35 mm.

2. Install the clamps as shown in the figure.
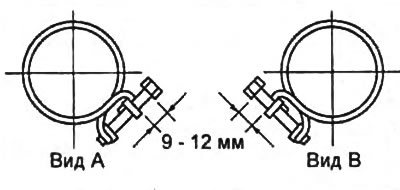
2. Install the clamps as shown in the figure.


Note on installing the vent hose, fuel hose, and evaporative emission system hose


When installing, it is necessary to push the hoses onto the tubes at a distance of at least 25 mm.

Install the clamps as shown in the figure.
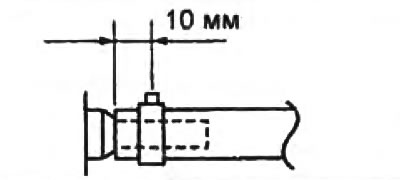
Install the clamps as shown in the figure.


Examination


Note: The test is performed on the fuel tank, the safety valve of which is removed.


1. Follow the procedures described in the section "Before carrying out repair work".

2. Disconnect the cable from the negative terminal of the battery.

3. Remove the fuel tank.

4. Install the plug into the fuel level sensor fuel pipe port.

5. Install the plug into port "C".

6. Connect the hand pump to port "B".
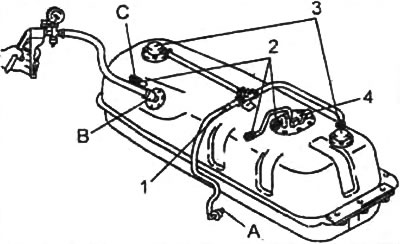
1 - valve (2-way),

1 - valve (2-way),
2 - plug,
3 - safety valve,
4 - fuel level sensor.


7. Place the fuel tank on a level surface.


8. Create excess pressure of 5 - 6 kPa (38 - 45 mm Hg.).

9. Make sure that air comes out of the "A" connection.

If air does not come out of the "A" connection, replace both fuel tank relief valves and the three fuel hoses.
10. Create a vacuum of 5-6 kPa (38-45 mm Hg.) and make sure that air is sucked into the fuel tank.
10. Create a vacuum of 5-6 kPa (38-45 mm Hg.) and make sure that air is sucked into the fuel tank.


Removal and installation the fuel tank.

Removal and installation the fuel tank.
1 - fuel filler neck connecting hose,
2 - ventilation hose,
3 - lower protection,
4 - fuel hoses,
5 - fuel tank,
6 - fuel vapor recovery system hose,
7 - fuel level sensor,
8 - valve,
9 - fuel filler pipe,
10 - anther,
11 - connecting tube.


If air is not sucked into the fuel tank, replace both fuel tank relief valves and the three fuel hoses.

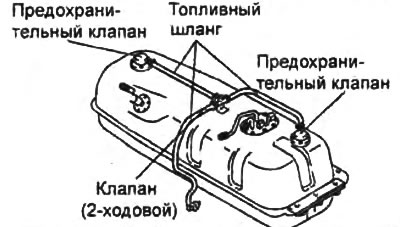
11. Turn the fuel tank upside down. Connect the hand pump to port "B" as shown in the figure.
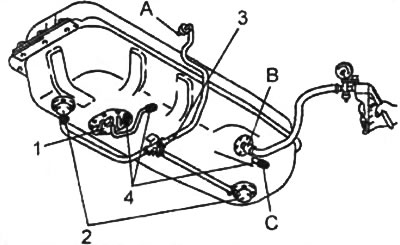


1 - fuel level sensor,

1 - fuel level sensor,
2 - safety valve,
3 - valve (2-way),
4 - plug.


12. Create excess pressure of 5-6 kPa (38-45 mm Hg.).

13. Make sure that air does not come out of the "A" connection.

(Based on website data: «MAZbook.ru»)

If air comes out of port "A", replace both fuel tank relief valves and the three fuel hoses.
This article is available at: russian, bulgarian, belarusian, ukrainian, serbian, croatian, romanian, polish, slovak, hungarian
This text was checked by: Vladimir Bazhenov
Share with friends on social networks:

Previous
Mazda BT-50 (1) » Fuel injection system
Next

Exhaust Gas Recirculation System Checks
Removal and installation of exhaust gas recirculation system…
Clutch pedal switch
Main relay
Start inhibit switch
Engine control unit
Diagnostic system
More articles on repairing other Mazda models
Removal and installation / checking the sensor in the fuel tank Mazda Familia 6 (1989-1994)
Fuel tank repair Mazda Capella 3 (1982-1992, petrol)
Fuel tank filler flap and cap Mazda3 BK (2003-2009)
Fuel tank filler flap and cap Mazda6 GG (2002-2008)
Fuel tank filler flap and cap Mazda CX-5KE (2012-2017)
Link in different formats to this article
Comments and feedback from visitors
No comments yet


How much will 18 + 49 ?


Mazda BT-50 (1) (2006-2011) 
  • General information
  • Introduction to guide
  • User manual
  • Maintenance
  • Power unit
  • Engine repair (diesel)
  • Cooling and lubrication system
  • Fuel injection system
  • Intake and exhaust system
  • Engine electrical equipment
  • Transmission
  • Clutch
  • Mechanical gearbox
  • All-wheel drive system
  • Transfer case and gearboxes
  • Chassis
  • Front suspension
  • Rear suspension
  • Steering
  • Brake system
  • Body
  • Exterior (external elements)
  • Interior (internal elements)
  • Heating and air conditioning
  • Security system SRS
  • Electrical equipment
  • Equipment and devices
  • Electrical circuits
Mazda 121 (3) (1996-2003) 
  • General information
  • User manual
  • Maintenance
  • Power unit
  • Petrol engine 1.3 l
  • Petrol engine 1.25/1.4 l
  • Diesel engine
  • Lubrication system
  • Cooling system
  • Ignition system
  • Supply system
  • Fuel injection (gasoline)
  • Fuel injection (diesel)
  • Exhaust system
  • Transmission
  • Clutch
  • Car gearbox
  • Chassis
  • Front suspension
  • Rear suspension
  • Steering
  • Brake system
  • Wheels and tires
  • Body
  • Exterior (external elements)
  • Interior (internal elements)
  • Doors, windows and locks
  • Heating system
  • Electrical equipment
  • Troubleshooting
  • Equipment and devices
  • Lighting system
  • Power devices
  • Electrical circuits
MazBook.ru © 2018–2026 · Mobile version · Articles and news · Sitemap: EN BG BY UA RS HR RO PL SK HU · Feedback · Site search · Add to bookmarks Familia 5 (BF) · Familia 6 (BG) · Capella 3 (GC) · Capella 3 and 4 (GC) · Capella 4 (GD) · Capella 5 (GE) · Capella 6 (GF) · Mazda3 BK · Mazda6 GG · CX-5KE · Mazda 121 (3) · Mazda BT-50 (1) ·
By continuing to use the site, you agree to the use of cookies 🔐