


Contents: Front direction indicators and…⇓ Headlight with replaceable bulb ⇓ Interior lighting lamps ⇓ Outdoor lighting lamps ⇓ Replacing the rear light lens ⇓
Before replacing the exterior lighting bulb, disconnect the cable from the negative terminal of the battery. Be aware that if the lamp has just been lit, it may be too hot.
Check the relevant electrical circuit and fuse first. Do not touch the glass bulb of the lamp with bare hands. Grease stains on the lamp cause it to darken and quickly fail. Be sure to replace defective lamps with lamps of the same type. Wipe off any stains that may appear due to carelessness with a clean, lint-free cloth or alcohol.
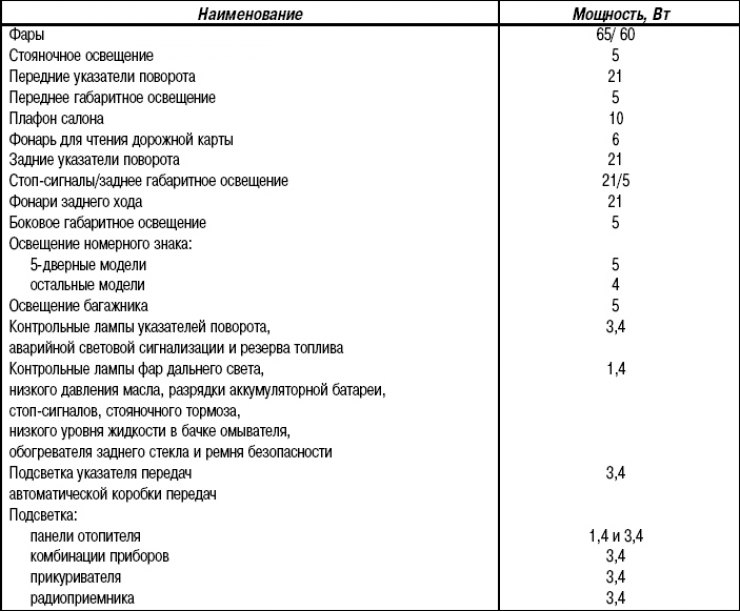
The lamps used in the car are listed in the table. 13.1.
Table 13.1. Lamps used
Front direction indicators and parking lights
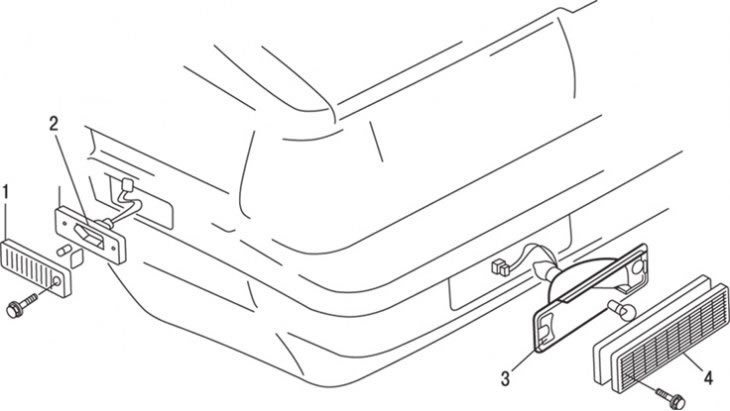
Figure 13.32. Front direction indicators and parking lights: 1 – front side marker light diffuser; 2 – front side marker light; 3 – direction indicator lens; 4 – direction indicator lens
The front turn signal and parking light bulbs can be replaced after unscrewing the screws and removing the lenses (figure 13.32). Remove the lamp from the socket (side marker lights) or press on the lamp and turn it counterclockwise (direction indicators).
Install a new lamp, check its operation, and then install the diffuser.
Headlight with replaceable bulb
Open the hood. Disconnect the connector from the headlight and remove the rubber boot.
Press down on the spring clip and remove the lamp.
Do not touch the glass bulb of the lamp with bare hands. Grease stains on the lamp lead to darkening of the bulb and rapid failure of the lamp. If any grease stains remain, wipe them off with a clean, lint-free cloth or rubbing alcohol.
Install the new bulb by inserting the tabs on the bulb base into the recesses in the reflector and secure it with the spring clip.
Install the rubber boot with the "TOP" mark facing up and connect the connector. Check the operation of the headlights, then close the hood.
Interior lighting lamps
Ignition switch illumination lamp
To access the ignition switch, remove the steering column covers. Remove the bulb from its socket and install a new one in its place. Install the steering column covers.
Interior light
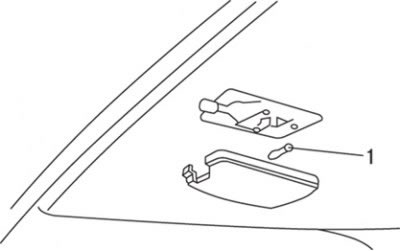
Figure 13.33. Replacing the lamp (1) of the interior light
Grasp the diffuser, pull it down and remove it. Remove the bulb from its socket and install a new one in its place (figure 13.33). Check the lamp operation and install the diffuser.
Map reading lamp
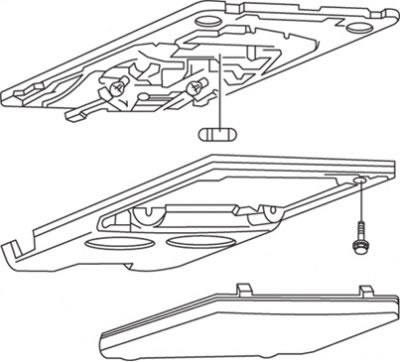
Figure 13.34. Replacing the interior light/map reader bulb
The article is copied from the website (MAZbook.ru)
Use a screwdriver to remove the diffuser/power button. Pull the bulb out of the socket and install a new one in its place (figure 13.34). Check if the lamp is lit and install the diffuser.
Instrument cluster illumination lamps
The instrument cluster illumination lamps can only be replaced after removing the instrument cluster.
Turn the socket with the bulb, remove it from the instrument cluster and remove the bulb from the socket. Some bulbs are not removable from the socket and must be replaced along with the socket.
Installation is carried out in the reverse order of removal.
Radio backlight lamps
The radio backlight bulbs are screwed into sockets and can be replaced after removing the radio.
Heater control panel illumination lamps
Remove the heater control panel. To gain access to the lamps, several heater control cables must be disconnected.
Remove the bulb from the socket and install a new one in its place. Check its operation, then install the heater control panel.
Glove compartment light
To access the lamp, remove the four screws and remove the glove box.
Remove the bulb from the socket and install a new one. Check its operation, then install the glove box back in place.
Instrument panel switch illumination lamps
Remove the instrument panel trim near the instrument cluster glass and disconnect the socket and bulb.
Replace the bulb, check that it lights, then replace the socket and trim.
Floor lighting lamps
Remove the trim at the bottom of the instrument panel, remove the lamp and socket from the panel.
Replace the lamp and check its operation. Install the cartridge into the panel, then install the trim.
Trunk lighting lamps
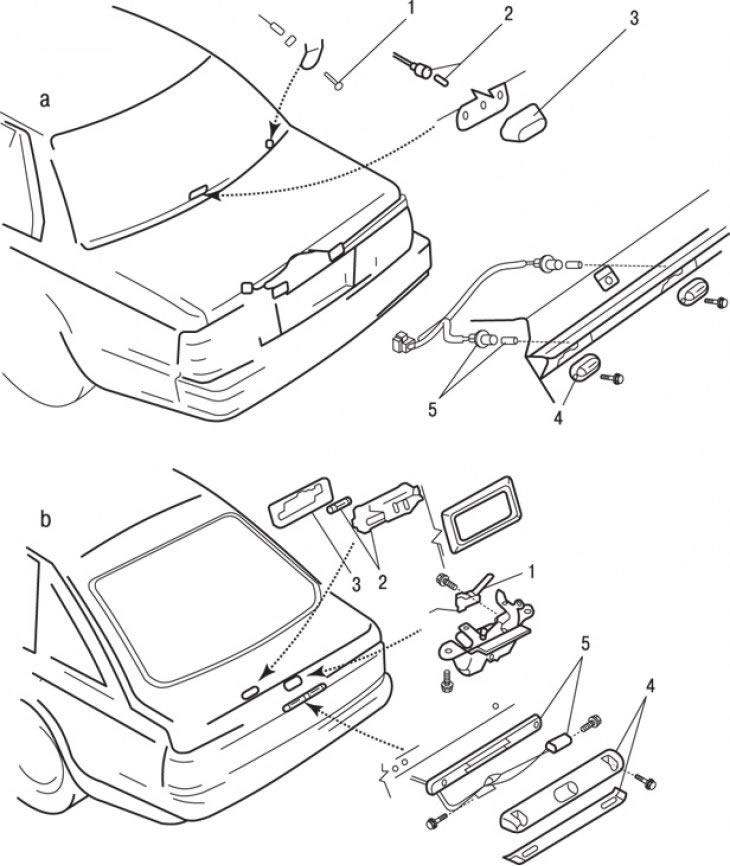
Figure 13.35. License plate and trunk lighting: a – for cars with sedan and coupe bodies; b – for hatchback vehicles; 1 – switch; 2 – lamp and socket for trunk lighting; 3 – trunk light diffuser; 4 – license plate light diffuser; 5 – license plate light bulb
Remove the diffuser and take the lamp out of the socket (figure 13.35).
Install a new lamp, check its operation, and then install the diffuser.
Outdoor lighting lamps
License plate lights
To access the lamp, unscrew the screws and remove the license plate light lens (see Figure 13.35). Install a new lamp, check if it lights up, then install the diffuser.
Tail light bulbs
Remove the interior trim of the trunk.
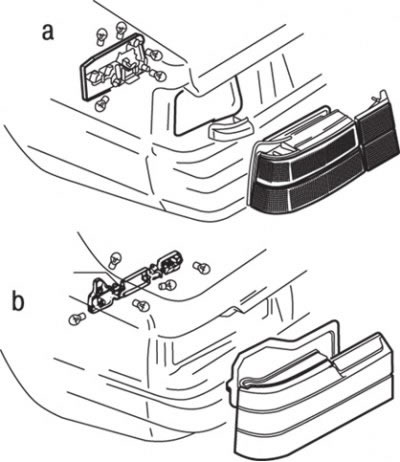
Figure 13.36. Tail light: a – for cars with sedan and coupe bodies; b – for hatchback vehicles
To access the brake light, reversing light, tail light and parking light bulbs, squeeze the tabs and remove the cover from the tail light (figure 13.36). Replace the lamp. When installing, make sure the tabs snap into place and hold the cover in place.
Check the operation of the lamps, then install the interior trim of the trunk.
Replacing the rear light lens
Remove the tail light.
Loosen the nuts securing the diffuser (four nuts on sedans and coupes or seven nuts on hatchbacks). Remove the diffuser and seal.
The diffusers can be removed after softening the adhesive holding them in place using a hair dryer or hot air compressor.
Install new diffusers. If possible, use old glue by heating it and pressing the diffuser into place. If reusing the old glue is not enough, apply new glue into the grooves in the diffuser housing.
Test the new diffuser assembly for leaks by placing it in water.
Installation is carried out in the reverse order of removal.