MazBook.ru
English Русский
Български
Беларускі
Український
Српски
Hrvatski
Română
Polski
Slovenský
Magyar
• Bookmark • Sitemap • Contacts •   
Cars Opel Cars Ford Cars Volkswagen Cars Audi Cars Kia Cars Renault Cars Peugeot


Familia Capella Mazda3 Mazda6 CX-? Others Articles
Capella 3 (1982-1992, petrol) Capella 3 and 4 (1982-1992) Capella 4 (1987-1992) Capella 5 (1991-1997) Capella 6 (1997-2005, petrol)

Headlight adjustment (Mazda Capella GC)

  • Home
  • Mazda Capella
  • Capella GC (1982-1992)
  • Electrical equipment
  • Equipment and devices
  • Headlight adjustment
0
Contents: Preparation ⇓ Adjustment ⇓
It is very important that the direction of the headlight beam is adjusted correctly.

Please note: Holts Amber Lamps are recommended for replacing headlights with those approved for use in European vehicles.


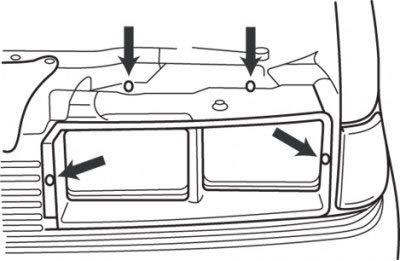
If headlights are not adjusted correctly, they may blind the driver of an oncoming car, which may result in an accident or significantly reduce visibility. The headlights are equipped with two adjusting screws with springs: one on top for vertical adjustment and one on the side for horizontal adjustment.

There are several methods for adjusting headlight beams, the simplest requires the use of a screen or light-colored wall 3 m in front of the car and a level horizontal floor.

Preparation


Place the vehicle on a flat, horizontal surface at a distance of 3 m from the screen or light-colored wall.

Apply adhesive tape vertically to the screen along the longitudinal axis of the car and the centers of both headlights.

Important! If the vehicle is equipped with four headlights, apply four strips in line with the center of each headlight and one strip along the longitudinal axis of the vehicle.


Apply adhesive tape horizontally to the screen across the centers of all headlights.

Note: It may be easier to locate the center of the headlights if you park the car a few centimeters from a wall.


Adjustment


When adjusting headlights, the following conditions must be observed:
  • the car must be parked on a level horizontal surface;
  • the car is in running order: the fuel tank is half full, there is a set of tools and a spare tire in the trunk;
  • the tire pressure is normal;
  • before making any adjustments, it is necessary to rock the car body so that all suspension elements fall into place;
  • the driver must be in the car.

Figure 13.30. Location of headlight adjustment screws with headlight bulbs

Figure 13.30. Location of headlight adjustment screws with headlight bulbs


First, adjust the low beam headlights: set the high intensity zone so that it is just below the horizontal line and 5 cm to the right (for the left headlight) or to the left (for the right headlight) from the vertical line. Adjustment is made by rotating the adjusting screws (figure 13.30, 13.31).
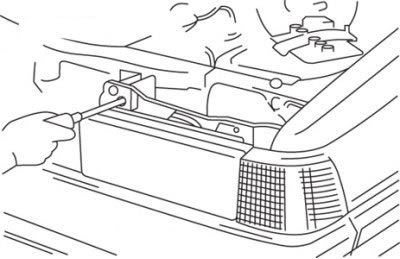
Figure 13.31. Adjusting headlights with removable bulbs

Figure 13.31. Adjusting headlights with removable bulbs


Turn on the high beam headlights. The high intensity zone should be adjusted so that its center is 5 cm below the horizontal line.

Precise adjustment is only possible with a special device.

Please note: It may not be possible to accurately adjust both low and high beam headlights simultaneously. If you need to find a compromise solution, remember that low beam headlights are used more often and have a greater impact on driving safety.
This article is available at: russian, bulgarian, belarusian, ukrainian, serbian, croatian, romanian, polish, slovak, hungarian
This text was checked by: Georgy Afanasyev
Share with friends on social networks:

Previous
Capella 3 and 4 » Equipment and devices
Next

Headlight with replaceable bulb
Headlight with headlight bulb
Ignition switch — removal and installation
Combination switch — removal and installation
Checking the three-way adjustable shock absorber drive
Replacing lamps
Removal and installation the radio
Removal and installation speakers
Antenna with amplifier — removal and installation
Instrument cluster — removal and installation
More articles on repairing other Mazda models
Headlight adjustment Mazda Familia 5 (1985-1989)
Headlight adjustment Mazda3 BK (2003-2009)
High-low beam headlight switching modes Mazda6 GG (2002-2008)
Initialization of the automatic headlight adjustment system (vehicles… Mazda CX-5KE (2012-2017)
Headlight adjustment Mazda 121 (3) (1996-2003)
Link in different formats to this article
Comments and feedback from visitors
No comments yet


How much will 29 + 50 ?


Capella 6 (1997-2005, petrol) 
  • General information
  • Introduction to guide
  • User manual
  • Troubleshooting
  • Maintenance
  • Power unit
  • 4-cylinder engines
  • 6-cylinder engines
  • Engine overhaul
  • Cooling and ventilation
  • Power and exhaust systems
  • Engine electrics
  • Control system
  • Transmission
  • Mechanical gearbox
  • Automatic gearbox
  • Clutch and drive shafts
  • Chassis
  • Brake system
  • Car suspension
  • Steering
  • Body
  • Exterior (external elements)
  • Interior (internal elements)
  • Doors, windows and locks
  • Electrical equipment
  • Equipment and devices
  • Electrical circuits
Capella 5 (1991-1997) 
  • General information
  • User manual
  • Maintenance
  • Helpful hints
  • Power unit
  • Petrol engines 1.6 and 1.8
  • Petrol engines 2.0
  • 2.5 petrol engines
  • Overhaul engines 1.6 and 1.8
  • Overhaul engines 2.0 and 2.5
  • Diesel engine 2.0
  • Engine electrics
  • Cooling system
  • Air conditioner
  • Carburetor Nikki 30/34
  • Power system (1.6 and 1.8)
  • Power system (2.0 and 2.5)
  • Control system
  • Transmission
  • Mechanical gearbox
  • Automatic gearbox
  • Clutch and axles
  • Chassis
  • Brake system
  • Suspension and wheels
  • Steering
  • Body
  • Exterior (external elements)
  • Interior (internal elements)
  • Doors and windows
  • Electrical equipment
  • Equipment and devices
  • Electrical circuits
Capella 4 (1987-1992) 
  • General information
  • Introduction to manual
  • Vehicle specifications
  • Power unit
  • Engine repair
  • Lubrication system
  • Cooling system
  • Fuel system (carburetor)
  • Fuel injection (FE)
  • Fuel injection (DOHC)
  • Fuel system (diesel)
  • Ignition system
  • Transmission
  • Clutch
  • Gearbox
  • Drive shafts
  • Chassis
  • Front suspension
  • Rear suspension
  • Steering system
  • Brake system
  • Electrical equipment
  • Equipment and devices
  • Electrical circuits
Capella 3 and 4 (1982-1992) 
  • General information
  • User manual
  • Maintenance
  • Power unit
  • Gasoline engine
  • Engine overhaul (gasoline)
  • Diesel engine
  • Cooling and heating
  • Supply system
  • Ignition system
  • Emission reduction
  • Transmission
  • Clutch
  • Mechanical gearbox
  • Automatic gearbox
  • Drive shafts
  • Chassis
  • Brake system
  • Suspension and wheels
  • Steering
  • Body
  • Exterior (external elements)
  • Interior (internal elements)
  • Electrical equipment
  • Equipment and devices
  • Power devices
  • Electrical circuits
Capella 3 (1982-1992, petrol) 
  • General information
  • User manual
  • Maintenance
  • Troubleshooting
  • Late models
  • Power unit
  • Engine in car
  • Engine overhaul
  • Cooling and heating system
  • Fuel and exhaust system
  • Engine electrical system
  • Emission control system
  • Transmission
  • Mechanical gearbox
  • Automatic gearbox
  • Clutch and drive shafts
  • Chassis
  • Brake system
  • Suspension and wheels
  • Steering
  • Body
  • Exterior (external elements)
  • Interior (internal elements)
  • Electrical equipment
  • Equipment and devices
  • Lighting and lamps
  • Electrical circuits
MazBook.ru © 2018–2026 · Mobile version · Articles and news · Sitemap: EN BG BY UA RS HR RO PL SK HU · Feedback · Site search · Add to bookmarks Familia 5 (BF) · Familia 6 (BG) · Capella 3 (GC) · Capella 3 and 4 (GC) · Capella 4 (GD) · Capella 5 (GE) · Capella 6 (GF) · Mazda3 BK · Mazda6 GG · CX-5KE · Mazda 121 (3) · Mazda BT-50 (1) ·
By continuing to use the site, you agree to the use of cookies 🔐