MazBook.ru
English Русский
Български
Беларускі
Український
Српски
Hrvatski
Română
Polski
Slovenský
Magyar
• Bookmark • Sitemap • Contacts •   
Cars Opel Cars Ford Cars Volkswagen Cars Audi Cars Kia Cars Renault Cars Peugeot


Familia Capella Mazda3 Mazda6 CX-? Others Articles
Mazda 121 (3) (1996-2003) Mazda BT-50 (1) (2006-2011)

Removal and installation the steering wheel (Mazda 121 (3))

  • Home
  • Mazda
  • 121 JASM (1996-2003)
  • Chassis
  • Steering
  • Removal and installation the steering wheel
0
Contents: Removal ⇓ Installation ⇓
Caution: The Ford KA model has a horn contact built into the airbag module. If the horn contact is faulty, the entire airbag unit must be replaced. It must not be opened.


Removal


Disconnect the negative cable from the battery with the ignition off. This will erase the data from the electronic memory units. See instructions in Chapter. "Electrical equipment".

Insulate the negative terminal of the battery to prevent unexpected contact.

Precautions: After disconnecting the battery, wait at least 2 minutes for the capacitor to discharge. This prevents unexpected deployment of the airbag and seat belt tensioner.


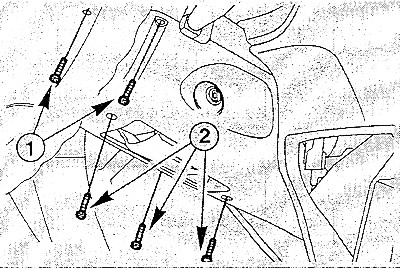
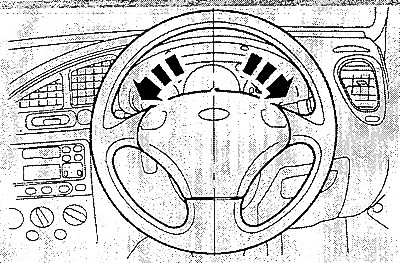
Loosen the screws of the upper steering column trim (1) and remove the trim.


Loosen the screws of the upper steering column trim (1) and remove the trim.

Loosen the screws of the lower steering column trim (2) and remove the trim.

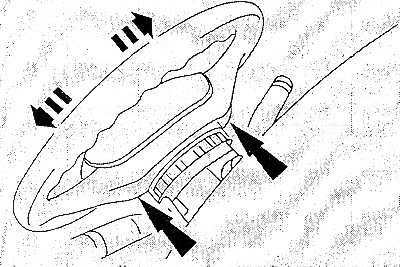
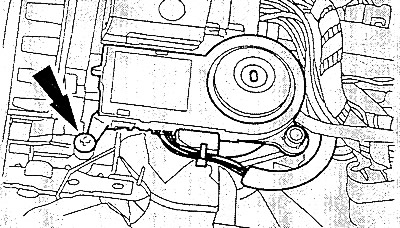
Remove the two airbag mounting bolts from the rear of the steering wheel. To do this, turn the…


Remove the two airbag mounting bolts from the rear of the steering wheel. To do this, turn the steering wheel slightly to the right and left to access the bolts.


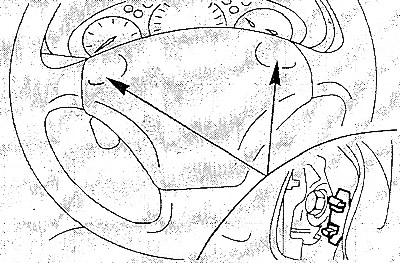
Pull the airbag away from the steering wheel a little and unhook the two clips.


Pull the airbag away from the steering wheel a little and unhook the two clips.

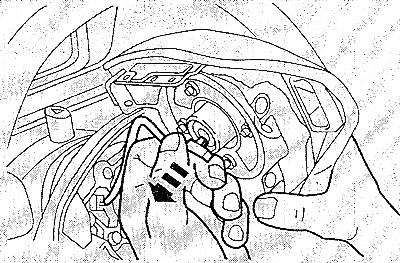
Pull the connector off the airbag.


Pull the connector off the airbag.

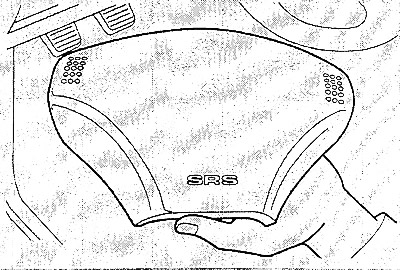
Carefully remove the airbag from the vehicle.


Carefully remove the airbag from the vehicle.

Precautions: Always carry and store the airbag with the lining facing up. Do not stand near the airbag when transporting it. Follow the rules for handling the airbag.


Set the steering wheel to the center position, with the wheels pointing straight ahead. In this…


Set the steering wheel to the center position, with the wheels pointing straight ahead. In this position, latch the steering column lock.

Unscrew the screws and remove the receiving and transmitting parts of the immobilizer from the…


Unscrew the screws and remove the receiving and transmitting parts of the immobilizer from the ignition switch.
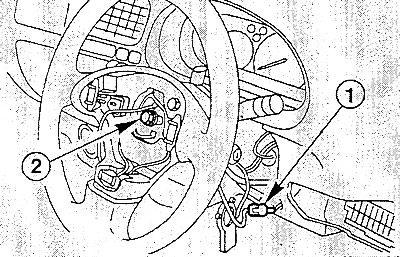
Disconnect the connector (1) for the airbag.


Disconnect the connector (1) for the airbag.

Loosen the steering wheel mounting bolt (2). Do not remove the steering wheel yet.


Turn the ignition key to position "I", pull the steering wheel off the steering column and return the key to position "0".

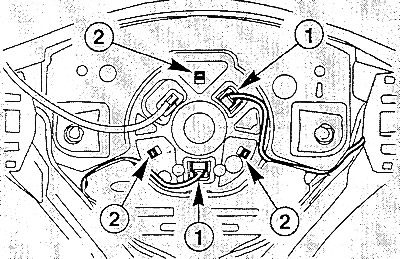
Release the coil spring. To do this, release the three fastening tabs (2) and pull off the plug…


Release the coil spring. To do this, release the three fastening tabs (2) and pull off the plug (1). When doing this, pull on the plug, not on the wire.

Remove the coil spring.


Remove the coil spring.

Installation


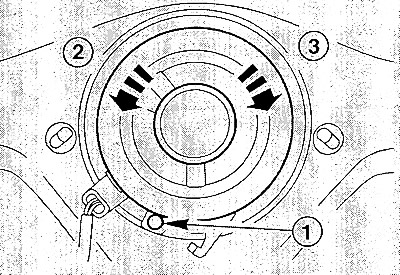
Center the coil spring before installation. To do this, press the mounting tab (1) and hold it.…


Center the coil spring before installation. To do this, press the mounting tab (1) and hold it. Turn the inner rotor counterclockwise (2) and counterclockwise the outer rotor until it fits snugly. Finally, turn the inner rotor clockwise (3) about 3 3/4 turns. In this position, release the mounting tab and ensure that the inner rotor locks in this position.


Note: If there is any doubt about the correct position of the coil spring, repeat the coil spring centering process.


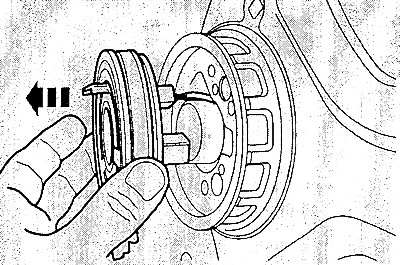
Insert the coil spring and secure it in the fastening tabs.

Put on the plug.

Place the steering wheel in the middle position on the steering column. Make sure that the tongues of the coil spring are correctly fixed over the locking pin of the steering column lock.

Tighten the steering column mounting bolt to 45 Nm.

Connect the airbag connector.

Install and secure the receiving and transmitting parts of the immobilizer with screws.

Carefully place the airbag on the steering wheel, put the plug on the airbag. Fix the two clamps.

Lightly tighten the two airbag mounting bolts on the back of the steering wheel. To do this, turn the steering wheel left and right 90° from the center position to gain access to the bolts.
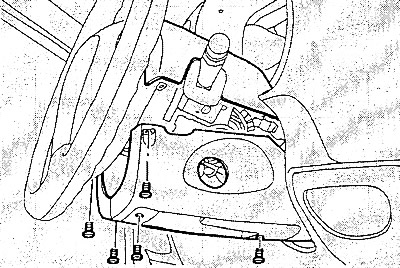
Install the steering column covers and secure them with screws.:


Install the steering column covers and secure them with screws.:

Connect the negative cable to the battery. No one should be in the car.

Set the clock readings.

If necessary, enter the radio codes.
This article is available at: russian, bulgarian, belarusian, ukrainian, serbian, croatian, romanian, polish, slovak, hungarian
This text was checked by: Evgeny Mereshnikov
Share with friends on social networks:

Previous
Mazda 121 (3) » Steering
Next

Precautions when working with an airbag
Steering — design description
Removal and installation the steering rod joint
Removal and installation rubber steering gear boots
Bleeding the steering gear
Wheel alignment angles of a car
More articles on repairing other Mazda models
Steering / Front Wheel Drive Mazda Familia 6 (1989-1994)
Key left in steering wheel lock reminder signal Mazda Capella 3 (1982-1992, petrol)
Steering wheel adjustment Mazda3 BK (2003-2009)
Steering wheel adjustment Mazda6 GG (2002-2008)
Steering wheel Mazda CX-5KE (2012-2017)
Link in different formats to this article
Comments and feedback from visitors
No comments yet


How much will 49 + 27 ?


Mazda BT-50 (1) (2006-2011) 
  • General information
  • Introduction to guide
  • User manual
  • Maintenance
  • Power unit
  • Engine repair (diesel)
  • Cooling and lubrication system
  • Fuel injection system
  • Intake and exhaust system
  • Engine electrical equipment
  • Transmission
  • Clutch
  • Mechanical gearbox
  • All-wheel drive system
  • Transfer case and gearboxes
  • Chassis
  • Front suspension
  • Rear suspension
  • Steering
  • Brake system
  • Body
  • Exterior (external elements)
  • Interior (internal elements)
  • Heating and air conditioning
  • Security system SRS
  • Electrical equipment
  • Equipment and devices
  • Electrical circuits
Mazda 121 (3) (1996-2003) 
  • General information
  • User manual
  • Maintenance
  • Power unit
  • Petrol engine 1.3 l
  • Petrol engine 1.25/1.4 l
  • Diesel engine
  • Lubrication system
  • Cooling system
  • Ignition system
  • Supply system
  • Fuel injection (gasoline)
  • Fuel injection (diesel)
  • Exhaust system
  • Transmission
  • Clutch
  • Car gearbox
  • Chassis
  • Front suspension
  • Rear suspension
  • Steering
  • Brake system
  • Wheels and tires
  • Body
  • Exterior (external elements)
  • Interior (internal elements)
  • Doors, windows and locks
  • Heating system
  • Electrical equipment
  • Troubleshooting
  • Equipment and devices
  • Lighting system
  • Power devices
  • Electrical circuits
MazBook.ru © 2018–2026 · Mobile version · Articles and news · Sitemap: EN BG BY UA RS HR RO PL SK HU · Feedback · Site search · Add to bookmarks Familia 5 (BF) · Familia 6 (BG) · Capella 3 (GC) · Capella 3 and 4 (GC) · Capella 4 (GD) · Capella 5 (GE) · Capella 6 (GF) · Mazda3 BK · Mazda6 GG · CX-5KE · Mazda 121 (3) · Mazda BT-50 (1) ·
By continuing to use the site, you agree to the use of cookies 🔐