
MazBook.ru
English Русский
Български
Беларускі
Український
Српски
Hrvatski
Română
Polski
Slovenský
Magyar
• Bookmark • Sitemap • Contacts •   
Cars Opel Cars Ford Cars Volkswagen Cars Audi Cars Kia Cars Renault Cars Peugeot


Familia Capella Mazda3 Mazda6 CX-? Others Articles
Mazda 121 (3) (1996-2003) Mazda BT-50 (1) (2006-2011)

Bleeding the steering gear (Mazda 121 (3))

  • Home
  • Mazda
  • 121 JASM (1996-2003)
  • Chassis
  • Steering
  • Bleeding the steering gear
0
Air in the power steering system makes it ineffective. Air can get into the system when it is disassembled for repairs or leaks can cause the fluid level in the reservoir to drop so low that the pump sucks in air.

Only new hydraulic fluid should be used for filling the system (automatic transmission fluid ATF), which meets the requirements.

Note: Do not shake the liquid before pouring, as air bubbles may form in it.


Note: The illustrations show Ford Fiesta/Mazda 121 models. On Ford KA models the fluid reservoir is located behind the right shock absorber strut seat.


Removal air
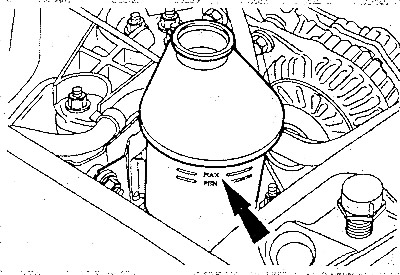


Fill the tank with fresh liquid without bubbles up to the «MAX» mark.


Fill the tank with fresh liquid without bubbles up to the "MAX" mark.

Note: The liquid must be poured slowly to avoid the formation of air bubbles.


Start the engine and slowly turn the steering wheel 3-4 times from lock to lock.

The assistant should monitor the hydraulic fluid level in the tank. The level should not fall below the "MIN" mark. Top up the fluid if necessary.

Repeat the procedure until air bubbles stop appearing in the tank.

Check the steering gear for tightness. Carefully inspect the pipe connections, steering rack boots and power steering valve body for fluid leaks.


Turn off the engine and check the fluid level again. Add fluid if necessary.

Note: A slight noise from the power steering after bleeding the air while the engine is running is normal as long as the vehicle has not yet been driven.


In case of strong noise, remove air from the power steering system using a suitable hand vacuum pump.
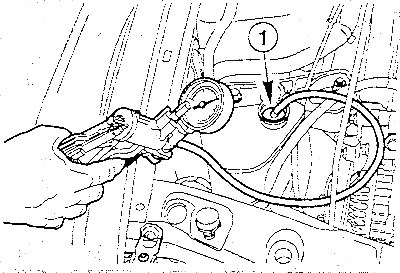
In the workshop, instead of the lid, an adapter (1) with a vacuum connection is installed on the…


In the workshop, instead of the lid, an adapter (1) with a vacuum connection is installed on the tank. In extreme cases, the adapter can be made by yourself from a spare lid for the tank.

Connect the vacuum pump.

Start the engine and slowly turn the steering wheel to the right almost to the stop.

Turn off the engine and use a vacuum pump to create a vacuum of about 0.5 bar until the air is completely removed from the system.

Note: The vacuum must be maintained for at least 5 minutes. If it decreases, pump it up with a vacuum pump.


Finally, remove the vacuum. Turn the steering wheel slowly to the left almost to the stop and repeat the air removal operation.

Remove the vacuum pump. Check the fluid level, top up if necessary. Close the tank.

Start the engine and turn the steering wheel from lock to lock. If noise is present, repeat the air bleeding operation. If the noise level is still too high, leave the car overnight and repeat the air bleeding operation the next day.
This article is available at: russian, bulgarian, belarusian, ukrainian, serbian, croatian, romanian, polish, slovak, hungarian
This text was checked by: Evgeny Mereshnikov
Share with friends on social networks:

Previous
Mazda 121 (3) » Steering
Next

Removal and installation rubber steering gear boots
Removal and installation the steering rod joint
Removal and installation the steering wheel
Precautions when working with an airbag
Steering — design description
Wheel alignment angles of a car
More articles on repairing other Mazda models
Components of a mechanical steering gear with a constant gear ratio Mazda Familia 5 (1985-1989)
Replacing the steering gear covers Mazda Capella 5 (1991-1997)
Technical characteristics of the steering gear Mazda3 BK (2003-2009)
Central steering column switch for exterior lighting Mazda6 GG (2002-2008)
Removal and installation the steering gear with rods Mazda CX-5KE (2012-2017)
Link in different formats to this article
Comments and feedback from visitors
No comments yet


How much will 20 + 24 ?


Mazda BT-50 (1) (2006-2011) 
  • General information
  • Introduction to guide
  • User manual
  • Maintenance
  • Power unit
  • Engine repair (diesel)
  • Cooling and lubrication system
  • Fuel injection system
  • Intake and exhaust system
  • Engine electrical equipment
  • Transmission
  • Clutch
  • Mechanical gearbox
  • All-wheel drive system
  • Transfer case and gearboxes
  • Chassis
  • Front suspension
  • Rear suspension
  • Steering
  • Brake system
  • Body
  • Exterior (external elements)
  • Interior (internal elements)
  • Heating and air conditioning
  • Security system SRS
  • Electrical equipment
  • Equipment and devices
  • Electrical circuits
Mazda 121 (3) (1996-2003) 
  • General information
  • User manual
  • Maintenance
  • Power unit
  • Petrol engine 1.3 l
  • Petrol engine 1.25/1.4 l
  • Diesel engine
  • Lubrication system
  • Cooling system
  • Ignition system
  • Supply system
  • Fuel injection (gasoline)
  • Fuel injection (diesel)
  • Exhaust system
  • Transmission
  • Clutch
  • Car gearbox
  • Chassis
  • Front suspension
  • Rear suspension
  • Steering
  • Brake system
  • Wheels and tires
  • Body
  • Exterior (external elements)
  • Interior (internal elements)
  • Doors, windows and locks
  • Heating system
  • Electrical equipment
  • Troubleshooting
  • Equipment and devices
  • Lighting system
  • Power devices
  • Electrical circuits
MazBook.ru © 2018–2026 · Mobile version · Articles and news · Sitemap: EN BG BY UA RS HR RO PL SK HU · Feedback · Site search · Add to bookmarks Familia 5 (BF) · Familia 6 (BG) · Capella 3 (GC) · Capella 3 and 4 (GC) · Capella 4 (GD) · Capella 5 (GE) · Capella 6 (GF) · Mazda3 BK · Mazda6 GG · CX-5KE · Mazda 121 (3) · Mazda BT-50 (1) ·
By continuing to use the site, you agree to the use of cookies 🔐