
MazBook.ru
English Русский
Български
Беларускі
Український
Српски
Hrvatski
Română
Polski
Slovenský
Magyar
• Bookmark • Sitemap • Contacts •   
Cars Opel Cars Ford Cars Volkswagen Cars Audi Cars Kia Cars Renault Cars Peugeot


Familia Capella Mazda3 Mazda6 CX-? Others Articles
Capella 3 (1982-1992, petrol) Capella 3 and 4 (1982-1992) Capella 4 (1987-1992) Capella 5 (1991-1997) Capella 6 (1997-2005, petrol)

Checking the brake system (Mazda Capella GE)

  • Home
  • Mazda Capella
  • Capella GE (1991-1997)
  • General information
  • Maintenance
  • Checking the brake system
0
Contents: Front and rear disc brakes ⇓ Rear drum brakes ⇓ Checking the brake booster ⇓ Handbrake ⇓
The following signs may indicate a fault in the brake system: the car pulls to the side when you press the brake pedal; the screeching of brakes can be heard; excessive free play of the brake pedal; brake pedal pulsation, brake fluid leakage, etc.

Front and rear disc brakes


Front and rear disc brakes


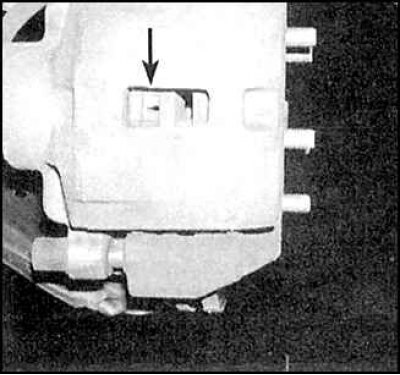
1. Check the thickness of the brake pads through the hole in the caliper (arrow).
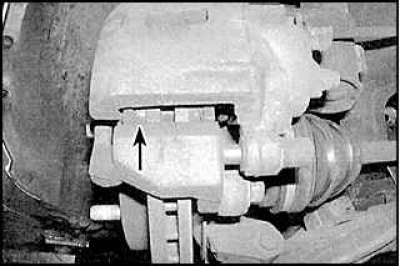
1. Check the thickness of the brake pads through the hole in the caliper (arrow).


2. Check the thickness of the outer brake lining.
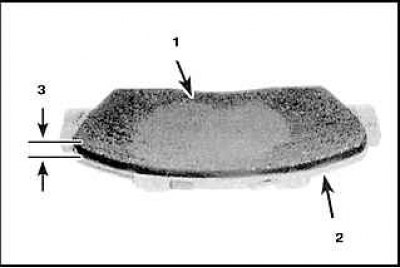
2. Check the thickness of the outer brake lining.


3. To accurately check the brake pad thickness and condition, remove the brake calipers and brake pads. Clean the linings (2) and check the thickness (3) and condition of the friction material (1).


4. Measure the thickness of the brake disc using a micrometer. Inspect the disc surface for deep scratches or grooves.
4. Measure the thickness of the brake disc using a micrometer. Inspect the disc surface for deep…


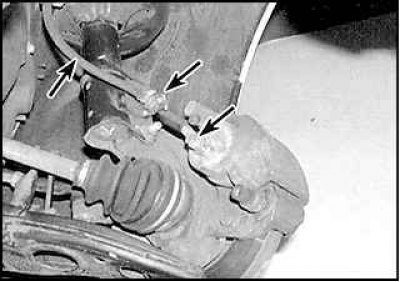
5. Check all brake lines and hoses for damage or wear. Check the reliability of fasteners and connections.

Rear drum brakes


1. Remove the two mounting screws in the center of the brake drum and remove the drum.

2. Clean the brake mechanism with brake cleaner.
2. Clean the brake mechanism with brake cleaner.


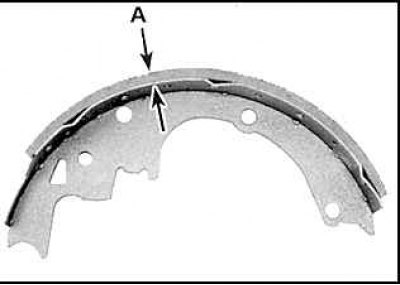
3. Measure the thickness of the brake pad friction material. If the height of the material above the rivet heads is less than 1.5 mm or the total thickness of the friction material is less than 3 mm, the pads must be replaced.
3. Measure the thickness of the brake pad friction material. If the height of the material above…


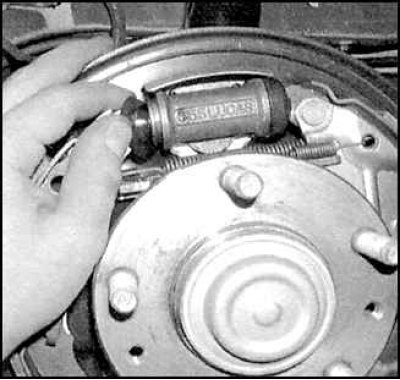
4. Check the condition of the brake mechanism springs. Inspect the wheel cylinder for signs of leakage. Check the integrity of the cylinder boots. Check brake lines and connections.


5. Inspect the inside surface of the brake drum for cracks, deep scratches and signs of wear.

6. Similarly, check the brake mechanism on the other side of the car.

Checking the brake booster


1. Press the brake pedal and start the engine - the pedal should drop slightly.

2. With the engine running, press the brake pedal several times - the brake pedal travel should not change.

3. Press the brake pedal, turn off the engine and hold the pedal down for 30 seconds – the pedal should not drop.

4. Start the engine, let it run for a few minutes and turn it off. Press the brake pedal several times – the pedal travel should decrease with each press.

5. If the brake pedal behaves differently, then the vacuum booster is faulty and needs to be replaced.

Handbrake


1. Count the number of clicks required to securely set the vehicle's handbrake. Adjust the handbrake mechanism if necessary.

2. Check that the handbrake can hold the car on a steep slope.
This article is available at: russian, bulgarian, belarusian, ukrainian, serbian, croatian, romanian, polish, slovak, hungarian
This text was checked by: Evgeny Mereshnikov
Share with friends on social networks:

Previous
Capella 5 » Maintenance
Next

Wheel rotation
Checking the cooling system
Checking and replacing hoses in the engine compartment
Checking, adjusting tension and replacing the drive belt
Checking, maintaining and charging the battery
Checking the manual transmission oil level
Replacing the air filter
Checking and replacing spark plugs
Checking and replacing ignition system components
Checking and replacing the crankcase ventilation valve
More articles on repairing other Mazda models
Checking and adjusting the injection system Mazda Familia 5 (1985-1989)
Checking the parking brake system Mazda3 BK (2003-2009)
Checking and adjusting the brake system components Mazda6 GG (2002-2008)
Checking the exhaust system Mazda CX-5KE (2012-2017)
Checking the cooling system for tightness Mazda 121 (3) (1996-2003)
Link in different formats to this article
Comments and feedback from visitors
No comments yet


How much will 21 + 35 ?


Capella 6 (1997-2005, petrol) 
  • General information
  • Introduction to guide
  • User manual
  • Troubleshooting
  • Maintenance
  • Power unit
  • 4-cylinder engines
  • 6-cylinder engines
  • Engine overhaul
  • Cooling and ventilation
  • Power and exhaust systems
  • Engine electrics
  • Control system
  • Transmission
  • Mechanical gearbox
  • Automatic gearbox
  • Clutch and drive shafts
  • Chassis
  • Brake system
  • Car suspension
  • Steering
  • Body
  • Exterior (external elements)
  • Interior (internal elements)
  • Doors, windows and locks
  • Electrical equipment
  • Equipment and devices
  • Electrical circuits
Capella 5 (1991-1997) 
  • General information
  • User manual
  • Maintenance
  • Helpful hints
  • Power unit
  • Petrol engines 1.6 and 1.8
  • Petrol engines 2.0
  • 2.5 petrol engines
  • Overhaul engines 1.6 and 1.8
  • Overhaul engines 2.0 and 2.5
  • Diesel engine 2.0
  • Engine electrics
  • Cooling system
  • Air conditioner
  • Carburetor Nikki 30/34
  • Power system (1.6 and 1.8)
  • Power system (2.0 and 2.5)
  • Control system
  • Transmission
  • Mechanical gearbox
  • Automatic gearbox
  • Clutch and axles
  • Chassis
  • Brake system
  • Suspension and wheels
  • Steering
  • Body
  • Exterior (external elements)
  • Interior (internal elements)
  • Doors and windows
  • Electrical equipment
  • Equipment and devices
  • Electrical circuits
Capella 4 (1987-1992) 
  • General information
  • Introduction to manual
  • Vehicle specifications
  • Power unit
  • Engine repair
  • Lubrication system
  • Cooling system
  • Fuel system (carburetor)
  • Fuel injection (FE)
  • Fuel injection (DOHC)
  • Fuel system (diesel)
  • Ignition system
  • Transmission
  • Clutch
  • Gearbox
  • Drive shafts
  • Chassis
  • Front suspension
  • Rear suspension
  • Steering system
  • Brake system
  • Electrical equipment
  • Equipment and devices
  • Electrical circuits
Capella 3 and 4 (1982-1992) 
  • General information
  • User manual
  • Maintenance
  • Power unit
  • Gasoline engine
  • Engine overhaul (gasoline)
  • Diesel engine
  • Cooling and heating
  • Supply system
  • Ignition system
  • Emission reduction
  • Transmission
  • Clutch
  • Mechanical gearbox
  • Automatic gearbox
  • Drive shafts
  • Chassis
  • Brake system
  • Suspension and wheels
  • Steering
  • Body
  • Exterior (external elements)
  • Interior (internal elements)
  • Electrical equipment
  • Equipment and devices
  • Power devices
  • Electrical circuits
Capella 3 (1982-1992, petrol) 
  • General information
  • User manual
  • Maintenance
  • Troubleshooting
  • Late models
  • Power unit
  • Engine in car
  • Engine overhaul
  • Cooling and heating system
  • Fuel and exhaust system
  • Engine electrical system
  • Emission control system
  • Transmission
  • Mechanical gearbox
  • Automatic gearbox
  • Clutch and drive shafts
  • Chassis
  • Brake system
  • Suspension and wheels
  • Steering
  • Body
  • Exterior (external elements)
  • Interior (internal elements)
  • Electrical equipment
  • Equipment and devices
  • Lighting and lamps
  • Electrical circuits
MazBook.ru © 2018–2026 · Mobile version · Articles and news · Sitemap: EN BG BY UA RS HR RO PL SK HU · Feedback · Site search · Add to bookmarks Familia 5 (BF) · Familia 6 (BG) · Capella 3 (GC) · Capella 3 and 4 (GC) · Capella 4 (GD) · Capella 5 (GE) · Capella 6 (GF) · Mazda3 BK · Mazda6 GG · CX-5KE · Mazda 121 (3) · Mazda BT-50 (1) ·
By continuing to use the site, you agree to the use of cookies 🔐