
MazBook.ru
English Русский
Български
Беларускі
Український
Српски
Hrvatski
Română
Polski
Slovenský
Magyar
• Bookmark • Sitemap • Contacts •   
Cars Opel Cars Ford Cars Volkswagen Cars Audi Cars Kia Cars Renault Cars Peugeot


Familia Capella Mazda3 Mazda6 CX-? Others Articles
Capella 3 (1982-1992, petrol) Capella 3 and 4 (1982-1992) Capella 4 (1987-1992) Capella 5 (1991-1997) Capella 6 (1997-2005, petrol)

Radiator — removal, maintenance and repair (Mazda Capella GC)

  • Home
  • Mazda Capella
  • Capella GC (1982-1992)
  • Power unit
  • Cooling and heating
  • Radiator — removal, maintenance and repair
0
The radiator serves to cool the liquid by the flow of air passing through the radiator core. The radiator core consists of aluminum tubes and aluminum cooling fins. To improve the efficiency of liquid cooling, the fins are stamped with a notch that ensures turbulent air movement through the radiator.

Caution! Replace the radiator on a cold engine. In addition, when carrying out any work near the fan, to prevent it from turning on accidentally, it is necessary to disconnect the wire from the negative terminal of the battery.


Please read the warnings provided in section 2.

Disconnect the cable from the negative terminal of the battery (if this has not been done previously).

If the radiator is being removed to fix a coolant leak, keep in mind that small leaks can be repaired without removing the radiator from the vehicle using a sealant such as Holts Radweld.

Drain the coolant from the radiator.

For easier access, remove the air filter intake pipe, disconnect the high-voltage wire from the ignition coil and move it to the side.

Disconnect the connectors from the thermal switch and the radiator fan motor.
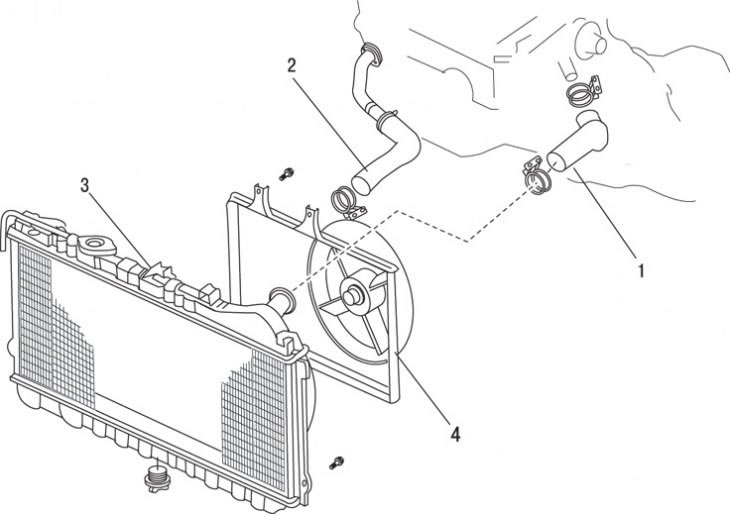
Figure 5.3. Radiator: 1 – upper radiator hose; 2 – lower radiator hose; 3 – radiator; 4 – radiator…

Figure 5.3. Radiator: 1 – upper radiator hose; 2 – lower radiator hose; 3 – radiator; 4 – radiator fan shroud


Disconnect the coolant supply hoses from the radiator and the hose from the expansion tank (figure 5.3).

Remove the radiator mounting bolts and clamp mounting bolts, then lift the radiator up. On models with automatic transmission, the radiator must be raised to provide access to the coolant lines, disconnected and capped. Remove the radiator from the engine compartment.

Inspect it carefully, check visually for leaks and damage. If repairs are necessary, it is recommended to take the radiator to a specialized workshop.

Use a brush to remove any insects or leaves from the radiator fins, and check and replace any worn hoses and clamps if necessary.

The radiator should be flushed as described in section 2.

Replace the radiator cap with a new one with exactly the same data. If the plug has been replaced recently, take it to a car service center for inspection.

(The full text is on the website: «www.MazBook.ru»)

When installing a new radiator, use all connections from the old unit.

Installation is carried out in the reverse order of removal, taking into account the following.

Make sure the radiator is seated correctly in the mounting locations.

After installing the radiator, fill the cooling system with antifreeze of the appropriate concentration, then start the engine and check for leaks.

On models with automatic transmission, check the transmission fluid level and top it up if necessary.
This article is available at: russian, bulgarian, belarusian, ukrainian, serbian, croatian, romanian, polish, slovak, hungarian
This text was checked by: Georgy Afanasyev
Share with friends on social networks:

Previous
Capella 3 and 4 » Cooling and heating
Next

Thermostat — replacement and inspection
General information about antifreeze
General information about the engine cooling system
Radiator Fan — removal, inspection, and installation
Radiator fan motor
Radiator fan intermediate relay
Thermal switch — checking and replacement
Water Pump — checking, removing and installing
More articles on repairing other Mazda models
Repair of cylinder head of engines B3, B5, B6 Mazda Familia 5 (1985-1989)
Maintenance of the wearable card «Advanced Key» Mazda3 BK (2003-2009)
Maintenance of the wearable card «Advanced Key» Mazda6 GG (2002-2008)
Temporary tyre repair kit (optional) Mazda CX-5KE (2012-2017)
Vehicle maintenance plan Mazda 121 (3) (1996-2003)
Link in different formats to this article
Comments and feedback from visitors
No comments yet


How much will 18 + 26 ?


Capella 6 (1997-2005, petrol) 
  • General information
  • Introduction to guide
  • User manual
  • Troubleshooting
  • Maintenance
  • Power unit
  • 4-cylinder engines
  • 6-cylinder engines
  • Engine overhaul
  • Cooling and ventilation
  • Power and exhaust systems
  • Engine electrics
  • Control system
  • Transmission
  • Mechanical gearbox
  • Automatic gearbox
  • Clutch and drive shafts
  • Chassis
  • Brake system
  • Car suspension
  • Steering
  • Body
  • Exterior (external elements)
  • Interior (internal elements)
  • Doors, windows and locks
  • Electrical equipment
  • Equipment and devices
  • Electrical circuits
Capella 5 (1991-1997) 
  • General information
  • User manual
  • Maintenance
  • Helpful hints
  • Power unit
  • Petrol engines 1.6 and 1.8
  • Petrol engines 2.0
  • 2.5 petrol engines
  • Overhaul engines 1.6 and 1.8
  • Overhaul engines 2.0 and 2.5
  • Diesel engine 2.0
  • Engine electrics
  • Cooling system
  • Air conditioner
  • Carburetor Nikki 30/34
  • Power system (1.6 and 1.8)
  • Power system (2.0 and 2.5)
  • Control system
  • Transmission
  • Mechanical gearbox
  • Automatic gearbox
  • Clutch and axles
  • Chassis
  • Brake system
  • Suspension and wheels
  • Steering
  • Body
  • Exterior (external elements)
  • Interior (internal elements)
  • Doors and windows
  • Electrical equipment
  • Equipment and devices
  • Electrical circuits
Capella 4 (1987-1992) 
  • General information
  • Introduction to manual
  • Vehicle specifications
  • Power unit
  • Engine repair
  • Lubrication system
  • Cooling system
  • Fuel system (carburetor)
  • Fuel injection (FE)
  • Fuel injection (DOHC)
  • Fuel system (diesel)
  • Ignition system
  • Transmission
  • Clutch
  • Gearbox
  • Drive shafts
  • Chassis
  • Front suspension
  • Rear suspension
  • Steering system
  • Brake system
  • Electrical equipment
  • Equipment and devices
  • Electrical circuits
Capella 3 and 4 (1982-1992) 
  • General information
  • User manual
  • Maintenance
  • Power unit
  • Gasoline engine
  • Engine overhaul (gasoline)
  • Diesel engine
  • Cooling and heating
  • Supply system
  • Ignition system
  • Emission reduction
  • Transmission
  • Clutch
  • Mechanical gearbox
  • Automatic gearbox
  • Drive shafts
  • Chassis
  • Brake system
  • Suspension and wheels
  • Steering
  • Body
  • Exterior (external elements)
  • Interior (internal elements)
  • Electrical equipment
  • Equipment and devices
  • Power devices
  • Electrical circuits
Capella 3 (1982-1992, petrol) 
  • General information
  • User manual
  • Maintenance
  • Troubleshooting
  • Late models
  • Power unit
  • Engine in car
  • Engine overhaul
  • Cooling and heating system
  • Fuel and exhaust system
  • Engine electrical system
  • Emission control system
  • Transmission
  • Mechanical gearbox
  • Automatic gearbox
  • Clutch and drive shafts
  • Chassis
  • Brake system
  • Suspension and wheels
  • Steering
  • Body
  • Exterior (external elements)
  • Interior (internal elements)
  • Electrical equipment
  • Equipment and devices
  • Lighting and lamps
  • Electrical circuits
MazBook.ru © 2018–2026 · Mobile version · Articles and news · Sitemap: EN BG BY UA RS HR RO PL SK HU · Feedback · Site search · Add to bookmarks Familia 5 (BF) · Familia 6 (BG) · Capella 3 (GC) · Capella 3 and 4 (GC) · Capella 4 (GD) · Capella 5 (GE) · Capella 6 (GF) · Mazda3 BK · Mazda6 GG · CX-5KE · Mazda 121 (3) · Mazda BT-50 (1) ·
By continuing to use the site, you agree to the use of cookies 🔐