
MazBook.ru
English Русский
Български
Беларускі
Український
Српски
Hrvatski
Română
Polski
Slovenský
Magyar
• Bookmark • Sitemap • Contacts •   
Cars Opel Cars Ford Cars Volkswagen Cars Audi Cars Kia Cars Renault Cars Peugeot


Familia Capella Mazda3 Mazda6 CX-? Others Articles
Capella 3 (1982-1992, petrol) Capella 3 and 4 (1982-1992) Capella 4 (1987-1992) Capella 5 (1991-1997) Capella 6 (1997-2005, petrol)

Thermostat — replacement and inspection (Mazda Capella GC)

  • Home
  • Mazda Capella
  • Capella GC (1982-1992)
  • Power unit
  • Cooling and heating
  • Thermostat — replacement and inspection
0
Contents: Replacement ⇓ Checking the Thermostat ⇓
Caution! Replace the thermostat on a cold engine. In addition, when carrying out any work near the fan, to prevent it from turning on accidentally, it is necessary to disconnect the wire from the negative terminal of the battery.


Replacement


Please read the warnings provided in section 2.

Disconnect the cable from the negative terminal of the battery (if this has not been done previously).

To make it easier to access the thermostat housing, remove the ignition distributor.

Drain the coolant from the cooling system to a level corresponding to the lower edge of the thermostat. To do this, unscrew the radiator filler cap and the drain plug at the bottom. After draining a sufficient amount of coolant, screw in the drain plug.

Disconnect the upper radiator hose from the thermostat housing outlet pipe.
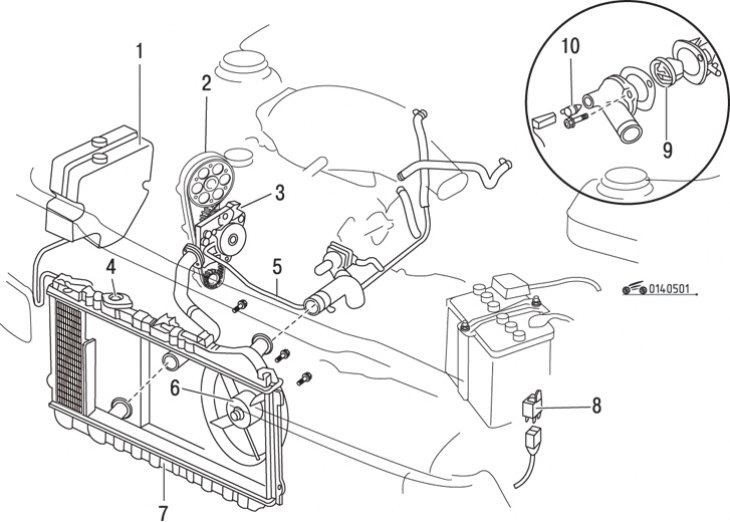
Figure 5.1. Cooling system elements: 1 – expansion tank; 2 – toothed belt; 3 – water pump; 4 –…

Figure 5.1. Cooling system elements: 1 – expansion tank; 2 – toothed belt; 3 – water pump; 4 – radiator filler cap; 5 – bypass hose; 6 – radiator fan motor; 7 – radiator; 8 – fan relay; 9 – thermostat; 10 – fan thermal switch


Unscrew the thermal switch of the cooling system fan (figure 5.1).


Unscrew the two nuts and remove the thermostat housing from the engine. You can use a rubber hammer to loosen the hardened gasket that is making it difficult to remove the thermostat housing.
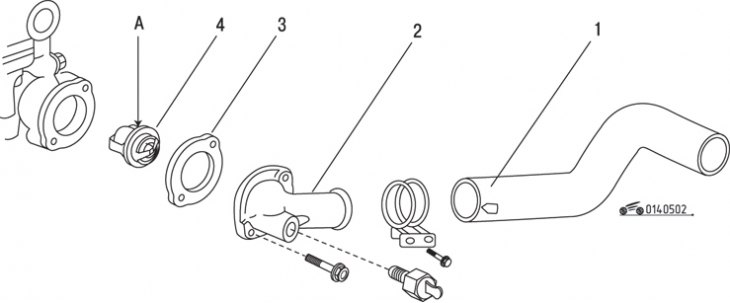
Figure 5.2. Thermostat mounting elements: 1 – upper radiator hose; 2 – thermostat housing; 3 –…

Figure 5.2. Thermostat mounting elements: 1 – upper radiator hose; 2 – thermostat housing; 3 – gasket; 4 – thermostat; A – pin (when installing the thermostat, it should be facing upwards)


Mark the position and remove the thermostat from the housing (figure 5.2).

Before installing the thermostat, clean the surface of the exhaust pipe and the mating surface of the thermostat housing from any remaining gasket.

Apply a thin layer of sealant to both sides of the new gasket.

Install the thermostat into the housing and position the gasket so that the ribbed surface faces the thermostat. Install the cover and secure with bolts, tightening them to the required torque.

Place a hose onto the thermostat housing outlet pipe and secure it securely with a clamp. Make sure the arrow on the hose is aligned with the protrusion on the body.

Screw in the radiator fan thermal switch.

Install the ignition distributor.

Fill the cooling system with antifreeze of the appropriate concentration.


Connect the cable to the negative terminal of the battery and start the engine.

Let the engine run with the filler cap removed until the upper radiator hose becomes hot (the thermostat is open).

With the engine idling, add coolant to the radiator to the bottom of the filler neck.

Install the filler cap.

Checking the Thermostat


It is best to check the thermostat after it has been removed from the engine. As a rule, if you suspect a malfunction, it is most advisable to replace the thermostat, since its cost is low.

To check, remove the thermostat.

If there are signs of severe corrosion or damage, the thermostat must be replaced.

(Based on website data: «MAZBOOK.RU»)

To test the thermostat's functionality, hang it on a thread in a glass vessel filled with water and heat the water to boiling point, making sure the thermostat does not touch the walls of the vessel. Monitor the water temperature with a thermometer. The thermostat should begin to open at 88°C and should be fully open at 97°C. Otherwise, replace it.

A thermostat that does not close when the water cools also needs to be replaced.

Install the thermostat.
This article is available at: russian, bulgarian, belarusian, ukrainian, serbian, croatian, romanian, polish, slovak, hungarian
This text was checked by: Georgy Afanasyev
Share with friends on social networks:

Previous
Capella 3 and 4 » Cooling and heating
Next

General information about antifreeze
General information about the engine cooling system
Radiator — removal, maintenance and repair
Radiator Fan — removal, inspection, and installation
Radiator fan motor
Radiator fan intermediate relay
Thermal switch — checking and replacement
More articles on repairing other Mazda models
Thermostat — removal and installation Mazda Familia 5 (1985-1989)
Thermostat — Description Mazda3 BK (2003-2009)
Thermostat — General Information Mazda6 GG (2002-2008)
Removal and installation the thermostat Mazda CX-5KE (2012-2017)
Removal and installation the thermostat Mazda 121 (3) (1996-2003)
Link in different formats to this article
Comments and feedback from visitors
No comments yet


How much will 44 + 44 ?


Capella 6 (1997-2005, petrol) 
  • General information
  • Introduction to guide
  • User manual
  • Troubleshooting
  • Maintenance
  • Power unit
  • 4-cylinder engines
  • 6-cylinder engines
  • Engine overhaul
  • Cooling and ventilation
  • Power and exhaust systems
  • Engine electrics
  • Control system
  • Transmission
  • Mechanical gearbox
  • Automatic gearbox
  • Clutch and drive shafts
  • Chassis
  • Brake system
  • Car suspension
  • Steering
  • Body
  • Exterior (external elements)
  • Interior (internal elements)
  • Doors, windows and locks
  • Electrical equipment
  • Equipment and devices
  • Electrical circuits
Capella 5 (1991-1997) 
  • General information
  • User manual
  • Maintenance
  • Helpful hints
  • Power unit
  • Petrol engines 1.6 and 1.8
  • Petrol engines 2.0
  • 2.5 petrol engines
  • Overhaul engines 1.6 and 1.8
  • Overhaul engines 2.0 and 2.5
  • Diesel engine 2.0
  • Engine electrics
  • Cooling system
  • Air conditioner
  • Carburetor Nikki 30/34
  • Power system (1.6 and 1.8)
  • Power system (2.0 and 2.5)
  • Control system
  • Transmission
  • Mechanical gearbox
  • Automatic gearbox
  • Clutch and axles
  • Chassis
  • Brake system
  • Suspension and wheels
  • Steering
  • Body
  • Exterior (external elements)
  • Interior (internal elements)
  • Doors and windows
  • Electrical equipment
  • Equipment and devices
  • Electrical circuits
Capella 4 (1987-1992) 
  • General information
  • Introduction to manual
  • Vehicle specifications
  • Power unit
  • Engine repair
  • Lubrication system
  • Cooling system
  • Fuel system (carburetor)
  • Fuel injection (FE)
  • Fuel injection (DOHC)
  • Fuel system (diesel)
  • Ignition system
  • Transmission
  • Clutch
  • Gearbox
  • Drive shafts
  • Chassis
  • Front suspension
  • Rear suspension
  • Steering system
  • Brake system
  • Electrical equipment
  • Equipment and devices
  • Electrical circuits
Capella 3 and 4 (1982-1992) 
  • General information
  • User manual
  • Maintenance
  • Power unit
  • Gasoline engine
  • Engine overhaul (gasoline)
  • Diesel engine
  • Cooling and heating
  • Supply system
  • Ignition system
  • Emission reduction
  • Transmission
  • Clutch
  • Mechanical gearbox
  • Automatic gearbox
  • Drive shafts
  • Chassis
  • Brake system
  • Suspension and wheels
  • Steering
  • Body
  • Exterior (external elements)
  • Interior (internal elements)
  • Electrical equipment
  • Equipment and devices
  • Power devices
  • Electrical circuits
Capella 3 (1982-1992, petrol) 
  • General information
  • User manual
  • Maintenance
  • Troubleshooting
  • Late models
  • Power unit
  • Engine in car
  • Engine overhaul
  • Cooling and heating system
  • Fuel and exhaust system
  • Engine electrical system
  • Emission control system
  • Transmission
  • Mechanical gearbox
  • Automatic gearbox
  • Clutch and drive shafts
  • Chassis
  • Brake system
  • Suspension and wheels
  • Steering
  • Body
  • Exterior (external elements)
  • Interior (internal elements)
  • Electrical equipment
  • Equipment and devices
  • Lighting and lamps
  • Electrical circuits
MazBook.ru © 2018–2026 · Mobile version · Articles and news · Sitemap: EN BG BY UA RS HR RO PL SK HU · Feedback · Site search · Add to bookmarks Familia 5 (BF) · Familia 6 (BG) · Capella 3 (GC) · Capella 3 and 4 (GC) · Capella 4 (GD) · Capella 5 (GE) · Capella 6 (GF) · Mazda3 BK · Mazda6 GG · CX-5KE · Mazda 121 (3) · Mazda BT-50 (1) ·
By continuing to use the site, you agree to the use of cookies 🔐