
MazBook.ru
English Русский
Български
Беларускі
Український
Српски
Hrvatski
Română
Polski
Slovenský
Magyar
• Bookmark • Sitemap • Contacts •   
Cars Opel Cars Ford Cars Volkswagen Cars Audi Cars Kia Cars Renault Cars Peugeot


Familia Capella Mazda3 Mazda6 CX-? Others Articles
Capella 3 (1982-1992, petrol) Capella 3 and 4 (1982-1992) Capella 4 (1987-1992) Capella 5 (1991-1997) Capella 6 (1997-2005, petrol)

Water Pump — checking, removing and installing (Mazda Capella GC)

  • Home
  • Mazda Capella
  • Capella GC (1982-1992)
  • Power unit
  • Cooling and heating
  • Water Pump — checking, removing and installing
0
Contents: Examination ⇓ Removal and installation ⇓

Examination


A faulty water pump can cause the engine to overheat and fail (the engine is not cooled by the flow of circulating coolant).

There are three ways to check the water pump's performance without removing it from the engine. If the pump is faulty, it should be replaced or repaired.

Warm up the engine to operating temperature and clamp the upper radiator hose.

If the pump is working properly, then when you release the hose you will feel a push from the pressure of the coolant.

The water pump body is equipped with inspection holes for fluid leakage. If the pump is not sealed properly, a small leak will be observed through these holes. To check for a leak through the pump, remove the lower timing belt cover and shine a powerful light onto the bottom of the pump housing from the underside of the vehicle.

If the water pump shaft bearings fail, a sharp squealing sound will be heard from the front of the engine. Shaft wear can be felt by the play when the pump pulley swings up and down.

All pump parts are interchangeable, but repair work should be entrusted to a specialist or the pump should be taken to a service center, as special tools for pressing will be required.

Removal and installation


Please read the warning in section 2.

Drain the coolant.

Remove the timing belt covers and timing belt. Remove the timing belt tensioner roller.

Disconnect the inlet hose from the water pump.

Loosen the water pump mounting bolts.
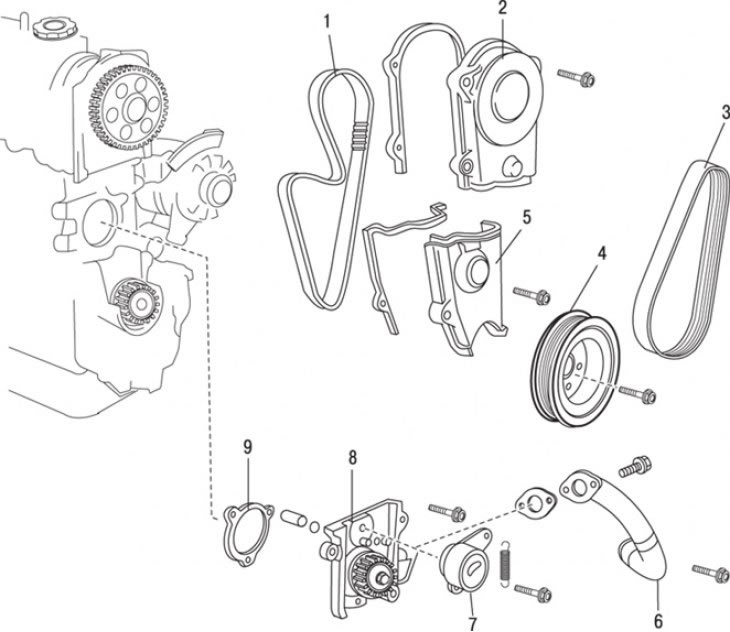
Figure 5.7. Water pump: 1 – toothed belt; 2 – upper toothed belt cover; 3 – drive belt; 4 – pulley;…

Figure 5.7. Water pump: 1 – toothed belt; 2 – upper toothed belt cover; 3 – drive belt; 4 – pulley; 5 – lower toothed belt cover; 6 – hose; 7 – tensioner roller; 8 – water pump; 9 – gasket


Using a large screwdriver or appropriately sized pry bar, pry the water pump out while rocking it to disengage the pump gear (figure 5.7).

With the water pump moved forward, remove the bolts and disconnect the inlet pipe.

Remove the water pump from the engine compartment.

Thoroughly clean the pump contact surfaces from any remaining gasket material. Inspect and clean the annular groove for the sealing gasket.

Lubricate the O-ring with petroleum jelly and place it into the groove. Before installation, lubricate both parts of the gasket with sealant.

Install the water pump in place and attach the inlet pipe. Tighten the two pump mounting bolts by hand.

Install the remaining bolts and tighten them crosswise to the specified torque.

Connect the inlet hose.

Install the timing belt and belt covers.

Fill the cooling system with antifreeze.
This article is available at: russian, bulgarian, belarusian, ukrainian, serbian, croatian, romanian, polish, slovak, hungarian
This text was checked by: Georgy Afanasyev
Share with friends on social networks:

Previous
Capella 3 and 4 » Cooling and heating
Next

Thermal switch — checking and replacement
Radiator fan intermediate relay
Radiator fan motor
Radiator Fan — removal, inspection, and installation
Radiator — removal, maintenance and repair
Heater Fan Motor — removal and installation
Air conditioning system maintenance
Checking, removing and installing the coolant temperature sensor…
More articles on repairing other Mazda models
Checking/removing and installing the fuel shut-off valve Mazda Familia 6 (1989-1994)
Checking for fuel leaks after installing the pump unit (diesel) Mazda3 BK (2003-2009)
Removal, checking and installation the coolant pump Mazda6 GG (2002-2008)
Checking, removing and installing the vacuum hose Mazda CX-5KE (2012-2017)
Checking, removing and installing the fuel pump relay Mazda 121 (3) (1996-2003)
Link in different formats to this article
Comments and feedback from visitors
No comments yet


How much will 25 + 10 ?


Capella 6 (1997-2005, petrol) 
  • General information
  • Introduction to guide
  • User manual
  • Troubleshooting
  • Maintenance
  • Power unit
  • 4-cylinder engines
  • 6-cylinder engines
  • Engine overhaul
  • Cooling and ventilation
  • Power and exhaust systems
  • Engine electrics
  • Control system
  • Transmission
  • Mechanical gearbox
  • Automatic gearbox
  • Clutch and drive shafts
  • Chassis
  • Brake system
  • Car suspension
  • Steering
  • Body
  • Exterior (external elements)
  • Interior (internal elements)
  • Doors, windows and locks
  • Electrical equipment
  • Equipment and devices
  • Electrical circuits
Capella 5 (1991-1997) 
  • General information
  • User manual
  • Maintenance
  • Helpful hints
  • Power unit
  • Petrol engines 1.6 and 1.8
  • Petrol engines 2.0
  • 2.5 petrol engines
  • Overhaul engines 1.6 and 1.8
  • Overhaul engines 2.0 and 2.5
  • Diesel engine 2.0
  • Engine electrics
  • Cooling system
  • Air conditioner
  • Carburetor Nikki 30/34
  • Power system (1.6 and 1.8)
  • Power system (2.0 and 2.5)
  • Control system
  • Transmission
  • Mechanical gearbox
  • Automatic gearbox
  • Clutch and axles
  • Chassis
  • Brake system
  • Suspension and wheels
  • Steering
  • Body
  • Exterior (external elements)
  • Interior (internal elements)
  • Doors and windows
  • Electrical equipment
  • Equipment and devices
  • Electrical circuits
Capella 4 (1987-1992) 
  • General information
  • Introduction to manual
  • Vehicle specifications
  • Power unit
  • Engine repair
  • Lubrication system
  • Cooling system
  • Fuel system (carburetor)
  • Fuel injection (FE)
  • Fuel injection (DOHC)
  • Fuel system (diesel)
  • Ignition system
  • Transmission
  • Clutch
  • Gearbox
  • Drive shafts
  • Chassis
  • Front suspension
  • Rear suspension
  • Steering system
  • Brake system
  • Electrical equipment
  • Equipment and devices
  • Electrical circuits
Capella 3 and 4 (1982-1992) 
  • General information
  • User manual
  • Maintenance
  • Power unit
  • Gasoline engine
  • Engine overhaul (gasoline)
  • Diesel engine
  • Cooling and heating
  • Supply system
  • Ignition system
  • Emission reduction
  • Transmission
  • Clutch
  • Mechanical gearbox
  • Automatic gearbox
  • Drive shafts
  • Chassis
  • Brake system
  • Suspension and wheels
  • Steering
  • Body
  • Exterior (external elements)
  • Interior (internal elements)
  • Electrical equipment
  • Equipment and devices
  • Power devices
  • Electrical circuits
Capella 3 (1982-1992, petrol) 
  • General information
  • User manual
  • Maintenance
  • Troubleshooting
  • Late models
  • Power unit
  • Engine in car
  • Engine overhaul
  • Cooling and heating system
  • Fuel and exhaust system
  • Engine electrical system
  • Emission control system
  • Transmission
  • Mechanical gearbox
  • Automatic gearbox
  • Clutch and drive shafts
  • Chassis
  • Brake system
  • Suspension and wheels
  • Steering
  • Body
  • Exterior (external elements)
  • Interior (internal elements)
  • Electrical equipment
  • Equipment and devices
  • Lighting and lamps
  • Electrical circuits
MazBook.ru © 2018–2026 · Mobile version · Articles and news · Sitemap: EN BG BY UA RS HR RO PL SK HU · Feedback · Site search · Add to bookmarks Familia 5 (BF) · Familia 6 (BG) · Capella 3 (GC) · Capella 3 and 4 (GC) · Capella 4 (GD) · Capella 5 (GE) · Capella 6 (GF) · Mazda3 BK · Mazda6 GG · CX-5KE · Mazda 121 (3) · Mazda BT-50 (1) ·
By continuing to use the site, you agree to the use of cookies 🔐