


Removing
1. Loosen the front wheel nuts, raise the vehicle and support it on supports. Remove wheels.
2. Disconnect the brake hose from the rack bracket (pic. 2.2). If the vehicle is equipped with an anti-lock braking system, disconnect the speed sensor wiring harness from the rack by removing the bracket mounting bolt.
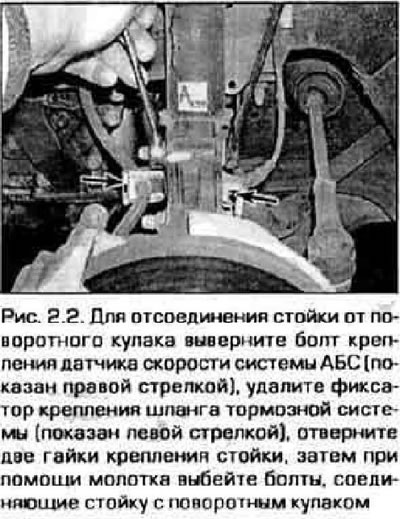
3. Turn away nuts of fastening of a rack to a rotary fist and knock out bolts a hammer through a punch from soft material.
4. Disconnect a rack from a rotary fist. Be careful not to damage the inner constant velocity joint of the input shaft. Also, support the steering knuckle so as not to tear the brake hose.
5. In the engine compartment, mark the relative position of the rack relative to the body (pic. 2.5).
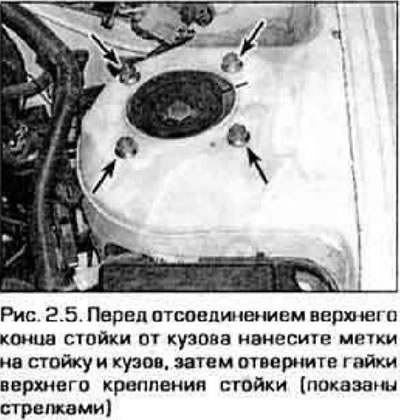
6. Supporting the rack with one hand, unscrew the nuts securing the rack to the body. Take out a rack from under a wing of the car.
Examination
7. Inspect the rack body for signs of fluid leakage, dents, cracks, or other obvious damage requiring repair or replacement of the rack.
8. Inspect the spring for chips, cracks, and integrity of the spring coating (damage to the coating leads to corrosion and breakage of the spring). Inspect the spring plates and make sure there is no damage.
9. If you find any problems, disassemble the rack (see paragraph 3).
Installation
10. Guide the strut in the wheel arch and insert the upper studs into the body holes so that the marks on the strut and the body made before removal match (see point 5). Tighten the nuts to prevent the stand from falling. For this operation, you will need an assistant, since the rack has a large mass and dimensions.
11. Establish a rotary fist on a rack flange and insert two bolts. Screw on the nuts and tighten them to the required torque.
12. Insert the brake hose into the bracket and secure it with the bracket. If the vehicle has an anti-lock braking system, bolt the speed sensor bracket to the strut.
13. Install the wheels and screw the nuts, lower the car and tighten the wheel nuts to the required torque (see technical data at the beginning of chapter 1).
14. Tighten nuts of fastening of a rack to a body the demanded moment.