MazBook.ru
English Русский
Български
Беларускі
Український
Српски
Hrvatski
Română
Polski
Slovenský
Magyar
• Bookmark • Sitemap • Contacts •   
Cars Opel Cars Ford Cars Volkswagen Cars Audi Cars Kia Cars Renault Cars Peugeot


Familia Capella Mazda3 Mazda6 CX-? Others Articles
Capella 3 (1982-1992, petrol) Capella 3 and 4 (1982-1992) Capella 4 (1987-1992) Capella 5 (1991-1997) Capella 6 (1997-2005, petrol)

Strut spring — replacement (Mazda Capella GF)

  • Home
  • Mazda Capella
  • Capella GF (1997-2005)
  • Chassis
  • Car suspension
  • Strut spring — replacement
0
Contents: Disassembling the rack ⇓ Assembly ⇓
1. If the shock absorber or strut springs are faulty (cracks, fluid leaks, loss of resistance), explore the possibility of purchasing a stand before you begin. A faulty strut shock absorber cannot be repaired and must be replaced. Try to purchase a refurbished rack assembly, which will save you time and money. In any case, weigh all your options before starting any renovation work.

Caution! Disassembling the rack poses a potential health hazard. Use extreme caution when performing this work. Use only a high quality spring compressor and follow all instructions for using the tool. After removing the spring, store it together with the puller in a separate safe place.


Disassembling the rack


2. Remove the rack as described in paragraph 2 (for front suspension strut) or in paragraph 9 (for rear suspension strut). Secure the stand in a vice, placing rags or wooden blocks under the vice jaws. Do not tighten the vice too much.

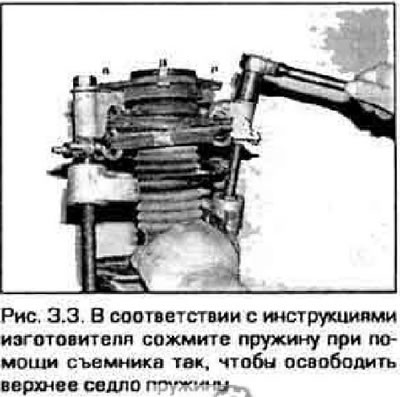
3. Install the spring compressor according to the manufacturer's instructions (the puller can be purchased at a parts store) and compress the spring so that it moves away from the top plate (figure 3.3). You can verify that the spring has come away from the top plate by moving it.

3. Install the spring compressor according to the manufacturer's instructions (the puller can be…


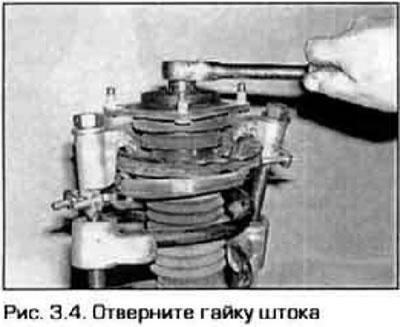
4. Unscrew the shock absorber rod nut (figure 3.4).


4. Unscrew the shock absorber rod nut (figure 3.4).


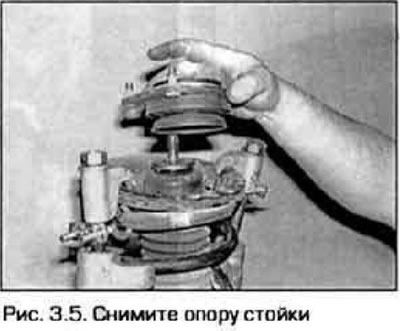
5. Remove the upper strut support (figure 3.5). Inspect the bearing and make sure that. that it is not damaged and rotates smoothly. If the bearing is faulty, replace it. Inspect the rubber seal for damage. Replace faulty components if necessary.

5. Remove the upper strut support (figure 3.5). Inspect the bearing and make sure that. that it is…


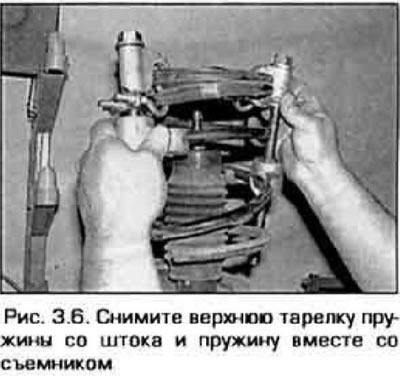
6. Remove the upper plate together with the compressed spring and the puller (figure 3.6). Inspect the spring support rubber gasket and ensure it is in good condition. Replace faulty components.

(The original article is on: www.mazbook.ru)

Caution: Stay away from the ends of the compressed spring. After removing the spring, store it together with the puller in a separate safe place.


Caution: Stay away from the ends of the compressed spring. After removing the spring, store it…


7. Disconnect the plate and rubber ring from the spring.


8. Remove the rubber boot from the rod.

9. Inspect the lower support gasket for cracks, chips or other damage and replace it if necessary.

Assembly


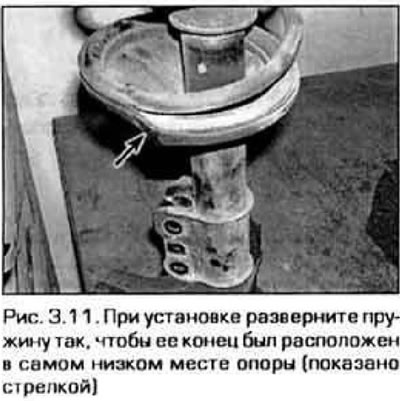
10. If you installed a new lower mount spacer, rotate it so that the step on it is at the lowest point on the lower spring plate. Pull the shock absorber rod out to its full length and put the rubber boot on it.

11. Install the spring on the lower plate so that the end of the spring fits into the ledge of the plate (figure 3.11).

11. Install the spring on the lower plate so that the end of the spring fits into the ledge of the…


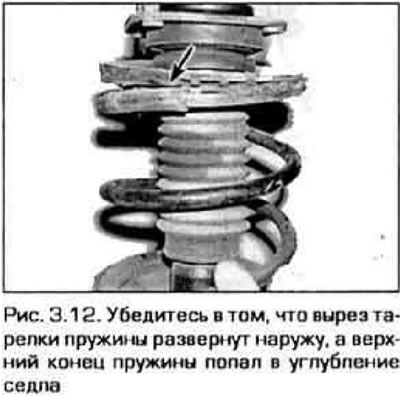
12. Install the upper seal and spring retainer. Make sure the plate cutout is facing outward and is in line with the strut mounting points on the steering knuckle (figure 3.12).

12. Install the upper seal and spring retainer. Make sure the plate cutout is facing outward and is…


13. Install the seal and upper strut support onto the shock absorber rod.


14. Screw on the nut and tighten it to the required torque.

15. Install the stand (see paragraph 2 for front suspension strut or paragraph 9 for the rear suspension strut).
This article is available at: russian, bulgarian, belarusian, ukrainian, serbian, croatian, romanian, polish, slovak, hungarian
This text was checked by: German Vorobyov
Share with friends on social networks:

Previous
Capella 6 » Car suspension
Next

Front suspension strut — removal, inspection and installation
Basic information about suspension and steering
Suspension and steering technical data
Steering knuckle — removal and installation
Front Hub and Bearing Assembly — removal and installation
Front anti-roll bar — removal and installation
Suspension arm — removal, inspection and installation
Ball joint — replacement
More articles on repairing other Mazda models
Disassembly and assembly of the telescopic suspension strut Mazda Familia 5 (1985-1989)
Valve, valve spring, valve stem seal, valve guide Mazda3 BK (2003-2009)
Valve, valve spring, valve stem seal, valve guide Mazda6 GG (2002-2008)
Removal/installing the front suspension strut Mazda CX-5KE (2012-2017)
Disassembling the shock absorber strut, removing and installing the… Mazda 121 (3) (1996-2003)
Link in different formats to this article
Comments and feedback from visitors
No comments yet


How much will 38 + 28 ?


Capella 6 (1997-2005, petrol) 
  • General information
  • Introduction to guide
  • User manual
  • Troubleshooting
  • Maintenance
  • Power unit
  • 4-cylinder engines
  • 6-cylinder engines
  • Engine overhaul
  • Cooling and ventilation
  • Power and exhaust systems
  • Engine electrics
  • Control system
  • Transmission
  • Mechanical gearbox
  • Automatic gearbox
  • Clutch and drive shafts
  • Chassis
  • Brake system
  • Car suspension
  • Steering
  • Body
  • Exterior (external elements)
  • Interior (internal elements)
  • Doors, windows and locks
  • Electrical equipment
  • Equipment and devices
  • Electrical circuits
Capella 5 (1991-1997) 
  • General information
  • User manual
  • Maintenance
  • Helpful hints
  • Power unit
  • Petrol engines 1.6 and 1.8
  • Petrol engines 2.0
  • 2.5 petrol engines
  • Overhaul engines 1.6 and 1.8
  • Overhaul engines 2.0 and 2.5
  • Diesel engine 2.0
  • Engine electrics
  • Cooling system
  • Air conditioner
  • Carburetor Nikki 30/34
  • Power system (1.6 and 1.8)
  • Power system (2.0 and 2.5)
  • Control system
  • Transmission
  • Mechanical gearbox
  • Automatic gearbox
  • Clutch and axles
  • Chassis
  • Brake system
  • Suspension and wheels
  • Steering
  • Body
  • Exterior (external elements)
  • Interior (internal elements)
  • Doors and windows
  • Electrical equipment
  • Equipment and devices
  • Electrical circuits
Capella 4 (1987-1992) 
  • General information
  • Introduction to manual
  • Vehicle specifications
  • Power unit
  • Engine repair
  • Lubrication system
  • Cooling system
  • Fuel system (carburetor)
  • Fuel injection (FE)
  • Fuel injection (DOHC)
  • Fuel system (diesel)
  • Ignition system
  • Transmission
  • Clutch
  • Gearbox
  • Drive shafts
  • Chassis
  • Front suspension
  • Rear suspension
  • Steering system
  • Brake system
  • Electrical equipment
  • Equipment and devices
  • Electrical circuits
Capella 3 and 4 (1982-1992) 
  • General information
  • User manual
  • Maintenance
  • Power unit
  • Gasoline engine
  • Engine overhaul (gasoline)
  • Diesel engine
  • Cooling and heating
  • Supply system
  • Ignition system
  • Emission reduction
  • Transmission
  • Clutch
  • Mechanical gearbox
  • Automatic gearbox
  • Drive shafts
  • Chassis
  • Brake system
  • Suspension and wheels
  • Steering
  • Body
  • Exterior (external elements)
  • Interior (internal elements)
  • Electrical equipment
  • Equipment and devices
  • Power devices
  • Electrical circuits
Capella 3 (1982-1992, petrol) 
  • General information
  • User manual
  • Maintenance
  • Troubleshooting
  • Late models
  • Power unit
  • Engine in car
  • Engine overhaul
  • Cooling and heating system
  • Fuel and exhaust system
  • Engine electrical system
  • Emission control system
  • Transmission
  • Mechanical gearbox
  • Automatic gearbox
  • Clutch and drive shafts
  • Chassis
  • Brake system
  • Suspension and wheels
  • Steering
  • Body
  • Exterior (external elements)
  • Interior (internal elements)
  • Electrical equipment
  • Equipment and devices
  • Lighting and lamps
  • Electrical circuits
MazBook.ru © 2018–2026 · Mobile version · Articles and news · Sitemap: EN BG BY UA RS HR RO PL SK HU · Feedback · Site search · Add to bookmarks Familia 5 (BF) · Familia 6 (BG) · Capella 3 (GC) · Capella 3 and 4 (GC) · Capella 4 (GD) · Capella 5 (GE) · Capella 6 (GF) · Mazda3 BK · Mazda6 GG · CX-5KE · Mazda 121 (3) · Mazda BT-50 (1) ·
By continuing to use the site, you agree to the use of cookies 🔐