
Egnition lock
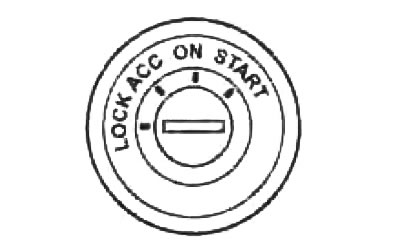
There are four fixed positions of the ignition switch:
LOCK: In this position, you can insert or remove the key from the ignition. When the key is removed, the steering wheel is locked.
ACC: in this position, you can use some electrical devices: the radio and control the exterior mirrors.
ON: The engine is running in this position. When the engine is started, the indicators of various systems on the instrument cluster light up.
START: in this position the engine is started.
Engine starting
Attention: do not allow the engine to run at high speeds for a long time and sharp accelerations in a cold state.
1. Apply the parking brake.
2. Turn off unnecessary lights and accessories:.
3. For models with manual transmission:
A) Fully depress the clutch pedal and move the shift lever to neutral.
b) Keep the clutch pedal depressed until the engine starts.
4. Start the engine.
Turn the ignition key to the position "ON". The start assist indicator will illuminate in the instrument cluster.

After the indicator goes out, without pressing the accelerator pedal, turn the key in the ignition lock to the position "START" and start the engine. Release the ignition key when the engine starts.
If the engine does not start, turn the ignition key to the "LOCK" or "ACC" and try to start the engine again.
Caution: Do not crank the engine for more than 30 seconds at a time. This can cause the starter motor and electrical circuit connections to overheat. If the engine does not start within 30 seconds, then take a break of about 30 seconds before the next attempt.
5. After starting the engine, let it idle for 10 seconds.
Note:
- To start the engine, turn off all auxiliary equipment.
- The engine may not start when you try to start the engine! when the start assist indicator is not off.
- If the Start Assist indicator does not turn off or illuminate, there is a problem with the Start Assist system. Contact the service center for diagnostics and repair.
If the engine does not start
1. Before performing checks, make sure there is enough fuel in the tank.
2. If the engine crankshaft does not turn or turns too slowly:
A) Make sure the battery terminals are secure and clean.
b) If the battery terminals are OK, then turn on the interior lighting. If the lighting is absent, dim, or goes out when the engine is cranked over by the starter, the battery is discharged. Start with a booster battery.
V) If the lighting is normal, but the engine does not start, then the engine is faulty,
3. If the engine cranks normally but the engine does not start, check:
A) Connector tightness (e.g. spark plug connections, ignition coils).
b) If the connectors are OK, then the spark plugs may be "flooded" due to repeated cranking of the engine crankshaft.
Engine starting (if spark plugs "flooded")
1. While depressing the accelerator pedal, turn the engine crankshaft by moving the ignition key to position "START" for approximately 10 seconds. Don't rock the pedal, just keep it pressed down.
2. Release the ignition key and the accelerator pedal. Then try to start the engine without depressing the accelerator pedal.
3. If the engine does not start within 10 seconds of cranking, then release the ignition key and wait a few minutes.
4. Try to start the engine. If the engine does not start, then:
A) Remove spark plugs and dry wet electrodes.
b) Turn the ignition key to position "START" for about 10 seconds while keeping the accelerator pedal depressed.
V) Install spark plugs.
5. Try to start the engine without depressing the accelerator pedal.
If the engine still does not start, it is faulty and needs to be adjusted or repaired.
Caution: Do not crank the engine for more than 10 seconds at a time. This can cause the starter motor and electrical circuit connections to overheat.
Starting with a booster battery
Starting with a booster battery ("booster")
Attention: the booster battery voltage must be 12 V. Do not start with the booster battery unless you are sure that its parameters are correct.
1. Turn off all unnecessary lights and accessories and make sure the vehicles are not touching.
2. If necessary, remove all vent plugs from booster and dead batteries. Lay a cloth over the open vents on the batteries (this helps to reduce the risk of explosion).
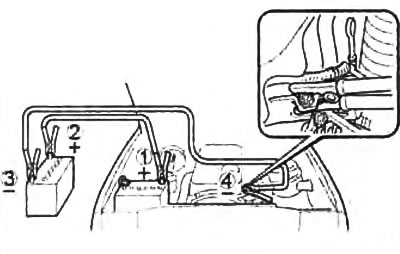
3. Connect the set of wires - to start in the following sequence:
A) Connect the wire clamp to the positive terminal of the discharged battery (1).
b) Then connect the wire clamp to the positive terminal of the booster battery (2).
V) Connect the wire clamp to the negative terminal of the booster battery (3).
G) Then to the mass (to a rigid immovable. unpainted metal part of a car engine with a dead battery) (4).
Note: To avoid serious injury when making connections, do not lean over the battery or allow the cables or clamps to accidentally touch anything other than the appropriate battery terminals or ground.
Attention: do not connect the cable near any part that can move when the engine is cranked.
5. Start the engine in the usual way. Once started, it should run at 2000 rpm for a few minutes".
6. Carefully disconnect the cables; first negative, then positive.
7. Carefully remove fabrics covering batteries as they may contain sulfuric acid.
8. If the vent plugs have been removed, reinstall them.
Starting with a battery installed in another vehicle
Before connecting and starting the engine using a battery installed in another vehicle, make sure that the reason for the inability to start the engine is precisely a discharged battery. If your vehicle or the vehicle that is used to start the vehicle has electrical damage, starting the engine in this way can cause serious damage to the vehicle's electrical system.
Note: We recommend that you ALWAYS disconnect the terminals from the battery of the vehicle that is used to start, in order to avoid possible damage to the electrical equipment of the vehicles. However, keep in mind that the settings of many systems will be deleted. In this case, follow the instructions described above in subsection "Starting with a booster battery ("booster") ".
Charging a discharged battery
1. Turn off all unnecessary lights, set the steering wheel in the straight ahead direction, and make sure the cars are not touching.
2. If necessary, remove all vent plugs from the batteries (this helps to reduce the risk of explosion). Lay a cloth over the open vents on the batteries (this helps to avoid splashing acid from the battery).
Caution: If sulfuric acid from a battery comes in contact with eyes or skin, rinse immediately with plenty of water and seek medical attention.
3. Connect the starter wire set in the sequence shown in the figure.
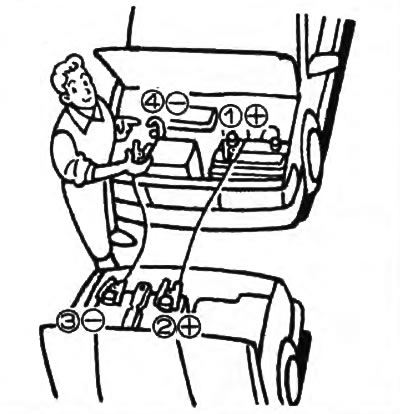
4. Charging a discharged battery.
A) Start the engine of the starting vehicle and let it run for at least 5 minutes.
At the same time, the crankshaft speed must be maintained at about 2000 rpm by pressing the accelerator pedal.
b) After 5-25 minutes, the charge of a discharged battery may be sufficient to start the engine.
5. Carefully disconnect the cables, negative first, then positive.
Attention: be especially careful when performing this paragraph. Do not touch the moving parts of the engine with your hands and keep an eye on the floors of clothing to avoid getting them on the rotating parts (e.g. drive belts).
6. Start the engine in the usual way.
Note: If the engine fails to start, start the vehicle with a booster battery.
7. Carefully remove fabrics covering batteries as they may contain sulfuric acid. If the vent plugs have been removed, reinstall them.