


Replacing the ignition distributor rotor
Disconnect the cable from the negative battery terminal.
Remove the distributor cap.
Loosen the screws and remove the ignition distributor rotor.
Installation is carried out in the reverse order of removal.
Disassembly
Remove the ignition distributor.
Remove the plate with the installation tooth from the distributor housing.
Clamp the ignition distributor in a vice using a rag to avoid damaging its surface.
Remove the two screws and the distributor rotor.
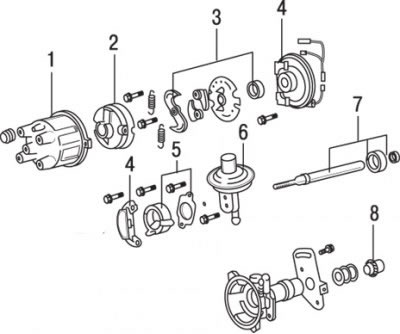
Figure 7.2. Distributor elements: 1 – ignition distributor cap; 2 – ignition distributor rotor; 3 – centrifugal ignition advance regulator mechanism; 4 – sensor coil; 5 – switch; 6 – vacuum ignition advance regulator; 7 – shaft; 8 – drive gear
Remove the two centrifugal governor mechanism springs, marking them first to facilitate assembly (figure 7.2).
Loosen the lock bolt and remove the centrifugal ignition timing mechanism from the shaft.
Remove the two screws and the sensor coil.
Using a small screwdriver, carefully separate the electronic module from the sensor coil.
Remove the two screws and remove the vacuum diaphragm from the housing.
Remove two screws and take out the switch.
Knock out the pin and remove the drive gear. Remove the washers.
Remove the distributor shaft, bearing and seal.
Assembly
Lubricate the distributor shaft with lithium grease.
Install the distributor shaft, bearing and seal.
Install the washers and drive gear. Select a number of washers so that the drive gear play is minimal and the gear fit is not tight. Lock the gear with a new pin.
Install the switch and secure it with screws.
Insert the vacuum regulator rod into the distributor housing and engage it with the commutator support plate at the base of the housing, rotating the plate so that the regulator rod engages and the plate is oriented correctly.
Install the sensor coil and electronics unit, ensuring that the latter is properly seated on the mounting tabs, then tighten the screws.