
MazBook.ru
English Русский
Български
Беларускі
Український
Српски
Hrvatski
Română
Polski
Slovenský
Magyar
• Bookmark • Sitemap • Contacts •   
Cars Opel Cars Ford Cars Volkswagen Cars Audi Cars Kia Cars Renault Cars Peugeot


Familia Capella Mazda3 Mazda6 CX-? Others Articles
Capella 3 (1982-1992, petrol) Capella 3 and 4 (1982-1992) Capella 4 (1987-1992) Capella 5 (1991-1997) Capella 6 (1997-2005, petrol)

Replacing the drive shaft protective cover (Mazda Capella GC)

  • Home
  • Mazda Capella
  • Capella GC (1982-1992)
  • Transmission
  • Drive shafts
  • Replacing the drive shaft protective cover
0
Remove the drive shaft and secure it in a vice using two wooden blocks to protect the surface from damage.

Important! Before starting work, purchase the appropriate cover replacement kit. The kit contains a special lubricant based on Moly paste, required for filling the CV joints. No other type of lubricant can be used.


Cut the cover's fastening straps and discard them.

Slide the protective cover from the CV joint onto the drive shaft.

Use a screwdriver to remove the large CV joint retaining ring (if any).

Remove the thrust ring and, by sliding it, remove the CV joint from the splines of the drive shaft.

Remove the protective cover from the drive shaft.
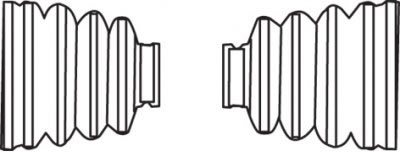
Figure 9.36. Protective covers for drive shaft CV joints

Figure 9.36. Protective covers for drive shaft CV joints


Please note: Different boots are used on the wheel and differential sides, so they cannot be mixed up (figure 9.36).


Since removing and installing the drive shaft is quite labor-intensive work, it is recommended to replace both drive shaft protective boots at the same time, even if only one is damaged.

Thoroughly clean the CV joint and shaft splines, inspect them for wear, damage, dirt and water. Replace any damaged parts with new ones.


Wrap the drive shaft splines with tape to avoid damaging the surface of the new boot when installing it. Lightly grease the inside diameter of the new boot and slide it onto the drive shaft.

Remove the tape, lightly coat the splines with grease and install the CV joint and thrust ring with the tapered side facing the shaft.

Fill the CV joint with a special lubricant based on Moly paste.

Install the outer snap ring.

Place the protective boot in the grooves of the CV joint housing and drive shaft.

Install the protective boot mounting clamp so that the tightening key closes in the direction opposite to the direction of rotation of the drive shaft when the vehicle is moving.
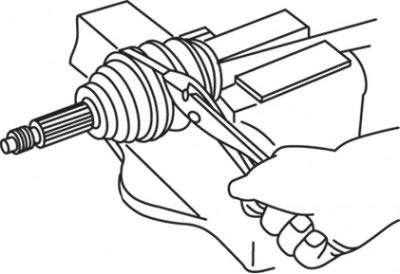
Figure 9.37. Tightening the CV joint protective boot clamp

Figure 9.37. Tightening the CV joint protective boot clamp


Tighten the clamp with pliers and bend its tail (figure 9.37).

Install the wheel drive shaft.
This article is available at: russian, bulgarian, belarusian, ukrainian, serbian, croatian, romanian, polish, slovak, hungarian
This text was checked by: Georgy Afanasyev
Share with friends on social networks:

Previous
Capella 3 and 4 » Drive shafts
Next

Installing the wheel drive shaft
Installing the intermediate shaft
Removal the intermediate shaft
Removal the drive shaft
General description of drive shafts
More articles on repairing other Mazda models
Checking/disassembling the drive shaft/replacing the seals Mazda Familia 6 (1989-1994)
Replacing the drive belt Mazda3 BK (2003-2009)
Replacing the drive belt Mazda6 GG (2002-2008)
Replacing the drive belts of the attachments Mazda CX-5KE (2012-2017)
Checking the drive shaft covers Mazda BT-50 (1) (2006-2011)
Link in different formats to this article
Comments and feedback from visitors
No comments yet


How much will 17 + 32 ?


Capella 6 (1997-2005, petrol) 
  • General information
  • Introduction to guide
  • User manual
  • Troubleshooting
  • Maintenance
  • Power unit
  • 4-cylinder engines
  • 6-cylinder engines
  • Engine overhaul
  • Cooling and ventilation
  • Power and exhaust systems
  • Engine electrics
  • Control system
  • Transmission
  • Mechanical gearbox
  • Automatic gearbox
  • Clutch and drive shafts
  • Chassis
  • Brake system
  • Car suspension
  • Steering
  • Body
  • Exterior (external elements)
  • Interior (internal elements)
  • Doors, windows and locks
  • Electrical equipment
  • Equipment and devices
  • Electrical circuits
Capella 5 (1991-1997) 
  • General information
  • User manual
  • Maintenance
  • Helpful hints
  • Power unit
  • Petrol engines 1.6 and 1.8
  • Petrol engines 2.0
  • 2.5 petrol engines
  • Overhaul engines 1.6 and 1.8
  • Overhaul engines 2.0 and 2.5
  • Diesel engine 2.0
  • Engine electrics
  • Cooling system
  • Air conditioner
  • Carburetor Nikki 30/34
  • Power system (1.6 and 1.8)
  • Power system (2.0 and 2.5)
  • Control system
  • Transmission
  • Mechanical gearbox
  • Automatic gearbox
  • Clutch and axles
  • Chassis
  • Brake system
  • Suspension and wheels
  • Steering
  • Body
  • Exterior (external elements)
  • Interior (internal elements)
  • Doors and windows
  • Electrical equipment
  • Equipment and devices
  • Electrical circuits
Capella 4 (1987-1992) 
  • General information
  • Introduction to manual
  • Vehicle specifications
  • Power unit
  • Engine repair
  • Lubrication system
  • Cooling system
  • Fuel system (carburetor)
  • Fuel injection (FE)
  • Fuel injection (DOHC)
  • Fuel system (diesel)
  • Ignition system
  • Transmission
  • Clutch
  • Gearbox
  • Drive shafts
  • Chassis
  • Front suspension
  • Rear suspension
  • Steering system
  • Brake system
  • Electrical equipment
  • Equipment and devices
  • Electrical circuits
Capella 3 and 4 (1982-1992) 
  • General information
  • User manual
  • Maintenance
  • Power unit
  • Gasoline engine
  • Engine overhaul (gasoline)
  • Diesel engine
  • Cooling and heating
  • Supply system
  • Ignition system
  • Emission reduction
  • Transmission
  • Clutch
  • Mechanical gearbox
  • Automatic gearbox
  • Drive shafts
  • Chassis
  • Brake system
  • Suspension and wheels
  • Steering
  • Body
  • Exterior (external elements)
  • Interior (internal elements)
  • Electrical equipment
  • Equipment and devices
  • Power devices
  • Electrical circuits
Capella 3 (1982-1992, petrol) 
  • General information
  • User manual
  • Maintenance
  • Troubleshooting
  • Late models
  • Power unit
  • Engine in car
  • Engine overhaul
  • Cooling and heating system
  • Fuel and exhaust system
  • Engine electrical system
  • Emission control system
  • Transmission
  • Mechanical gearbox
  • Automatic gearbox
  • Clutch and drive shafts
  • Chassis
  • Brake system
  • Suspension and wheels
  • Steering
  • Body
  • Exterior (external elements)
  • Interior (internal elements)
  • Electrical equipment
  • Equipment and devices
  • Lighting and lamps
  • Electrical circuits
MazBook.ru © 2018–2026 · Mobile version · Articles and news · Sitemap: EN BG BY UA RS HR RO PL SK HU · Feedback · Site search · Add to bookmarks Familia 5 (BF) · Familia 6 (BG) · Capella 3 (GC) · Capella 3 and 4 (GC) · Capella 4 (GD) · Capella 5 (GE) · Capella 6 (GF) · Mazda3 BK · Mazda6 GG · CX-5KE · Mazda 121 (3) · Mazda BT-50 (1) ·
By continuing to use the site, you agree to the use of cookies 🔐