
Attention! The dust generated when brake pads wear out contains asbestos. hazardous to your health. Do not blow out the brakes with compressed air or inhale this dust. Before working on the brakes, clean them with brake cleaner.
We recommend that you work with the brakes in a respirator. Never use petroleum-based solvents to clean brake system components.
Note. Calipers are always replaced in pairs (front pair or back pair); never replace one caliper.
Front brake
Removing
1. Loosen the front wheel nuts, raise the front of the vehicle and place it on stands. Remove wheels.
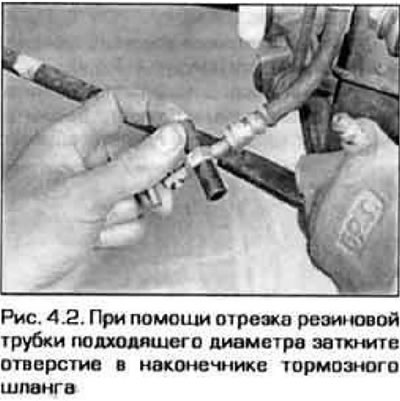
2. Turn away a bolt of fastening of a hose and disconnect a hose from a support (see fig. 3.6b). Plug the tip of the hose to prevent contamination of the hydraulic system and leakage of brake fluid (pic. 4.2).
3. Turn out a bolt of fastening of a support (see fig. 3.6b).
4. Turn the caliper up and remove it from the support pin.
Installation
5. Installation of a support is carried out in sequence, return to removal. Replace the sealing washers on both sides of the hose head. Tighten the caliper mounting bolt and hose mounting bolt to the required torque.
6. Bleed the brake system (see paragraph 10).
7. Put on the wheels, tighten the nuts of their fastening and lower the car. Tighten the wheel nuts to the required torque (see technical data at the beginning of chapter 1).
Rear brake
Removing
8. Loosen the rear wheel nuts, raise the rear of the vehicle and place it on stands. Remove wheels.
9. Release the parking brake, then remove the retainer from the parking brake cable (see fig. 3.7a).
10. Disconnect the parking brake cable □t of the caliper lever (see fig. 3.7.6, in).
11. Turn out a bolt of the union and disconnect a hose of a hydraulic system from a support. Plug the tip of the hose to prevent contamination of the hydraulic system and leakage of brake fluid (see fig. 4.2).
12. Turn out a bolt of fastening of a support (see fig. 3.7,e).
13. Turn a support back and remove it from a finger of a basic arm.
Installation
14. The caliper is installed in the reverse order of removal. Replace the sealing washers located on both sides of the hose end. Tighten the caliper mounting bolt and hose mounting bolt to the required torque.
15. Bleed the brake system (see paragraph 10).
16. Put on the wheels, tighten the nuts of their fastening and lower the car. Tighten the wheel nuts to the required torque (see Technical foams at the beginning of chapter 1).