


Contents: Tightening torques, Nm ⇓ Adjusting the tension of the…⇓ Adjusting the engine idle speed and…⇓ Checking and adjusting the ignition…⇓ Checking the rear disc brakes ⇓ Checking and adjusting the…⇓ Replacing the fuel filter (engines…⇓ Replacing the air filter (engines…⇓ Replacing windshield wipers ⇓
Tightening torques, Nm
- Rear Brake Caliper Guide Pins - 63-82
- Rear Brake Caliper Mounting Brackets - 49-74
Adjusting the tension of the auxiliary drive belt
Some later models do not have a tensioner pulley to adjust the belt tension, as adjustment is made by moving the alternator or air conditioning compressor.
Adjusting the engine idle speed and the quality of the fuel-air mixture (engines with RVT system)
Apply the parking brake and place the gear shift lever in neutral.
Connect a tachometer to the engine and turn off all electrical consumers.
Start the engine and warm it up to normal operating temperature, then let it run at 2500–3000 rpm for 3 minutes.
Stop the engine and install an exhaust gas analyzer sensor into the exhaust pipe.
(Content based on information from: MAZBOOK.RU)
Start the engine and let it idle. If the electric radiator fan comes on, wait for it to turn off.
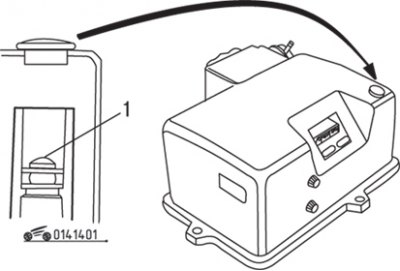
Figure 14.1. Location of the screw (1) for adjusting the air supply when the engine is idling
Check the engine idle speed and compare it with the specifications. If the frequency is different from the required one, adjust it by turning the air supply screw (figure 14.1).
To adjust the air-fuel mixture, disconnect the air intake pipes from the air filter and close them with suitable plugs.
Start the engine and warm it up to normal operating temperature, allow it to run at a crankshaft speed of 2500-1000 min⁻¹ for 3 minutes, and leave it running in idle mode. If the electric radiator fan comes on, wait for it to turn off.
Check the CO content in the exhaust gases and compare the result with the technical data. If the CO content is different from the required level, remove the rubber plug from the air filter and adjust the CO content by turning the air supply adjustment screw with a special tool Mazda §49 HC27 140. The adjusting screw has an oval convex head, and the Mazda §49 HC27 140 tool is made exactly to fit it, so it is impossible to make such a tool yourself.
Replace the rubber cap, then adjust the idle speed of the crankshaft.
Checking and adjusting the ignition timing (engines with RVT system)
This operation is basically the same as the operation described in the subsection "Checking and adjusting the ignition timing" (see section 2 "Adjustments and Maintenance"), but before checking and adjusting the ignition timing, additionally disconnect and plug the vacuum regulator tube of the ignition distributor. Once the check is complete, reinstall the tube and check that the spark advance vacuum valve is set correctly.
Checking the rear disc brakes
Block the front wheels, raise the rear of the car and secure it on supports. Remove the rear wheels.
Check the thickness of the brake pads through the hole in the rear of the caliper, which should be at least 1.0 mm, otherwise replace all four rear brake pads.
Check the brake hoses for cracks and cuts, check the calipers for leaks and signs of damage.
Check the rear brake discs for deep scratches and replace them if present.
Install the rear wheels and lower the vehicle to the ground.
Checking and adjusting the carburetor damper (engines with RVT system)
Open the throttle fully, then press the carburetor damper rod with your finger and check that it moves slowly. After releasing the rod, it should quickly return to its original position.
To adjust the carburetor damper, start the engine and warm it up to normal operating temperature.
Stop the engine and connect the tachometer.
Increase the engine crankshaft speed to 3500 min⁻¹, then slowly reduce the speed and check that the throttle lever is touching the damper rod at a speed of 3000+100 min⁻¹.
If necessary, loosen the lock nut and set the rod to the required position.
After adjustment, tighten the lock nut and remove the tachometer.
Replacing the fuel filter (engines with RVT system)
The fuel filter is located on the left side of the engine compartment.
To collect leaking fuel, place a piece of cloth under the fuel filter.
Remove the hollow bolts and disconnect the hoses from the fuel filter. Remove the washers.
Loosen the nuts and remove the fuel filter. Loosen the clamp bolt and remove the bracket.
Check the rubber filter mounting elements for wear and replace them if necessary.
Install a new fuel filter. Installation is carried out in the reverse order of removal.
Replacing the air filter (engines with RVT system)
Remove the four bolts securing the air cleaner cover and air flow meter to the bottom of the housing.
Remove the cover and take out the air filter.
Wipe the inside of the lid and bottom of the case. If necessary, the lower housing can be completely removed by unscrewing the nuts and disconnecting the air supply hose.
Install a new air filter. Installation is carried out in the reverse order of removal.
Replacing windshield wipers
The wiper blades and arms of models manufactured from October 1984 onwards have been modified. The brush is attached to the arm using a hook and hinge rather than a pin and socket.
To remove the blade, first turn it at a right angle to the wiper arm, then detach it from the hook and remove it from the end of the arm. Installation is carried out in the reverse order of removal.