
MazBook.ru
English Русский
Български
Беларускі
Український
Српски
Hrvatski
Română
Polski
Slovenský
Magyar
• Bookmark • Sitemap • Contacts •   
Cars Opel Cars Ford Cars Volkswagen Cars Audi Cars Kia Cars Renault Cars Peugeot


Familia Capella Mazda3 Mazda6 CX-? Others Articles
Capella 3 (1982-1992, petrol) Capella 3 and 4 (1982-1992) Capella 4 (1987-1992) Capella 5 (1991-1997) Capella 6 (1997-2005, petrol)

Checking the compression in the engine cylinders (Mazda Capella GC)

  • Home
  • Mazda Capella
  • Capella GC (1982-1992)
  • General information
  • Maintenance
  • Checking the compression in the engine cylinders
0
To obtain accurate compression test results, warm up the engine to normal temperature and make sure the battery is fully charged.

The compression values in the engine cylinders allow us to judge the condition of a group of parts in the upper part of the engine (pistons, piston rings, valves and cylinder head gasket). A decrease in compression may be caused by leaks in the combustion chambers due to wear of the piston rings, damage to the valve plates and seats, or burnt-out cylinder head gaskets.

Start and warm up the engine to normal operating temperature, then stop it and wait 10 minutes for the catalytic converter temperature to decrease.

Clean the areas around the spark plugs by blowing them out with compressed air (if you don't have a compressor, blow out the areas with a car or even a bicycle pump). This is necessary to prevent dirt from getting into the cylinders when measuring compression.

Remove all spark plugs.

Disable the ignition system by disconnecting the primary winding of the ignition coil from the ignition distributor.

Open the throttle fully.

Insert the compression tester into the spark plug well.
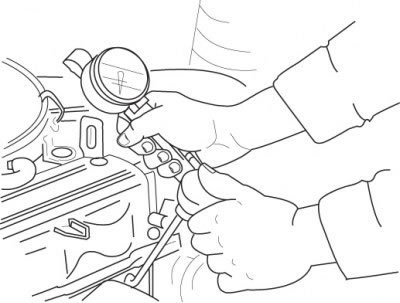
Figure 2.24. Using a compression gauge to measure compression in engine cylinders

Figure 2.24. Using a compression gauge to measure compression in engine cylinders


Turn on the starter and turn the crankshaft for at least seven compression strokes, monitoring the compression gauge readings (figure 2.24). On a properly functioning engine, the pressure should build up quickly. Low pressure after the first piston stroke and a slow increase during subsequent compression strokes indicate worn piston rings. If the pressure is low after the first stroke of the piston and does not increase during subsequent compression strokes, then the cause is a leak in the valves or a leak in the cylinder head gasket (the reason may also be the formation of cracks in the head). A decrease in compression can be caused by carbon deposits on the back sides of the valve plates. Record the highest compression reading.

Measure the compression in the remaining cylinders and compare the results with the technical data given at the beginning of the section.

If the compression is below the minimum acceptable value, inject a small amount of engine oil into each cylinder through the spark plug hole, then repeat the check. If the compression increases after adding oil, then we can definitely conclude that the piston rings are worn out. If the compression has increased only slightly, the leak is through the valves or the cylinder head gasket. Valve leakage may be caused by burnt valve seats and/or working edges, deformation of valve stems, or formation of cracks in them.

If the compression is equally low only in two adjacent cylinders, then the most likely cause is a burnt-out gasket between them. As confirmation, traces of coolant may appear in the combustion chambers or oil pan.


If the compression in one of the cylinders is lower than in the others, and the engine runs unsteadily at idle speed, then the cause may be wear of the camshaft cam.

If the compression exceeds the nominal value, it means there are carbon deposits in the combustion chamber. In this case, the cylinder head must be removed and the carbon deposits removed.

If the compression in all cylinders is low or varies greatly between cylinders, then the combustion chambers need to be checked for leaks. To do this, contact a specialized auto repair shop. As a result of the tests, the leak locations must be accurately identified and the quantitative characteristics of the leak must be provided.

After checking the compression, release the throttle valve and restore the ignition system.
This article is available at: russian, bulgarian, belarusian, ukrainian, serbian, croatian, romanian, polish, slovak, hungarian
This text was checked by: Georgy Afanasyev
Share with friends on social networks:

Previous
Capella 3 and 4 » Maintenance
Next

Adjusting valve clearances and checking the tightening torque of the…
Checking the ignition system
Checking the fuel vapor recovery system
Checking the Exhaust Gas Recirculation (EGR) Valve
Checking and replacing the crankcase gas ventilation valve (PCV)
Checking the air-fuel mixture leaning system while coasting
Checks and adjustments (since 1984)
Adjustments and maintenance (since 1986)
More articles on repairing other Mazda models
Checking the compression in the cylinders Mazda Familia 6 (1989-1994)
Measuring compression in engine cylinders Mazda3 BK (2003-2009)
Measuring compression in engine cylinders Mazda6 GG (2002-2008)
Checking the compression in the cylinders Mazda CX-5KE (2012-2017)
Checking the compression in the cylinders Mazda 121 (3) (1996-2003)
Link in different formats to this article
Comments and feedback from visitors
No comments yet


How much will 19 + 32 ?


Capella 6 (1997-2005, petrol) 
  • General information
  • Introduction to guide
  • User manual
  • Troubleshooting
  • Maintenance
  • Power unit
  • 4-cylinder engines
  • 6-cylinder engines
  • Engine overhaul
  • Cooling and ventilation
  • Power and exhaust systems
  • Engine electrics
  • Control system
  • Transmission
  • Mechanical gearbox
  • Automatic gearbox
  • Clutch and drive shafts
  • Chassis
  • Brake system
  • Car suspension
  • Steering
  • Body
  • Exterior (external elements)
  • Interior (internal elements)
  • Doors, windows and locks
  • Electrical equipment
  • Equipment and devices
  • Electrical circuits
Capella 5 (1991-1997) 
  • General information
  • User manual
  • Maintenance
  • Helpful hints
  • Power unit
  • Petrol engines 1.6 and 1.8
  • Petrol engines 2.0
  • 2.5 petrol engines
  • Overhaul engines 1.6 and 1.8
  • Overhaul engines 2.0 and 2.5
  • Diesel engine 2.0
  • Engine electrics
  • Cooling system
  • Air conditioner
  • Carburetor Nikki 30/34
  • Power system (1.6 and 1.8)
  • Power system (2.0 and 2.5)
  • Control system
  • Transmission
  • Mechanical gearbox
  • Automatic gearbox
  • Clutch and axles
  • Chassis
  • Brake system
  • Suspension and wheels
  • Steering
  • Body
  • Exterior (external elements)
  • Interior (internal elements)
  • Doors and windows
  • Electrical equipment
  • Equipment and devices
  • Electrical circuits
Capella 4 (1987-1992) 
  • General information
  • Introduction to manual
  • Vehicle specifications
  • Power unit
  • Engine repair
  • Lubrication system
  • Cooling system
  • Fuel system (carburetor)
  • Fuel injection (FE)
  • Fuel injection (DOHC)
  • Fuel system (diesel)
  • Ignition system
  • Transmission
  • Clutch
  • Gearbox
  • Drive shafts
  • Chassis
  • Front suspension
  • Rear suspension
  • Steering system
  • Brake system
  • Electrical equipment
  • Equipment and devices
  • Electrical circuits
Capella 3 and 4 (1982-1992) 
  • General information
  • User manual
  • Maintenance
  • Power unit
  • Gasoline engine
  • Engine overhaul (gasoline)
  • Diesel engine
  • Cooling and heating
  • Supply system
  • Ignition system
  • Emission reduction
  • Transmission
  • Clutch
  • Mechanical gearbox
  • Automatic gearbox
  • Drive shafts
  • Chassis
  • Brake system
  • Suspension and wheels
  • Steering
  • Body
  • Exterior (external elements)
  • Interior (internal elements)
  • Electrical equipment
  • Equipment and devices
  • Power devices
  • Electrical circuits
Capella 3 (1982-1992, petrol) 
  • General information
  • User manual
  • Maintenance
  • Troubleshooting
  • Late models
  • Power unit
  • Engine in car
  • Engine overhaul
  • Cooling and heating system
  • Fuel and exhaust system
  • Engine electrical system
  • Emission control system
  • Transmission
  • Mechanical gearbox
  • Automatic gearbox
  • Clutch and drive shafts
  • Chassis
  • Brake system
  • Suspension and wheels
  • Steering
  • Body
  • Exterior (external elements)
  • Interior (internal elements)
  • Electrical equipment
  • Equipment and devices
  • Lighting and lamps
  • Electrical circuits
MazBook.ru © 2018–2026 · Mobile version · Articles and news · Sitemap: EN BG BY UA RS HR RO PL SK HU · Feedback · Site search · Add to bookmarks Familia 5 (BF) · Familia 6 (BG) · Capella 3 (GC) · Capella 3 and 4 (GC) · Capella 4 (GD) · Capella 5 (GE) · Capella 6 (GF) · Mazda3 BK · Mazda6 GG · CX-5KE · Mazda 121 (3) · Mazda BT-50 (1) ·
By continuing to use the site, you agree to the use of cookies 🔐