


Contents: Examination ⇓ Replacement ⇓
Examination
With the vehicle raised and securely supported on stands, quickly spin the rear wheels and check for bearing noise, turning resistance, and play. Grasp the rear wheel at the 6 o'clock position and attempt to rock it vertically. The acceptable play should be no more than 0.5 mm. If the play is significant, check and adjust or replace the wheel bearings.
Servicing the front wheel bearings requires disassembling the front hub, while the rear wheel bearings can be replaced during routine maintenance.
Replacement
Raise the rear of the vehicle and support it on stands.
Remove the wheels and release the parking brake lever.
Using a chisel and hammer, remove the hub cap by tapping it around until it dislodges and can be removed.
Bend back the flange and unscrew the hub mounting nut. A new nut must be used during installation.
Pull the hub block out slightly and then return it to its original position.
This operation should push the outer bearing and washer forward on the axle so that they can be removed with your fingers.
Remove the hub, place it on a suitable work surface and use a screwdriver to remove the inner bearing race.
Use solvent to remove all traces of old grease from bearings, hub and axle. You can use a small brush for this, but be careful not to let the bristles from the brush get inside the support rollers. Dry the parts using a jet of compressed air.
Carefully inspect the bearings for cracks, wear, and uneven wear. Bearings and rings are a single set, so new rings require the installation of new bearings. Similarly, when replacing bearings, new rings are installed in the hub.
To fill the bearings, use high-temperature lubricant, which is packed between the rollers, the conical surface and the bearing housing.
Apply a thin layer of lubricant to the axle, outer and inner surfaces of the bearing, lever and gasket.
Press a small amount of grease into each bearing inside the hub. Use your finger to form a layer at these points to provide additional lubrication and to keep the thin layer of lubricant from leaking out of the bearing.
Install the grease filled inner bearing into the hub and add a small amount of grease to the outside of the bearing.
Place a new gasket on top of the inner bearing, with the open tab facing the bearing, and press the gasket evenly into place.
Lubricate the gasket lip, install the hub assembly onto the axle and install the grease filled outer bearing and gasket in place.
Thread a new nut onto the axle and adjust the bearing preload as follows:
- tighten the nut to the initial torque specified in the technical data;
- turn the hub two or three times to install the bearing rollers, then loosen the nut one turn, making sure that the brakes do not move;
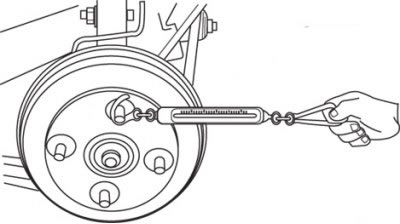
Figure 2.19. Measuring the rear wheel bearing preload using a spring dynamometer
- attach a spring dynamometer to the top wheel stud and measure the torque at which the hub begins to turn (this value determines the resistance of the oil seal) (figure 2.19);
- tighten the nut until resistance (the point at which the hub begins to turn) will not be 3.9–9.8 N greater than the seal resistance;
- use a hammer and a center punch to drive the nut flange into the axle groove.
Fill the dust cap with grease and install it using a hammer and punch.
Install the wheels and lower the car to the ground. Tighten the wheel nuts.
Press the brake pedal several times to adjust the position of the brake pads, then check the travel of the parking brake lever and adjust it if necessary.