
MazBook.ru
English Русский
Български
Беларускі
Український
Српски
Hrvatski
Română
Polski
Slovenský
Magyar
• Bookmark • Sitemap • Contacts •   
Cars Opel Cars Ford Cars Volkswagen Cars Audi Cars Kia Cars Renault Cars Peugeot


Familia Capella Mazda3 Mazda6 CX-? Others Articles
Capella 3 (1982-1992, petrol) Capella 3 and 4 (1982-1992) Capella 4 (1987-1992) Capella 5 (1991-1997) Capella 6 (1997-2005, petrol)

Adjustments and maintenance (since 1986) (Mazda Capella GC)

  • Home
  • Mazda Capella
  • Capella GC (1982-1992)
  • General information
  • Maintenance
  • Adjustments and maintenance (since 1986)
0
Contents: Tightening torques, Nm ⇓ Data for adjustment and maintenance ⇓ Replacing the fuel filter ⇓ Engine crankshaft speed control at…⇓

Tightening torques, Nm


  • Turbocharger to exhaust manifold mounting nuts — 31–43
  • Fuel filter housing mounting bolts — 24–34
  • Timing belt tensioner mounting bolt — 37–52
  • Rear wheel caliper mounting bolts:
    • 1987 models - 63-52
    • models produced since 1988 - 12–17
  • Rear wheel hub bearing retaining nut - 98-177
  • Fastening the flywheel to the crankshaft - 96-103
  • Fastening the clutch housing assembly with the pressure plate to the flywheel — 18–26
  • Clutch master cylinder mounting bolts — 19–26
  • Clutch slave cylinder mounting bolts — 19–26

Data for adjustment and maintenance
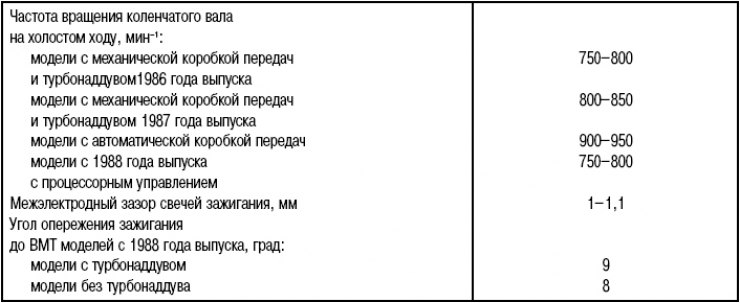


Data for adjustment and maintenance

With the installation of an electronic fuel injection system on engines, two types of routine maintenance have also changed: replacing the fuel filter and checking and adjusting the engine idle speed. The recommended service intervals are the same as for earlier models.

Caution! The fuel system is under pressure. Before disconnecting system elements, it is necessary to relieve the pressure in the system. To do this, cover the disconnected area with a clean cloth and, being careful, smoothly unscrew the union nut.


Warning! Gasoline is extremely flammable. When working with fuel system components, do not use open flames, sparking devices, open fire-hazardous lighting devices, or smoke. Avoid sparks when working with wires and electrical devices.


(Article is based on website data: «MAZbook.ru»)

Warning: Since gasoline is a carcinogen, avoid contact with your body or your vehicle's paintwork. Otherwise, you should immediately wash the affected area with soap and water.


Replacing the fuel filter


According to the manufacturer's instructions, on models with a fuel injection system, the fuel filter must be

change every 55,000 km of vehicle mileage.

Disconnect the cable from the negative battery terminal.

The fuel filter is installed on the left front shock absorber cup near the brake master cylinder reservoir.
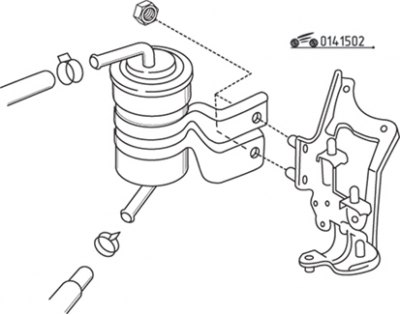
Figure 15.1. Fuel filter mounting components for 1986 and 1987 models

Figure 15.1. Fuel filter mounting components for 1986 and 1987 models


Have plenty of rags available to absorb any spilled gasoline. Remove the two bolts securing the filter housing (one on each side) or loosen the clamps and remove the hoses (figure 15.1, 15.2). Drain any remaining fuel from the filter.
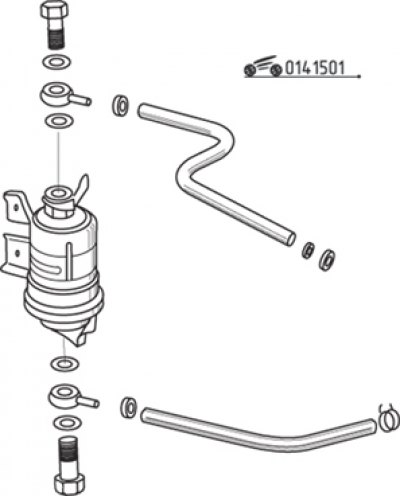
Figure 15.2. Fuel filter mounting elements for models produced since 1988

Figure 15.2. Fuel filter mounting elements for models produced since 1988


Loosen the nuts securing the filter bracket to the shock absorber cup and remove the filter.

Install the new filter with the bracket and secure with nuts.

Install new copper gaskets on both ends of the housing and tighten the cover mounting bolts to the specified torque.

Attention! On the 1986 and 1987 models, this operation is performed after the first 3,500 km run, and then every 25,000 km. On models manufactured since 1988, the idle speed of the crankshaft is automatically controlled by the processor control unit.


Engine crankshaft speed control at idle


Connect a tachometer to the engine. With the engine warmed up to operating temperature, after setting the selector lever to the "park" or "neutral" position, increase the engine crankshaft speed to 2500–3000 min⁻¹ for 3 minutes.

Check the ignition timing setting and adjust it if necessary.

If the vehicle is operated at altitudes up to 1,300 m above sea level, disconnect the bypass solenoid valve connector.

If the cooling fan is running, let the engine idle and wait until the fan stops.
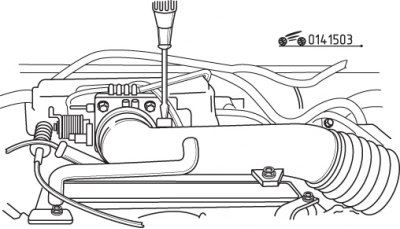
Figure 15.3. Adjusting the engine crankshaft speed at idle by turning the screw on the air damper…

Figure 15.3. Adjusting the engine crankshaft speed at idle by turning the screw on the air damper housing


Check the idle speed of the crankshaft. If it is not as required, adjust it by turning the screw on the air damper body (figure 15.3).

If the solenoid valve connector was disconnected, reconnect it.
This article is available at: russian, bulgarian, belarusian, ukrainian, serbian, croatian, romanian, polish, slovak, hungarian
This text was checked by: Georgy Afanasyev
Share with friends on social networks:

Previous
Capella 3 and 4 » Maintenance
Next

Checks and adjustments (since 1984)
Checking the air-fuel mixture leaning system while coasting
Checking the compression in the engine cylinders
Adjusting valve clearances and checking the tightening torque of the…
Checking the ignition system
More articles on repairing other Mazda models
Maintenance technology, tools and workplace equipment Mazda Familia 6 (1989-1994)
Maintenance of the wearable card «Advanced Key» Mazda3 BK (2003-2009)
Maintenance of the wearable card «Advanced Key» Mazda6 GG (2002-2008)
Car maintenance — running in a car Mazda CX-5KE (2012-2017)
Vehicle maintenance plan Mazda 121 (3) (1996-2003)
Link in different formats to this article
Comments and feedback from visitors
No comments yet


How much will 38 + 34 ?


Capella 6 (1997-2005, petrol) 
  • General information
  • Introduction to guide
  • User manual
  • Troubleshooting
  • Maintenance
  • Power unit
  • 4-cylinder engines
  • 6-cylinder engines
  • Engine overhaul
  • Cooling and ventilation
  • Power and exhaust systems
  • Engine electrics
  • Control system
  • Transmission
  • Mechanical gearbox
  • Automatic gearbox
  • Clutch and drive shafts
  • Chassis
  • Brake system
  • Car suspension
  • Steering
  • Body
  • Exterior (external elements)
  • Interior (internal elements)
  • Doors, windows and locks
  • Electrical equipment
  • Equipment and devices
  • Electrical circuits
Capella 5 (1991-1997) 
  • General information
  • User manual
  • Maintenance
  • Helpful hints
  • Power unit
  • Petrol engines 1.6 and 1.8
  • Petrol engines 2.0
  • 2.5 petrol engines
  • Overhaul engines 1.6 and 1.8
  • Overhaul engines 2.0 and 2.5
  • Diesel engine 2.0
  • Engine electrics
  • Cooling system
  • Air conditioner
  • Carburetor Nikki 30/34
  • Power system (1.6 and 1.8)
  • Power system (2.0 and 2.5)
  • Control system
  • Transmission
  • Mechanical gearbox
  • Automatic gearbox
  • Clutch and axles
  • Chassis
  • Brake system
  • Suspension and wheels
  • Steering
  • Body
  • Exterior (external elements)
  • Interior (internal elements)
  • Doors and windows
  • Electrical equipment
  • Equipment and devices
  • Electrical circuits
Capella 4 (1987-1992) 
  • General information
  • Introduction to manual
  • Vehicle specifications
  • Power unit
  • Engine repair
  • Lubrication system
  • Cooling system
  • Fuel system (carburetor)
  • Fuel injection (FE)
  • Fuel injection (DOHC)
  • Fuel system (diesel)
  • Ignition system
  • Transmission
  • Clutch
  • Gearbox
  • Drive shafts
  • Chassis
  • Front suspension
  • Rear suspension
  • Steering system
  • Brake system
  • Electrical equipment
  • Equipment and devices
  • Electrical circuits
Capella 3 and 4 (1982-1992) 
  • General information
  • User manual
  • Maintenance
  • Power unit
  • Gasoline engine
  • Engine overhaul (gasoline)
  • Diesel engine
  • Cooling and heating
  • Supply system
  • Ignition system
  • Emission reduction
  • Transmission
  • Clutch
  • Mechanical gearbox
  • Automatic gearbox
  • Drive shafts
  • Chassis
  • Brake system
  • Suspension and wheels
  • Steering
  • Body
  • Exterior (external elements)
  • Interior (internal elements)
  • Electrical equipment
  • Equipment and devices
  • Power devices
  • Electrical circuits
Capella 3 (1982-1992, petrol) 
  • General information
  • User manual
  • Maintenance
  • Troubleshooting
  • Late models
  • Power unit
  • Engine in car
  • Engine overhaul
  • Cooling and heating system
  • Fuel and exhaust system
  • Engine electrical system
  • Emission control system
  • Transmission
  • Mechanical gearbox
  • Automatic gearbox
  • Clutch and drive shafts
  • Chassis
  • Brake system
  • Suspension and wheels
  • Steering
  • Body
  • Exterior (external elements)
  • Interior (internal elements)
  • Electrical equipment
  • Equipment and devices
  • Lighting and lamps
  • Electrical circuits
MazBook.ru © 2018–2026 · Mobile version · Articles and news · Sitemap: EN BG BY UA RS HR RO PL SK HU · Feedback · Site search · Add to bookmarks Familia 5 (BF) · Familia 6 (BG) · Capella 3 (GC) · Capella 3 and 4 (GC) · Capella 4 (GD) · Capella 5 (GE) · Capella 6 (GF) · Mazda3 BK · Mazda6 GG · CX-5KE · Mazda 121 (3) · Mazda BT-50 (1) ·
By continuing to use the site, you agree to the use of cookies 🔐