
MazBook.ru
English Русский
Български
Беларускі
Український
Српски
Hrvatski
Română
Polski
Slovenský
Magyar
• Bookmark • Sitemap • Contacts •   
Cars Opel Cars Ford Cars Volkswagen Cars Audi Cars Kia Cars Renault Cars Peugeot


Familia Capella Mazda3 Mazda6 CX-? Others Articles
Capella 3 (1982-1992, petrol) Capella 3 and 4 (1982-1992) Capella 4 (1987-1992) Capella 5 (1991-1997) Capella 6 (1997-2005, petrol)

Installing pistons and connecting rods (Mazda Capella GE)

  • Home
  • Mazda Capella
  • Capella GE (1991-1997)
  • Power unit
  • Overhaul engines 1.6 and 1.8
  • Installing pistons and connecting rods
0
Contents: Checking the lubrication clearance…⇓ Final installation of pistons and…⇓

Checking the lubrication clearance of connecting rod bearings
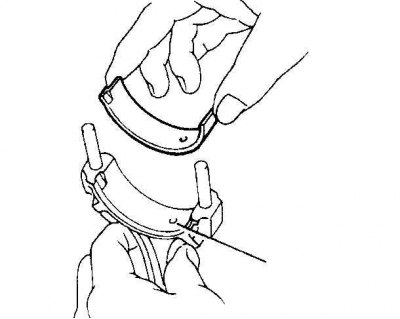


Checking the lubrication clearance of connecting rod bearings


1. Clean the upper connecting rod bearing shell and install it on the connecting rod. The lubrication holes of the connecting rod and bearing must be aligned.

2. Clean the second bearing and install it into the connecting rod cap.
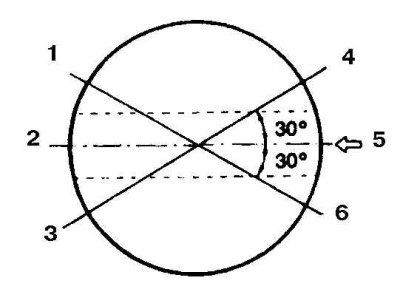
1. Upper oil scraper ring clearance

1. Upper oil scraper ring clearance
2. Expansion ring gap
3. Clearance of the lower oil scraper ring
4. Upper compression ring clearance
5. Piston pin
6. Second compression ring clearance


3. Arrange the piston ring end gaps as shown in the figure.

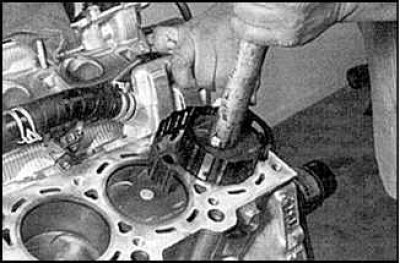
4. Lubricate the pistons and rings and compress the piston rings using a piston ring compressor.


5. Turn the crankshaft so that the connecting rod bearing of the first cylinder is at the bottom dead center position and lubricate the cylinder walls.
5. Turn the crankshaft so that the connecting rod bearing of the first cylinder is at the bottom…


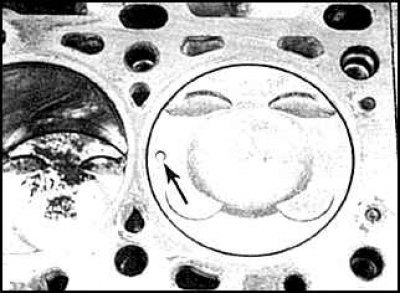
6. Make sure the mark on the top of the piston is facing forward.
6. Make sure the mark on the top of the piston is facing forward.


7. Press the piston down and install it into the cylinder.
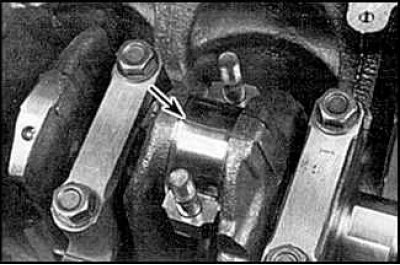
7. Press the piston down and install it into the cylinder.


8. To measure the lubrication gap, you can use an internal micrometer or other special device, but the most accurate and easiest method is to use a special plastic gauge.
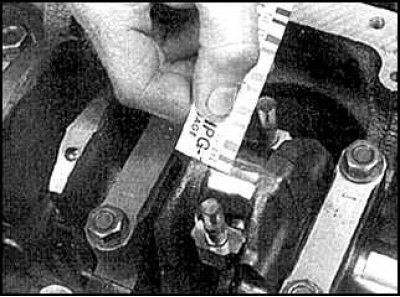


8. To measure the lubrication gap, you can use an internal micrometer or other special device, but…


9. After installing the piston into the cylinder, tighten the connecting rod cap bolts and check the connecting rod bearing lubrication clearance in the same way as checking the main bearing lubrication clearance.

10. If the gap size is not as required, the bearing shells may be the wrong size.

Final installation of pistons and connecting rods


1. Remove all traces of plastic. Make sure the bearing surface is completely clean and lubricate it with engine oil.

[Text taken from an online platform mazbook.ru]

2. Install the connecting rod onto the shaft journal, install the connecting rod cap and tighten the nuts to the required tightening torque.

3. The installation of the remaining connecting rods is carried out in a similar manner.

4. After installing all the connecting rods, turn the crankshaft several times and check for ease of movement.

5. Check the axial play of the connecting rods.
This article is available at: russian, bulgarian, belarusian, ukrainian, serbian, croatian, romanian, polish, slovak, hungarian
This text was checked by: Evgeny Mereshnikov
Share with friends on social networks:

Previous
Capella 5 » Overhaul engines 1.6 and 1.8
Next

Installing the rear crankshaft oil seal
Installing the crankshaft
Installing piston rings
Engine assembly procedure
Checking main and connecting rod bearings
Starting the engine after repair and running-in
More articles on repairing other Mazda models
Installing the cylinder head Mazda Familia 5 (1985-1989)
Installing the connecting rod bearing and cover Mazda3 BK (2003-2009)
Installing the connecting rod bearing and cover Mazda6 GG (2002-2008)
Checking the connecting rods of the cylinder block Mazda CX-5KE (2012-2017)
Connecting rods and pistons Mazda BT-50 (1) (2006-2011)
Link in different formats to this article
Comments and feedback from visitors
No comments yet


How much will 12 + 25 ?


Capella 6 (1997-2005, petrol) 
  • General information
  • Introduction to guide
  • User manual
  • Troubleshooting
  • Maintenance
  • Power unit
  • 4-cylinder engines
  • 6-cylinder engines
  • Engine overhaul
  • Cooling and ventilation
  • Power and exhaust systems
  • Engine electrics
  • Control system
  • Transmission
  • Mechanical gearbox
  • Automatic gearbox
  • Clutch and drive shafts
  • Chassis
  • Brake system
  • Car suspension
  • Steering
  • Body
  • Exterior (external elements)
  • Interior (internal elements)
  • Doors, windows and locks
  • Electrical equipment
  • Equipment and devices
  • Electrical circuits
Capella 5 (1991-1997) 
  • General information
  • User manual
  • Maintenance
  • Helpful hints
  • Power unit
  • Petrol engines 1.6 and 1.8
  • Petrol engines 2.0
  • 2.5 petrol engines
  • Overhaul engines 1.6 and 1.8
  • Overhaul engines 2.0 and 2.5
  • Diesel engine 2.0
  • Engine electrics
  • Cooling system
  • Air conditioner
  • Carburetor Nikki 30/34
  • Power system (1.6 and 1.8)
  • Power system (2.0 and 2.5)
  • Control system
  • Transmission
  • Mechanical gearbox
  • Automatic gearbox
  • Clutch and axles
  • Chassis
  • Brake system
  • Suspension and wheels
  • Steering
  • Body
  • Exterior (external elements)
  • Interior (internal elements)
  • Doors and windows
  • Electrical equipment
  • Equipment and devices
  • Electrical circuits
Capella 4 (1987-1992) 
  • General information
  • Introduction to manual
  • Vehicle specifications
  • Power unit
  • Engine repair
  • Lubrication system
  • Cooling system
  • Fuel system (carburetor)
  • Fuel injection (FE)
  • Fuel injection (DOHC)
  • Fuel system (diesel)
  • Ignition system
  • Transmission
  • Clutch
  • Gearbox
  • Drive shafts
  • Chassis
  • Front suspension
  • Rear suspension
  • Steering system
  • Brake system
  • Electrical equipment
  • Equipment and devices
  • Electrical circuits
Capella 3 and 4 (1982-1992) 
  • General information
  • User manual
  • Maintenance
  • Power unit
  • Gasoline engine
  • Engine overhaul (gasoline)
  • Diesel engine
  • Cooling and heating
  • Supply system
  • Ignition system
  • Emission reduction
  • Transmission
  • Clutch
  • Mechanical gearbox
  • Automatic gearbox
  • Drive shafts
  • Chassis
  • Brake system
  • Suspension and wheels
  • Steering
  • Body
  • Exterior (external elements)
  • Interior (internal elements)
  • Electrical equipment
  • Equipment and devices
  • Power devices
  • Electrical circuits
Capella 3 (1982-1992, petrol) 
  • General information
  • User manual
  • Maintenance
  • Troubleshooting
  • Late models
  • Power unit
  • Engine in car
  • Engine overhaul
  • Cooling and heating system
  • Fuel and exhaust system
  • Engine electrical system
  • Emission control system
  • Transmission
  • Mechanical gearbox
  • Automatic gearbox
  • Clutch and drive shafts
  • Chassis
  • Brake system
  • Suspension and wheels
  • Steering
  • Body
  • Exterior (external elements)
  • Interior (internal elements)
  • Electrical equipment
  • Equipment and devices
  • Lighting and lamps
  • Electrical circuits
MazBook.ru © 2018–2026 · Mobile version · Articles and news · Sitemap: EN BG BY UA RS HR RO PL SK HU · Feedback · Site search · Add to bookmarks Familia 5 (BF) · Familia 6 (BG) · Capella 3 (GC) · Capella 3 and 4 (GC) · Capella 4 (GD) · Capella 5 (GE) · Capella 6 (GF) · Mazda3 BK · Mazda6 GG · CX-5KE · Mazda 121 (3) · Mazda BT-50 (1) ·
By continuing to use the site, you agree to the use of cookies 🔐