
MazBook.ru
English Русский
Български
Беларускі
Український
Српски
Hrvatski
Română
Polski
Slovenský
Magyar
• Bookmark • Sitemap • Contacts •   
Cars Opel Cars Ford Cars Volkswagen Cars Audi Cars Kia Cars Renault Cars Peugeot


Familia Capella Mazda3 Mazda6 CX-? Others Articles
Capella 3 (1982-1992, petrol) Capella 3 and 4 (1982-1992) Capella 4 (1987-1992) Capella 5 (1991-1997) Capella 6 (1997-2005, petrol)

Checking main and connecting rod bearings (Mazda Capella GE)

  • Home
  • Mazda Capella
  • Capella GE (1991-1997)
  • Power unit
  • Overhaul engines 1.6 and 1.8
  • Checking main and connecting rod bearings
0

Causes of bearing wear
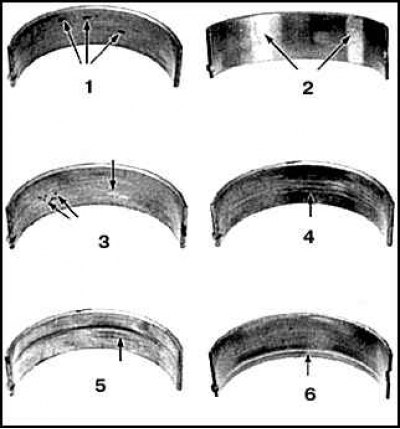


1. Reduction of the tensile strength of the metal; jagged scratches

1. Reduction of the tensile strength of the metal; jagged scratches
2. Incorrectly planted; bright (polished) stripes
3. Scratched with dirt; dirt has eaten into the bearing surface
4. Lack of oil; the top layer has worn off
5. Excessive wear; the top layer has worn off over the entire surface
6. The bearing is deformed; the top layer has worn off in a circle


Although main and connecting rod bearings must be replaced during a major engine overhaul, old bearings should be kept in their original location for careful inspection, as wear marks on these parts can help restore the overall condition of the engine.

Causes of crankshaft bearing failure include insufficient lubrication, the presence of dirt and foreign particles, engine overload and corrosion.

Regardless of the cause of bearing failure, it should be corrected before final engine assembly to avoid further damage to these parts.

(The original article is on: «MAZBOOK.RU»)

When checking bearings, they must be removed from their seats (from the cylinder block, crankshaft main bearing caps, connecting rod caps and connecting rods) and lay them out on a clean surface in the same order in which they were installed on the engine. This will allow the installation of a suitable crankshaft support where the bearing has been subjected to increased wear.


Dirt and foreign particles enter the engine for various reasons - during assembly, through filters or the crankcase ventilation system, through the oil.

Often, contaminants contain metal particles from mechanical processing of engine parts, or as a result of wear during normal engine operation. Sometimes the contamination contains residues of abrasive materials after lapping and grinding work, especially if there is insufficient rinsing and cleaning. Regardless of the cause of origin, foreign contaminants are usually embedded in the soft alloy of the bearing and are easily visible.

Large particles will not be able to penetrate the bearing and will cause scratches and scuffs on the surfaces of both the bearing and the crankshaft journals.

The best way to eliminate the cause of such wear is to thoroughly clean the parts and maintain impeccable cleanliness during the engine assembly process. To prevent premature wear, it is also recommended to change the oil and filters more frequently.

Insufficient engine lubrication can be caused by a number of interrelated reasons. These include excessive engine overheating (causes oil liquefaction), overloads (cause oil to be squeezed out from the surface of the bearings) and a decrease in pressure due to oil leakage (ejection) (due to increased clearances in bearings, wear of the oil pump, high crankshaft speed). Another cause of accelerated wear of crankshaft bearings is blocked oil passages, usually due to misalignment of lubrication holes in the bearing and its housing components, which leads to insufficient lubrication and failure. When failure is caused by insufficient lubrication, the bearing coating material is wiped or squeezed out of the steel base. The temperature rises to such a level that due to overheating the steel base of the bearing is discoloured blue, and the possibility of deformation of the bearing caps and connecting rod bolts cannot be ruled out.


The durability of crankshaft bearings also depends significantly on driving skills and the nature of the movement. Bearings experience increased loads when driving with the throttle fully open, during long-term driving at low speeds, and when slipping. Under increased loads, the oil film is squeezed out, and the bearings experience bending deformations, which cause microcracks to form (fatigue wear). Typically, the bearing coating is torn off from the steel base in the form of small particles. Short-distance travel can cause corrosive wear of bearings, as insufficient warming prevents the condensed moisture and gases that cause corrosion from being removed. These components accumulate in the oil, causing the formation of acids and insoluble precipitates. As oil reaches the bearings, they become corroded by the acids, causing them to deteriorate and fail.

Bearing failure can also be caused by improper installation during engine assembly. Too tight a fit will result in insufficient lubrication clearance and poor lubricant penetration. Dirt and foreign particles trapped under the back of the bearing cause uneven contact and premature failure.
This article is available at: russian, bulgarian, belarusian, ukrainian, serbian, croatian, romanian, polish, slovak, hungarian
This text was checked by: Evgeny Mereshnikov
Share with friends on social networks:

Previous
Capella 5 » Overhaul engines 1.6 and 1.8
Next

Checking the crankshaft
Checking pistons and connecting rods
Cylinder honing
Checking and cleaning the cylinder block
Removal the crankshaft
Engine assembly procedure
Installing piston rings
Installing the crankshaft
Installing the rear crankshaft oil seal
Installing pistons and connecting rods
More articles on repairing other Mazda models
Main technical characteristics of the engine Mazda Familia 5 (1985-1989)
Checking the connecting rod side clearance Mazda3 BK (2003-2009)
Checking the connecting rod side clearance Mazda6 GG (2002-2008)
Checking the piston with connecting rod in the cylinder block assembly Mazda CX-5KE (2012-2017)
Checking the electromagnetic valves for connecting and disconnecting… Mazda BT-50 (1) (2006-2011)
Link in different formats to this article
Comments and feedback from visitors
No comments yet


How much will 32 + 23 ?


Capella 6 (1997-2005, petrol) 
  • General information
  • Introduction to guide
  • User manual
  • Troubleshooting
  • Maintenance
  • Power unit
  • 4-cylinder engines
  • 6-cylinder engines
  • Engine overhaul
  • Cooling and ventilation
  • Power and exhaust systems
  • Engine electrics
  • Control system
  • Transmission
  • Mechanical gearbox
  • Automatic gearbox
  • Clutch and drive shafts
  • Chassis
  • Brake system
  • Car suspension
  • Steering
  • Body
  • Exterior (external elements)
  • Interior (internal elements)
  • Doors, windows and locks
  • Electrical equipment
  • Equipment and devices
  • Electrical circuits
Capella 5 (1991-1997) 
  • General information
  • User manual
  • Maintenance
  • Helpful hints
  • Power unit
  • Petrol engines 1.6 and 1.8
  • Petrol engines 2.0
  • 2.5 petrol engines
  • Overhaul engines 1.6 and 1.8
  • Overhaul engines 2.0 and 2.5
  • Diesel engine 2.0
  • Engine electrics
  • Cooling system
  • Air conditioner
  • Carburetor Nikki 30/34
  • Power system (1.6 and 1.8)
  • Power system (2.0 and 2.5)
  • Control system
  • Transmission
  • Mechanical gearbox
  • Automatic gearbox
  • Clutch and axles
  • Chassis
  • Brake system
  • Suspension and wheels
  • Steering
  • Body
  • Exterior (external elements)
  • Interior (internal elements)
  • Doors and windows
  • Electrical equipment
  • Equipment and devices
  • Electrical circuits
Capella 4 (1987-1992) 
  • General information
  • Introduction to manual
  • Vehicle specifications
  • Power unit
  • Engine repair
  • Lubrication system
  • Cooling system
  • Fuel system (carburetor)
  • Fuel injection (FE)
  • Fuel injection (DOHC)
  • Fuel system (diesel)
  • Ignition system
  • Transmission
  • Clutch
  • Gearbox
  • Drive shafts
  • Chassis
  • Front suspension
  • Rear suspension
  • Steering system
  • Brake system
  • Electrical equipment
  • Equipment and devices
  • Electrical circuits
Capella 3 and 4 (1982-1992) 
  • General information
  • User manual
  • Maintenance
  • Power unit
  • Gasoline engine
  • Engine overhaul (gasoline)
  • Diesel engine
  • Cooling and heating
  • Supply system
  • Ignition system
  • Emission reduction
  • Transmission
  • Clutch
  • Mechanical gearbox
  • Automatic gearbox
  • Drive shafts
  • Chassis
  • Brake system
  • Suspension and wheels
  • Steering
  • Body
  • Exterior (external elements)
  • Interior (internal elements)
  • Electrical equipment
  • Equipment and devices
  • Power devices
  • Electrical circuits
Capella 3 (1982-1992, petrol) 
  • General information
  • User manual
  • Maintenance
  • Troubleshooting
  • Late models
  • Power unit
  • Engine in car
  • Engine overhaul
  • Cooling and heating system
  • Fuel and exhaust system
  • Engine electrical system
  • Emission control system
  • Transmission
  • Mechanical gearbox
  • Automatic gearbox
  • Clutch and drive shafts
  • Chassis
  • Brake system
  • Suspension and wheels
  • Steering
  • Body
  • Exterior (external elements)
  • Interior (internal elements)
  • Electrical equipment
  • Equipment and devices
  • Lighting and lamps
  • Electrical circuits
MazBook.ru © 2018–2026 · Mobile version · Articles and news · Sitemap: EN BG BY UA RS HR RO PL SK HU · Feedback · Site search · Add to bookmarks Familia 5 (BF) · Familia 6 (BG) · Capella 3 (GC) · Capella 3 and 4 (GC) · Capella 4 (GD) · Capella 5 (GE) · Capella 6 (GF) · Mazda3 BK · Mazda6 GG · CX-5KE · Mazda 121 (3) · Mazda BT-50 (1) ·
By continuing to use the site, you agree to the use of cookies 🔐