MazBook.ru
English Русский
Български
Беларускі
Український
Српски
Hrvatski
Română
Polski
Slovenský
Magyar
• Bookmark • Sitemap • Contacts •   
Cars Opel Cars Ford Cars Volkswagen Cars Audi Cars Kia Cars Renault Cars Peugeot


Familia Capella Mazda3 Mazda6 CX-? Others Articles
Capella 3 (1982-1992, petrol) Capella 3 and 4 (1982-1992) Capella 4 (1987-1992) Capella 5 (1991-1997) Capella 6 (1997-2005, petrol)

Car radio and speakers — removal and installation (Mazda Capella GF)

  • Home
  • Mazda Capella
  • Capella GF (1997-2005)
  • Electrical equipment
  • Equipment and devices
  • Car radio and speakers — removal and installation
0
Contents: Car radio ⇓ Graphic equalizer ⇓ Front speakers ⇓ Rear speakers ⇓ High-frequency speakers ⇓
Warning. The models described in this manual are equipped with an airbag system. Before working in the immediate vicinity of impact sensors, the steering column, or the dashboard, disconnect the negative battery cable, then the positive battery cable, and wait at least 3 minutes. Accidental deployment of the airbag could result in injury (see paragraph 28).


Car radio


1. Disconnect the cable from the negative battery terminal.

Warning. If your car's radio has an anti-theft system, make sure you have the unlock code before disconnecting the battery.


2. On the Probe model, remove the car radio trim (see chapter 11).

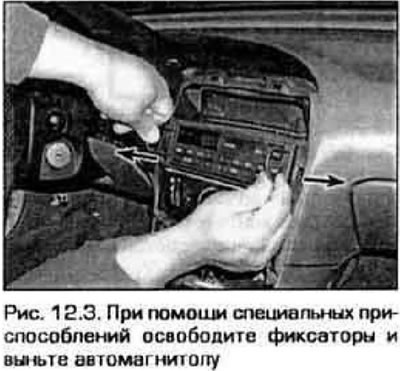
3. Remove the plugs from the technological holes. Insert two keys into the holes to remove the radio. Move the devices apart and remove them together with the car radio (figure 12.3).

3. Remove the plugs from the technological holes. Insert two keys into the holes to remove the…


4. Disconnect the antenna cable and electrical connectors from the car radio and remove the car radio from the vehicle.

5. Installation is carried out in the reverse order of removal.


Graphic equalizer


6. The graphic equalizer is installed as additional equipment on the reverse side of the central section of the front panel.

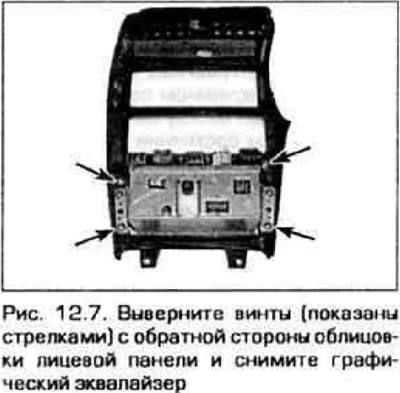
7. Remove the center section of the front panel trim (see chapter 11) and disconnect the wiring connector from the equalizer, Unscrew the mounting screws and remove the equalizer (figure 12.7).

7. Remove the center section of the front panel trim (see chapter 11) and disconnect the wiring…


Front speakers


8. Remove the front door trim (see chapter 11).

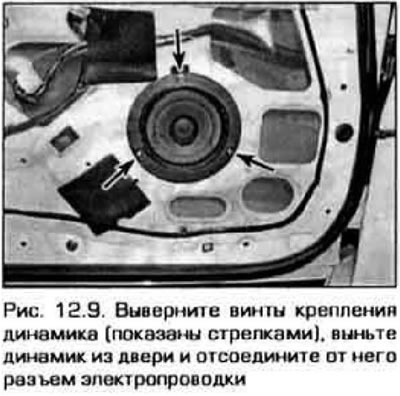
9. Remove the speaker mounting screws. Disconnect the wiring connector and remove the speaker from the vehicle (figure 12.9).

9. Remove the speaker mounting screws. Disconnect the wiring connector and remove the speaker from…


10. Installation is carried out in sequence. reverse of removal.

Rear speakers


11. On the Probe model, the rear speakers are mounted to the right and left of the rear seat. Remove the trim panels (see chapter 11). On the Mazda model, the rear speakers are mounted on the rear shelf. To access the speaker mounting screws, remove the decorative grilles.


12. Remove the speaker mounting screws. Disconnect the wiring connector and remove the speakers from the vehicle.

13. Installation is carried out in the reverse order of removal.

High-frequency speakers


14. In addition to the front and rear speakers, the Ethel models are equipped with tweeters. The speakers are mounted on the front panel. To crush the speaker, hook it by one of the corners. Remove the speaker and disconnect the wiring connector from it.

15. Installation is carried out in the reverse order of removal.
This article is available at: russian, bulgarian, belarusian, ukrainian, serbian, croatian, romanian, polish, slovak, hungarian
This text was checked by: German Vorobyov
Share with friends on social networks:

Previous
Capella 6 » Equipment and devices
Next

Dashboard — removal and installation
Dashboard Indicators — checking
Dashboard Switches — checking and replacing
Ignition Switch and Lock Cylinder — checking and replacing
Steering Column Switch Combination — checking and replacing
Antenna — replacement
Headlight bulbs — replacement
Headlights — adjustment
Headlights — replacement
Headlight Actuators (Probe Model Only) — inspection and replacement
More articles on repairing other Mazda models
Removal and installation the radio Mazda Familia 6 (1989-1994)
Removal and installation the radio Mazda 121 (3) (1996-2003)
Link in different formats to this article
Comments and feedback from visitors
No comments yet


How much will 20 + 47 ?


Capella 6 (1997-2005, petrol) 
  • General information
  • Introduction to guide
  • User manual
  • Troubleshooting
  • Maintenance
  • Power unit
  • 4-cylinder engines
  • 6-cylinder engines
  • Engine overhaul
  • Cooling and ventilation
  • Power and exhaust systems
  • Engine electrics
  • Control system
  • Transmission
  • Mechanical gearbox
  • Automatic gearbox
  • Clutch and drive shafts
  • Chassis
  • Brake system
  • Car suspension
  • Steering
  • Body
  • Exterior (external elements)
  • Interior (internal elements)
  • Doors, windows and locks
  • Electrical equipment
  • Equipment and devices
  • Electrical circuits
Capella 5 (1991-1997) 
  • General information
  • User manual
  • Maintenance
  • Helpful hints
  • Power unit
  • Petrol engines 1.6 and 1.8
  • Petrol engines 2.0
  • 2.5 petrol engines
  • Overhaul engines 1.6 and 1.8
  • Overhaul engines 2.0 and 2.5
  • Diesel engine 2.0
  • Engine electrics
  • Cooling system
  • Air conditioner
  • Carburetor Nikki 30/34
  • Power system (1.6 and 1.8)
  • Power system (2.0 and 2.5)
  • Control system
  • Transmission
  • Mechanical gearbox
  • Automatic gearbox
  • Clutch and axles
  • Chassis
  • Brake system
  • Suspension and wheels
  • Steering
  • Body
  • Exterior (external elements)
  • Interior (internal elements)
  • Doors and windows
  • Electrical equipment
  • Equipment and devices
  • Electrical circuits
Capella 4 (1987-1992) 
  • General information
  • Introduction to manual
  • Vehicle specifications
  • Power unit
  • Engine repair
  • Lubrication system
  • Cooling system
  • Fuel system (carburetor)
  • Fuel injection (FE)
  • Fuel injection (DOHC)
  • Fuel system (diesel)
  • Ignition system
  • Transmission
  • Clutch
  • Gearbox
  • Drive shafts
  • Chassis
  • Front suspension
  • Rear suspension
  • Steering system
  • Brake system
  • Electrical equipment
  • Equipment and devices
  • Electrical circuits
Capella 3 and 4 (1982-1992) 
  • General information
  • User manual
  • Maintenance
  • Power unit
  • Gasoline engine
  • Engine overhaul (gasoline)
  • Diesel engine
  • Cooling and heating
  • Supply system
  • Ignition system
  • Emission reduction
  • Transmission
  • Clutch
  • Mechanical gearbox
  • Automatic gearbox
  • Drive shafts
  • Chassis
  • Brake system
  • Suspension and wheels
  • Steering
  • Body
  • Exterior (external elements)
  • Interior (internal elements)
  • Electrical equipment
  • Equipment and devices
  • Power devices
  • Electrical circuits
Capella 3 (1982-1992, petrol) 
  • General information
  • User manual
  • Maintenance
  • Troubleshooting
  • Late models
  • Power unit
  • Engine in car
  • Engine overhaul
  • Cooling and heating system
  • Fuel and exhaust system
  • Engine electrical system
  • Emission control system
  • Transmission
  • Mechanical gearbox
  • Automatic gearbox
  • Clutch and drive shafts
  • Chassis
  • Brake system
  • Suspension and wheels
  • Steering
  • Body
  • Exterior (external elements)
  • Interior (internal elements)
  • Electrical equipment
  • Equipment and devices
  • Lighting and lamps
  • Electrical circuits
MazBook.ru © 2018–2026 · Mobile version · Articles and news · Sitemap: EN BG BY UA RS HR RO PL SK HU · Feedback · Site search · Add to bookmarks Familia 5 (BF) · Familia 6 (BG) · Capella 3 (GC) · Capella 3 and 4 (GC) · Capella 4 (GD) · Capella 5 (GE) · Capella 6 (GF) · Mazda3 BK · Mazda6 GG · CX-5KE · Mazda 121 (3) · Mazda BT-50 (1) ·
By continuing to use the site, you agree to the use of cookies 🔐