
MazBook.ru
English Русский
Български
Беларускі
Український
Српски
Hrvatski
Română
Polski
Slovenský
Magyar
• Bookmark • Sitemap • Contacts •   
Cars Opel Cars Ford Cars Volkswagen Cars Audi Cars Kia Cars Renault Cars Peugeot


Familia Capella Mazda3 Mazda6 CX-? Others Articles
Capella 3 (1982-1992, petrol) Capella 3 and 4 (1982-1992) Capella 4 (1987-1992) Capella 5 (1991-1997) Capella 6 (1997-2005, petrol)

Airbag system — basic information, removal and installation (Mazda Capella GF)

  • Home
  • Mazda Capella
  • Capella GF (1997-2005)
  • Electrical equipment
  • Equipment and devices
  • Airbag system — basic information, removal and installation
0
Contents: Basic information ⇓ Operating principle ⇓ Self-diagnosis system ⇓ Servicing components located near…⇓ Disabling the ladushki system ⇓ Removal and installation ⇓

Basic information


1. All models of cars described in this Manual. equipped with an airbag system. This system consists of two pillows (driver's airbag and front passenger airbag) and is designed to protect the driver and passenger in the event of a frontal vehicle collision.

2. The airbag system is controlled by an electronic unit, which includes a crash sensor, a self-diagnosis circuit, and a backup power supply circuit. The control unit is installed under the front panel (figure 28.2). In addition, the system includes two impact sensors, a driver's airbag unit mounted on the steering wheel, and a passenger airbag unit mounted above the glove box.
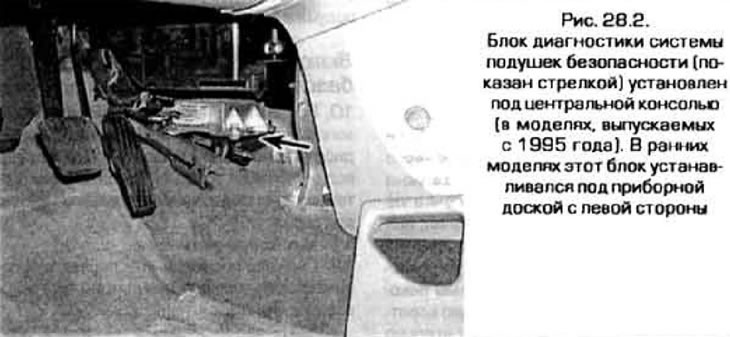
2. The airbag system is controlled by an electronic unit, which includes a crash sensor, a…


Operating principle


3. In order for the airbags to deploy, the control system must receive a signal from the crash sensors and one or both of the acceleration sensors. In this case, the circuit is closed and the airbags inflate. If the car battery fails (or its voltage is insufficient) the airbag inflation circuit is powered by a backup power source (installed inside the control unit).


Self-diagnosis system


4. The self-diagnostic system is activated when the ignition is turned on. At this point, the system's warning light comes on. If the system is working properly, the indicator light should go out after approximately 6 seconds. If the warning light does not come on when the ignition is turned on, or does not go out after 6 seconds, this indicates a malfunction in the airbag system. It is recommended that any malfunction of this system be corrected as soon as possible. Do not attempt to find and fix the system malfunction yourself - even the slightest mistake on your part may prevent the system from working when needed.

Servicing components located near the airbag system


5. From time to time, it becomes necessary to remove the steering wheel, car radio, or other components located near the airbag system. In particular, this concerns both the system units themselves and its electrical wiring. The airbag system wiring is very easy to identify because it is bright yellow in color. Do not disconnect the airbag system wiring connectors or connect a tester to these wires, as this may cause the airbags to deploy. Always disconnect the airbag system before working near its components or wiring.

Disabling the ladushki system


Caution! Before working near air bag system components or wiring, always turn off the air bag system.


6. Disconnect the negative battery cable, then disconnect the positive battery cable and wait for at least 2 minutes.

Caution: If your car's radio is equipped with a coded anti-theft system, make sure you know the unlock code before disconnecting the battery.


Driver's airbag


7. Remove the trim panel under the steering column and disconnect the driver's airbag wiring connector.

Passenger airbag


8. Remove the glove compartment (see chapter 11).

9. Disconnect the passenger airbag wiring connector.

(The full text is on the website: «MazBook.ru»)

Activating the airbag system


10. After disabling the airbag system and completing the scheduled work, reconnect the electrical connectors to the airbag units. Replace the trim panel and glove box.

11. Start the ignition.

12. First connect the wire to the positive battery terminal, then to the negative one.

Removal and installation


Driver's airbag


13. Removal and installation of the driver's airbag are described in chapter 10.

Passenger airbag


14. Disconnect the negative battery cable, then disconnect the positive battery cable and wait at least 2 minutes.

Caution: If your car's radio is equipped with a coded anti-theft system, make sure you know the unlock code before disconnecting the battery.


15. Remove the glove compartment (see chapter 11).

16. Disconnect the electrical wiring connectors from the airbag unit. Unscrew the block mounting bolts, carefully lift the pillow block and remove it from the front panel.

Warning: Be extremely careful when touching the bottom of the unit. Excessive force may cause the airbag to deploy.


17. Installation is carried out in the reverse order of removal.
This article is available at: russian, bulgarian, belarusian, ukrainian, serbian, croatian, romanian, polish, slovak, hungarian
This text was checked by: German Vorobyov
Share with friends on social networks:

Previous
Capella 6 » Equipment and devices
Next

Electric Sunroof — description and testing
Electrically powered mirrors — description and testing
Central door locking system and remote control system
Electric window system — description and testing
Cruise control system — description, testing and adjustment of the…
More articles on repairing other Mazda models
Basic special tool Mazda Familia 5 (1985-1989)
General information about the exhaust system Mazda3 BK (2003-2009)
Airbag and seat belt pretensioner system malfunction indicator Mazda6 GG (2002-2008)
Airbag system Mazda CX-5KE (2012-2017)
Engine lubrication system — general information Mazda 121 (3) (1996-2003)
Link in different formats to this article
Comments and feedback from visitors
No comments yet


How much will 34 + 44 ?


Capella 6 (1997-2005, petrol) 
  • General information
  • Introduction to guide
  • User manual
  • Troubleshooting
  • Maintenance
  • Power unit
  • 4-cylinder engines
  • 6-cylinder engines
  • Engine overhaul
  • Cooling and ventilation
  • Power and exhaust systems
  • Engine electrics
  • Control system
  • Transmission
  • Mechanical gearbox
  • Automatic gearbox
  • Clutch and drive shafts
  • Chassis
  • Brake system
  • Car suspension
  • Steering
  • Body
  • Exterior (external elements)
  • Interior (internal elements)
  • Doors, windows and locks
  • Electrical equipment
  • Equipment and devices
  • Electrical circuits
Capella 5 (1991-1997) 
  • General information
  • User manual
  • Maintenance
  • Helpful hints
  • Power unit
  • Petrol engines 1.6 and 1.8
  • Petrol engines 2.0
  • 2.5 petrol engines
  • Overhaul engines 1.6 and 1.8
  • Overhaul engines 2.0 and 2.5
  • Diesel engine 2.0
  • Engine electrics
  • Cooling system
  • Air conditioner
  • Carburetor Nikki 30/34
  • Power system (1.6 and 1.8)
  • Power system (2.0 and 2.5)
  • Control system
  • Transmission
  • Mechanical gearbox
  • Automatic gearbox
  • Clutch and axles
  • Chassis
  • Brake system
  • Suspension and wheels
  • Steering
  • Body
  • Exterior (external elements)
  • Interior (internal elements)
  • Doors and windows
  • Electrical equipment
  • Equipment and devices
  • Electrical circuits
Capella 4 (1987-1992) 
  • General information
  • Introduction to manual
  • Vehicle specifications
  • Power unit
  • Engine repair
  • Lubrication system
  • Cooling system
  • Fuel system (carburetor)
  • Fuel injection (FE)
  • Fuel injection (DOHC)
  • Fuel system (diesel)
  • Ignition system
  • Transmission
  • Clutch
  • Gearbox
  • Drive shafts
  • Chassis
  • Front suspension
  • Rear suspension
  • Steering system
  • Brake system
  • Electrical equipment
  • Equipment and devices
  • Electrical circuits
Capella 3 and 4 (1982-1992) 
  • General information
  • User manual
  • Maintenance
  • Power unit
  • Gasoline engine
  • Engine overhaul (gasoline)
  • Diesel engine
  • Cooling and heating
  • Supply system
  • Ignition system
  • Emission reduction
  • Transmission
  • Clutch
  • Mechanical gearbox
  • Automatic gearbox
  • Drive shafts
  • Chassis
  • Brake system
  • Suspension and wheels
  • Steering
  • Body
  • Exterior (external elements)
  • Interior (internal elements)
  • Electrical equipment
  • Equipment and devices
  • Power devices
  • Electrical circuits
Capella 3 (1982-1992, petrol) 
  • General information
  • User manual
  • Maintenance
  • Troubleshooting
  • Late models
  • Power unit
  • Engine in car
  • Engine overhaul
  • Cooling and heating system
  • Fuel and exhaust system
  • Engine electrical system
  • Emission control system
  • Transmission
  • Mechanical gearbox
  • Automatic gearbox
  • Clutch and drive shafts
  • Chassis
  • Brake system
  • Suspension and wheels
  • Steering
  • Body
  • Exterior (external elements)
  • Interior (internal elements)
  • Electrical equipment
  • Equipment and devices
  • Lighting and lamps
  • Electrical circuits
MazBook.ru © 2018–2026 · Mobile version · Articles and news · Sitemap: EN BG BY UA RS HR RO PL SK HU · Feedback · Site search · Add to bookmarks Familia 5 (BF) · Familia 6 (BG) · Capella 3 (GC) · Capella 3 and 4 (GC) · Capella 4 (GD) · Capella 5 (GE) · Capella 6 (GF) · Mazda3 BK · Mazda6 GG · CX-5KE · Mazda 121 (3) · Mazda BT-50 (1) ·
By continuing to use the site, you agree to the use of cookies 🔐