MazBook.ru
English Русский
Български
Беларускі
Український
Српски
Hrvatski
Română
Polski
Slovenský
Magyar
• Bookmark • Sitemap • Contacts •   
Cars Opel Cars Ford Cars Volkswagen Cars Audi Cars Kia Cars Renault Cars Peugeot


Familia Capella Mazda3 Mazda6 CX-? Others Articles
Capella 3 (1982-1992, petrol) Capella 3 and 4 (1982-1992) Capella 4 (1987-1992) Capella 5 (1991-1997) Capella 6 (1997-2005, petrol)

Radiator and expansion tank — removal and installation (Mazda Capella GF)

  • Home
  • Mazda Capella
  • Capella GF (1997-2005)
  • Power unit
  • Cooling and ventilation
  • Radiator and expansion tank — removal and installation
0
Contents: Expansion tank ⇓ Radiator ⇓
Caution: Do not begin this work until the engine has cooled down.


Expansion tank


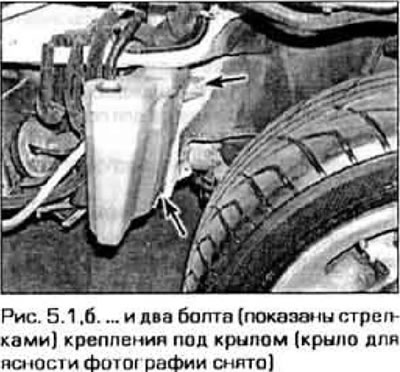
1. Disconnect the hose from the expansion tank neck that connects it to the radiator. Remove the tank mounting bolts and remove it from the vehicle (figure 5.1, a, b). Drain the liquid from the tank into a suitable container. Inspect the tank for cracks and other damage.

1. Disconnect the hose from the expansion tank neck that connects it to the radiator. Remove the…

Radiator


2. Disconnect the negative cable from the battery.

Caution: If your vehicle's audio system is equipped with anti-theft protection, make sure you have the unlock code before disconnecting the battery.


3. Drain the coolant into a clean container.

4. Remove the fans (see paragraph 4).

5. Disconnect the expansion tank hose from the radiator neck. Loosen the upper and lower radiator hose clamps and disconnect the hoses (figure 5.5).
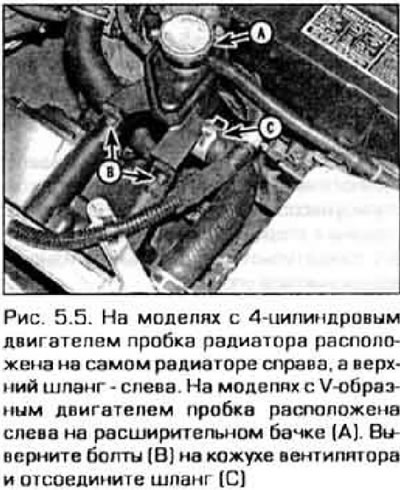


5. Disconnect the expansion tank hose from the radiator neck. Loosen the upper and lower radiator…


6. On models with automatic transmission, disconnect the oil cooler hoses from the radiator (figure 5.6). Place a container underneath to collect the transmission fluid and plug the openings to prevent dirt from entering the system.
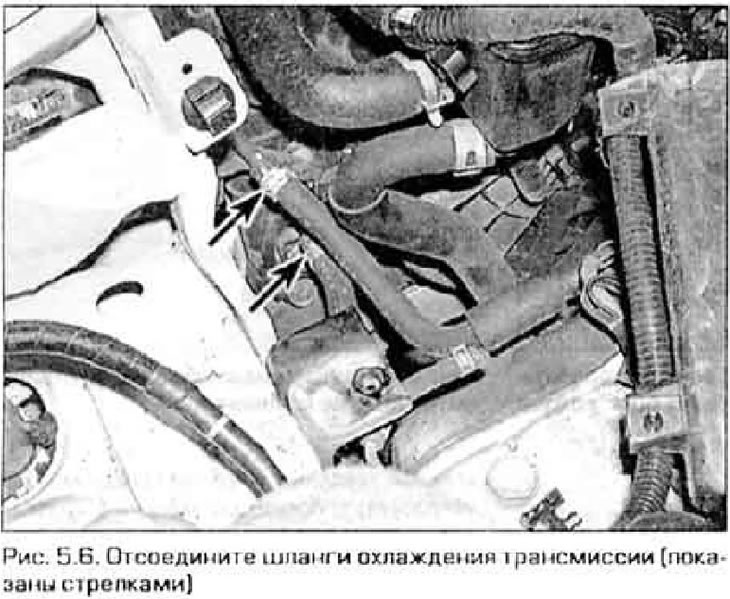
6. On models with automatic transmission, disconnect the oil cooler hoses from the radiator (figure…


7. Remove the radiator mounting bolts (one on each side) and pull the radiator up (figure 5.7).
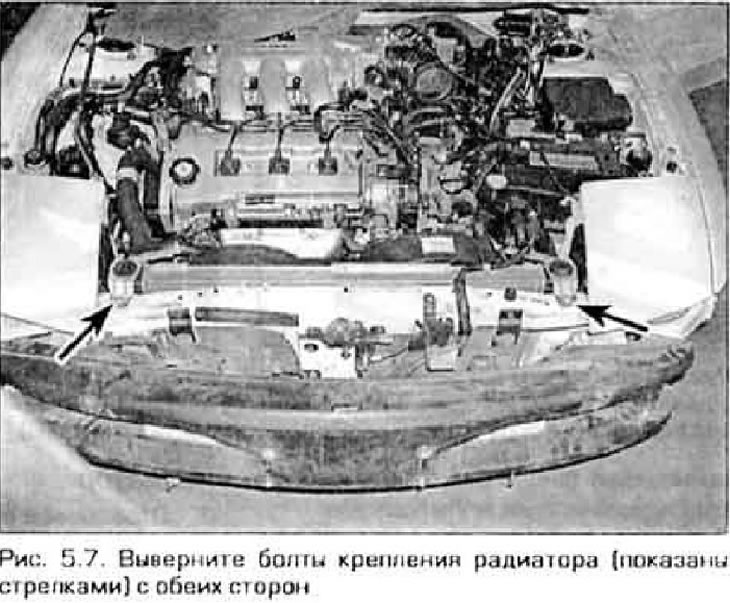
7. Remove the radiator mounting bolts (one on each side) and pull the radiator up (figure 5.7).


Note: The radiator is mounted on the support frame from below without bolts.


8. After removing the radiator, it can be checked for leaks, damage and blockage of the core tubes. If repairs are necessary, take it to a service station or a specialized workshop, as repairs require specialized equipment and technology.

9. External contamination of the core by insects, leaves and other dirt can be removed with a soft brush and compressed air. Do not attempt to repair bent grill ribs yourself.

The original text is published on: MAZBOOK

Caution! Protect your eyes when working with compressed air.


10. The radiator is installed in reverse order. Install the radiator correctly into the support frame. Tighten the fan shroud and intake duct mounting bolts securely.

11. Fill the cooling system with the same liquid as before. If necessary, please contact for details chapter 1.

12. Start the engine and check for leaks. Warm up the engine to normal operating temperature when both radiator hoses are hot. Check the coolant level and top up if necessary.

13. On models with automatic transmission, check the transmission fluid level and top up as needed.
This article is available at: russian, bulgarian, belarusian, ukrainian, serbian, croatian, romanian, polish, slovak, hungarian
This text was checked by: German Vorobyov
Share with friends on social networks:

Previous
Capella 6 » Cooling and ventilation
Next

Cooling system fans and their circuits — inspection and replacement
Thermostat — checking and replacing
Coolant — basic information
General information about the cooling and ventilation system
Technical data of the cooling and ventilation system
Water pump — checking
Water pump — replacement
Coolant Temperature Indicator Sensor — checking and replacing
Oil Heat Exchanger (V-Type Engines) — removal and installation
Heater Fan and Circuit — checking
More articles on repairing other Mazda models
Removal and installation the radiator Mazda Familia 6 (1989-1994)
Fan, radiator fairing, expansion tank of the cooling system Mazda3 BK (2003-2009)
Fan, radiator fairing, expansion tank of the cooling system Mazda6 GG (2002-2008)
Removal and installation the expansion tank of the cooling system Mazda CX-5KE (2012-2017)
Expansion tank — removal and installation Mazda BT-50 (1) (2006-2011)
Link in different formats to this article
Comments and feedback from visitors
No comments yet


How much will 44 + 20 ?


Capella 6 (1997-2005, petrol) 
  • General information
  • Introduction to guide
  • User manual
  • Troubleshooting
  • Maintenance
  • Power unit
  • 4-cylinder engines
  • 6-cylinder engines
  • Engine overhaul
  • Cooling and ventilation
  • Power and exhaust systems
  • Engine electrics
  • Control system
  • Transmission
  • Mechanical gearbox
  • Automatic gearbox
  • Clutch and drive shafts
  • Chassis
  • Brake system
  • Car suspension
  • Steering
  • Body
  • Exterior (external elements)
  • Interior (internal elements)
  • Doors, windows and locks
  • Electrical equipment
  • Equipment and devices
  • Electrical circuits
Capella 5 (1991-1997) 
  • General information
  • User manual
  • Maintenance
  • Helpful hints
  • Power unit
  • Petrol engines 1.6 and 1.8
  • Petrol engines 2.0
  • 2.5 petrol engines
  • Overhaul engines 1.6 and 1.8
  • Overhaul engines 2.0 and 2.5
  • Diesel engine 2.0
  • Engine electrics
  • Cooling system
  • Air conditioner
  • Carburetor Nikki 30/34
  • Power system (1.6 and 1.8)
  • Power system (2.0 and 2.5)
  • Control system
  • Transmission
  • Mechanical gearbox
  • Automatic gearbox
  • Clutch and axles
  • Chassis
  • Brake system
  • Suspension and wheels
  • Steering
  • Body
  • Exterior (external elements)
  • Interior (internal elements)
  • Doors and windows
  • Electrical equipment
  • Equipment and devices
  • Electrical circuits
Capella 4 (1987-1992) 
  • General information
  • Introduction to manual
  • Vehicle specifications
  • Power unit
  • Engine repair
  • Lubrication system
  • Cooling system
  • Fuel system (carburetor)
  • Fuel injection (FE)
  • Fuel injection (DOHC)
  • Fuel system (diesel)
  • Ignition system
  • Transmission
  • Clutch
  • Gearbox
  • Drive shafts
  • Chassis
  • Front suspension
  • Rear suspension
  • Steering system
  • Brake system
  • Electrical equipment
  • Equipment and devices
  • Electrical circuits
Capella 3 and 4 (1982-1992) 
  • General information
  • User manual
  • Maintenance
  • Power unit
  • Gasoline engine
  • Engine overhaul (gasoline)
  • Diesel engine
  • Cooling and heating
  • Supply system
  • Ignition system
  • Emission reduction
  • Transmission
  • Clutch
  • Mechanical gearbox
  • Automatic gearbox
  • Drive shafts
  • Chassis
  • Brake system
  • Suspension and wheels
  • Steering
  • Body
  • Exterior (external elements)
  • Interior (internal elements)
  • Electrical equipment
  • Equipment and devices
  • Power devices
  • Electrical circuits
Capella 3 (1982-1992, petrol) 
  • General information
  • User manual
  • Maintenance
  • Troubleshooting
  • Late models
  • Power unit
  • Engine in car
  • Engine overhaul
  • Cooling and heating system
  • Fuel and exhaust system
  • Engine electrical system
  • Emission control system
  • Transmission
  • Mechanical gearbox
  • Automatic gearbox
  • Clutch and drive shafts
  • Chassis
  • Brake system
  • Suspension and wheels
  • Steering
  • Body
  • Exterior (external elements)
  • Interior (internal elements)
  • Electrical equipment
  • Equipment and devices
  • Lighting and lamps
  • Electrical circuits
MazBook.ru © 2018–2026 · Mobile version · Articles and news · Sitemap: EN BG BY UA RS HR RO PL SK HU · Feedback · Site search · Add to bookmarks Familia 5 (BF) · Familia 6 (BG) · Capella 3 (GC) · Capella 3 and 4 (GC) · Capella 4 (GD) · Capella 5 (GE) · Capella 6 (GF) · Mazda3 BK · Mazda6 GG · CX-5KE · Mazda 121 (3) · Mazda BT-50 (1) ·
By continuing to use the site, you agree to the use of cookies 🔐