
MazBook.ru
English Русский
Български
Беларускі
Український
Српски
Hrvatski
Română
Polski
Slovenský
Magyar
• Bookmark • Sitemap • Contacts •   
Cars Opel Cars Ford Cars Volkswagen Cars Audi Cars Kia Cars Renault Cars Peugeot


Familia Capella Mazda3 Mazda6 CX-? Others Articles
Capella 3 (1982-1992, petrol) Capella 3 and 4 (1982-1992) Capella 4 (1987-1992) Capella 5 (1991-1997) Capella 6 (1997-2005, petrol)

Thermostat — checking and replacing (Mazda Capella GF)

  • Home
  • Mazda Capella
  • Capella GF (1997-2005)
  • Power unit
  • Cooling and ventilation
  • Thermostat — checking and replacing
0
Contents: Examination ⇓ Replacement ⇓
Caution! Do not remove the radiator cap, drain the coolant, or disassemble the thermostat until the engine has completely cooled down.


Examination


1. Before checking the thermostat, check the coolant level (see chapter 1), alternator belt tension (see chapter 1), as well as the serviceability of the coolant temperature sensor.

2. If the engine warms up too slowly (according to the temperature sensor readings), the problem is probably caused by the thermostat not closing. Replace the thermostat.

3. If the engine is overheating, touch the upper radiator hose with your hand. If the hose is cold and the engine is hot, the problem is likely due to the thermostat not opening and fluid not circulating through the radiator. Replace the thermostat.

Warning. Do not drive your car without a thermostat. The computer will operate without feedback, which may result in increased exhaust emissions and decreased fuel economy.


4. If the bottom hose is hot, the thermostat is open. To locate and correct the problem, please refer to the Troubleshooting section at the beginning of this Manuals.

5. A more thorough inspection of the thermostat is possible only after removing it from the engine (see below). If the thermostat remains open at room temperature, it is faulty and must be replaced.

6. To fully test the thermostat, hang the thermostat on a wire in a container of water. It is better if the container is transparent so that you can observe the behavior of the thermostat during this test. Place a thermometer with a 100-degree scale into the container.


7. Heat the water in the container, observing the thermostat and the thermometer. Neither of them should touch the walls of the container (figure 3.7).
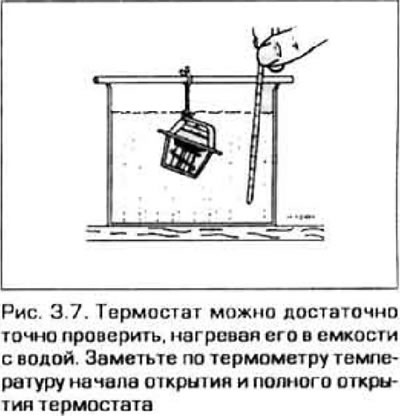
7. Heat the water in the container, observing the thermostat and the thermometer. Neither of them…


8. Note the temperature values at which the thermostat begins to open and opens fully. Compare the obtained results with the values. given in Technical data at the beginning of this chapter. Usually the thermostat itself has a stamped temperature value indicating its full opening temperature. The thermostat must open at least 8.5 mm.

9. If the thermostat does not open or close at the specified temperature, or if it gets stuck in some middle position, replace it.

Replacement


10. Disconnect the negative cable from the battery.

Caution: If your vehicle's audio system is equipped with anti-theft protection, make sure you have the unlock code before disconnecting the battery.


11. Drain the coolant from the radiator (see chapter 1). On a V-engine, remove the air intake duct.

12. Disconnect the hose from the thermostat cover, unscrew the cover bolts (figure 3.12,a,6).
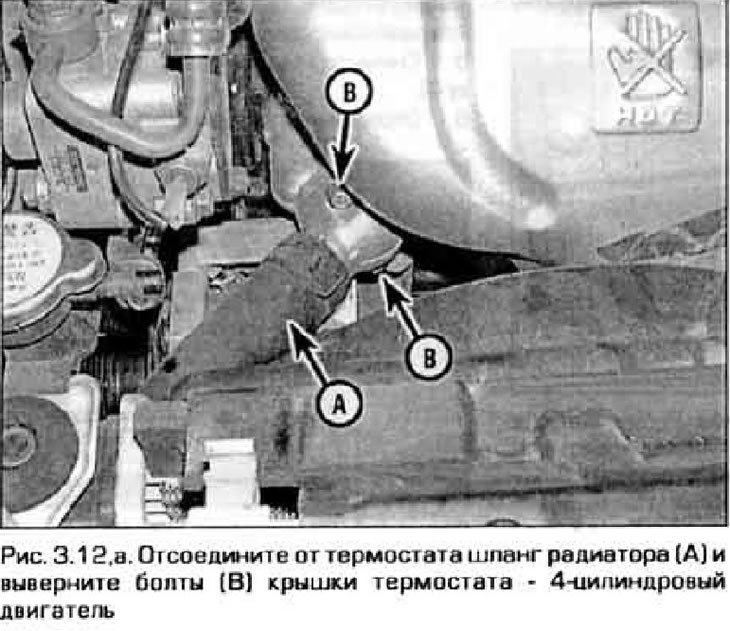
12. Disconnect the hose from the thermostat cover, unscrew the cover bolts (figure 3.12,a,6).
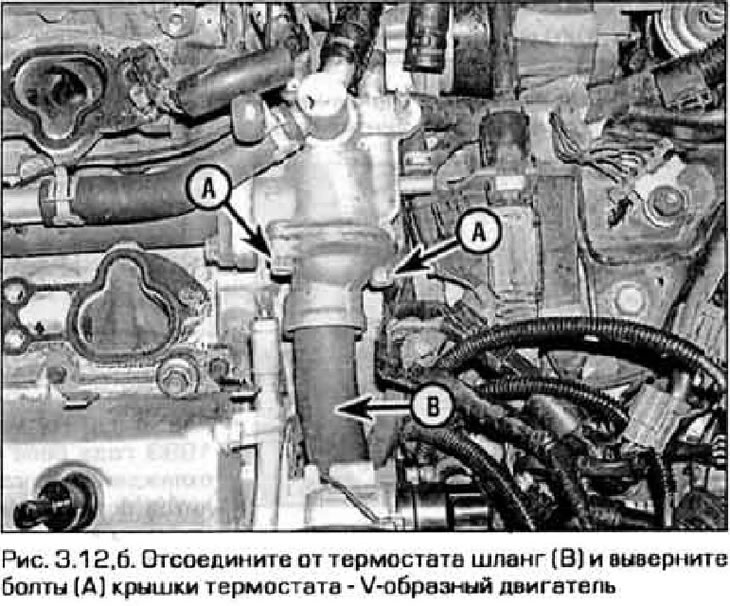

12. Disconnect the hose from the thermostat cover, unscrew the cover bolts (figure 3.12,a,6).


13. Remove the thermostat cover. Be prepared for some coolant to spill when doing this.


14. Remove the thermostat, noting its location in the cylinder block.

15. Clean the mating surfaces thoroughly. Install a new O-ring onto the thermostat.

16. Install the thermostat with the spring inward and align the protrusion on the thermostat with the cutout in the housing (figure 3.16).
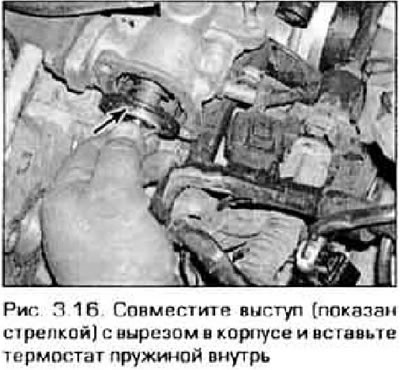
16. Install the thermostat with the spring inward and align the protrusion on the thermostat with…


17. The remaining actions are performed in the reverse order of removal. Tighten the thermostat mounting bolts to the specified torque. Add coolant, start the engine and check for leaks and that the cooling system is in good working order.
This article is available at: russian, bulgarian, belarusian, ukrainian, serbian, croatian, romanian, polish, slovak, hungarian
This text was checked by: German Vorobyov
Share with friends on social networks:

Previous
Capella 6 » Cooling and ventilation
Next

Coolant — basic information
General information about the cooling and ventilation system
Technical data of the cooling and ventilation system
Cooling system fans and their circuits — inspection and replacement
Radiator and expansion tank — removal and installation
Water pump — checking
Water pump — replacement
Coolant Temperature Indicator Sensor — checking and replacing
More articles on repairing other Mazda models
Checking/disassembling the drive shaft/replacing the seals Mazda Familia 6 (1989-1994)
Checking the level and replacing oil in the manual transmission Mazda3 BK (2003-2009)
Checking the Thermostat Mazda6 GG (2002-2008)
Checking the Thermostat Mazda CX-5KE (2012-2017)
Checking and replacing the air filter Mazda BT-50 (1) (2006-2011)
Link in different formats to this article
Comments and feedback from visitors
No comments yet


How much will 17 + 36 ?


Capella 6 (1997-2005, petrol) 
  • General information
  • Introduction to guide
  • User manual
  • Troubleshooting
  • Maintenance
  • Power unit
  • 4-cylinder engines
  • 6-cylinder engines
  • Engine overhaul
  • Cooling and ventilation
  • Power and exhaust systems
  • Engine electrics
  • Control system
  • Transmission
  • Mechanical gearbox
  • Automatic gearbox
  • Clutch and drive shafts
  • Chassis
  • Brake system
  • Car suspension
  • Steering
  • Body
  • Exterior (external elements)
  • Interior (internal elements)
  • Doors, windows and locks
  • Electrical equipment
  • Equipment and devices
  • Electrical circuits
Capella 5 (1991-1997) 
  • General information
  • User manual
  • Maintenance
  • Helpful hints
  • Power unit
  • Petrol engines 1.6 and 1.8
  • Petrol engines 2.0
  • 2.5 petrol engines
  • Overhaul engines 1.6 and 1.8
  • Overhaul engines 2.0 and 2.5
  • Diesel engine 2.0
  • Engine electrics
  • Cooling system
  • Air conditioner
  • Carburetor Nikki 30/34
  • Power system (1.6 and 1.8)
  • Power system (2.0 and 2.5)
  • Control system
  • Transmission
  • Mechanical gearbox
  • Automatic gearbox
  • Clutch and axles
  • Chassis
  • Brake system
  • Suspension and wheels
  • Steering
  • Body
  • Exterior (external elements)
  • Interior (internal elements)
  • Doors and windows
  • Electrical equipment
  • Equipment and devices
  • Electrical circuits
Capella 4 (1987-1992) 
  • General information
  • Introduction to manual
  • Vehicle specifications
  • Power unit
  • Engine repair
  • Lubrication system
  • Cooling system
  • Fuel system (carburetor)
  • Fuel injection (FE)
  • Fuel injection (DOHC)
  • Fuel system (diesel)
  • Ignition system
  • Transmission
  • Clutch
  • Gearbox
  • Drive shafts
  • Chassis
  • Front suspension
  • Rear suspension
  • Steering system
  • Brake system
  • Electrical equipment
  • Equipment and devices
  • Electrical circuits
Capella 3 and 4 (1982-1992) 
  • General information
  • User manual
  • Maintenance
  • Power unit
  • Gasoline engine
  • Engine overhaul (gasoline)
  • Diesel engine
  • Cooling and heating
  • Supply system
  • Ignition system
  • Emission reduction
  • Transmission
  • Clutch
  • Mechanical gearbox
  • Automatic gearbox
  • Drive shafts
  • Chassis
  • Brake system
  • Suspension and wheels
  • Steering
  • Body
  • Exterior (external elements)
  • Interior (internal elements)
  • Electrical equipment
  • Equipment and devices
  • Power devices
  • Electrical circuits
Capella 3 (1982-1992, petrol) 
  • General information
  • User manual
  • Maintenance
  • Troubleshooting
  • Late models
  • Power unit
  • Engine in car
  • Engine overhaul
  • Cooling and heating system
  • Fuel and exhaust system
  • Engine electrical system
  • Emission control system
  • Transmission
  • Mechanical gearbox
  • Automatic gearbox
  • Clutch and drive shafts
  • Chassis
  • Brake system
  • Suspension and wheels
  • Steering
  • Body
  • Exterior (external elements)
  • Interior (internal elements)
  • Electrical equipment
  • Equipment and devices
  • Lighting and lamps
  • Electrical circuits
MazBook.ru © 2018–2026 · Mobile version · Articles and news · Sitemap: EN BG BY UA RS HR RO PL SK HU · Feedback · Site search · Add to bookmarks Familia 5 (BF) · Familia 6 (BG) · Capella 3 (GC) · Capella 3 and 4 (GC) · Capella 4 (GD) · Capella 5 (GE) · Capella 6 (GF) · Mazda3 BK · Mazda6 GG · CX-5KE · Mazda 121 (3) · Mazda BT-50 (1) ·
By continuing to use the site, you agree to the use of cookies 🔐