
Note. When checking fluid levels, the vehicle must be on level ground.
Engine oil
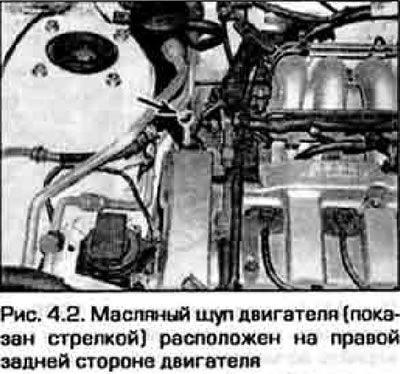
2. The engine oil level is checked using the oil dipstick located on the right rear side of the engine (pic. 4.2). The dipstick is inserted into the guide tube and lowered through it into the oil pan.
3. Checking the oil level should be done before starting the engine or not earlier than 15 minutes after stopping it. If the oil level is checked immediately after a trip, some oil will remain on the upper parts of the engine and the check will give an incorrect result.
4. Remove the dipstick from the tube and wipe it with a clean cloth or paper towel. Insert a clean dipstick into the tube and pull it out again. Inspect the end of the dipstick - a trace of oil should be between the marks on the dipstick (pic. 4.4).
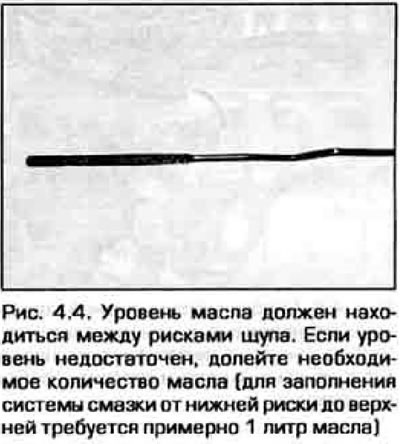
5. Approximately 1 liter of oil is required to raise the level from the lower line to the upper one. Do not allow the level to fall below the lower mark - in this case, oil starvation of the engine may occur, which will lead to serious malfunctions. Conversely, overfilling the engine with oil (above the upper level on the probe) can cause oil to get on the spark plugs, oil leaks and damage to the cuffs,
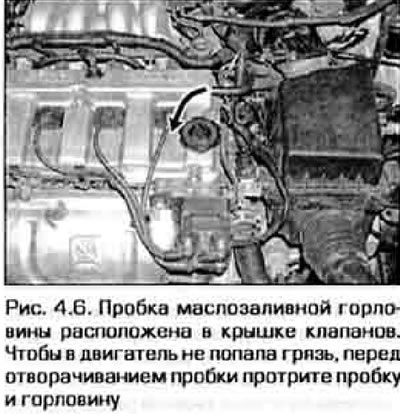
6. Unscrew the oil filler cap on the valve cover and drink up the oil (pic. 4.6) In order not to drink the oil, use a funnel. After filling the oil, tighten the plug by hand. Start the engine and check for oil leaks around the oil filter and drain plug. Stop the engine, let the oil drain into the sump and check the level again.
7. Checking the oil level is an important preventive measure. A persistently low oil level may be due to leaks from damaged seals, loose connections, or may indicate oil entering the combustion chambers through worn piston rings or through valve stem seals.. This can happen if the cylinder head gasket is blown or if the oil heat exchanger seal is leaking. In this case, check the engine immediately.
Every time you check the oil level, also check the condition of the oil before wiping the dipstick. remove some oil from the end of the dipstick with your thumb and forefinger If dirt and metal particles are visible on the oil, change the oil completely (see paragraph 6).
Coolant
Attention! Do not allow antifreeze to come into contact with skin or painted vehicle surfaces. Immediately crush the soaked liquid with plenty of water. Be careful not to get antifreeze inside the body - it is very toxic. Do not leave antifreeze in an open container or spilled antifreeze on the floor - children and pets may be attracted to its sweet smell and stumps may taste it.
Note. A non-toxic antifreeze has been developed and is available from hardware stores. But even it must be handled with care.
8. All vehicles covered in this Guide are equipped with a closed cooling system operating under high pressure. The expansion tank of the cooling system is located in the front corner of the engine compartment and is connected by a hose to the radiator neck. When heated, the coolant expands, overcomes the resistance of the exhaust valve and its excess flows through the hose into the expansion tank. When the engine cools, the liquid is sucked back from the expansion tank into the radiator.
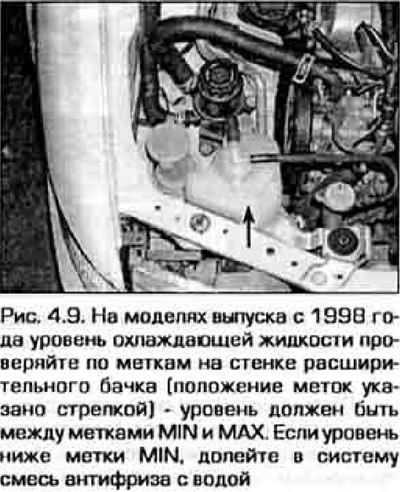
9. Regularly check the coolant level in the expansion tank. On models manufactured in 1997 and earlier, remove the dipstick from the reservoir and make sure that the fluid level is between the marks F and L. On models of release since 1998, the MAX and MIN·marks are applied to the reservoir wall. Fluid level may fluctuate depending on engine temperature. When the engine is cold, the level should match or be slightly above the lower mark, and when it is hot, it should be near the upper mark. If this is not the case, let the engine cool down, then unscrew the expansion tank cap (rice, 4.9) and add liquid.
Use only ethylene glycol based antifreeze in the proportion specified in your vehicle owner's manual. Don't use any supplements. In case of emergency, a small amount of clean water can be added to the system, but it must be borne in mind that water will reduce the concentration of antifreeze compared to the recommended one. To maintain the correct concentration of coolant, add only the correct composition of coolant to the system.
10. If the coolant has to be topped up frequently, there may be leaks in the system. Carefully inspect the radiator, hoses, radiator cap, drain plugs and water pump. If no leaks are visible, check the radiator cap valves.
Attention! Never unscrew the caps of the radiator or expansion tank while the engine is running or immediately after it has stopped - the coolant may be very hot. Steam escaping from under the caps can cause severe burns.
11. If you need to unscrew the radiator cap, let the engine cool down, cover the cap with a piece of thick rag and turn it to the first stop. If steam comes out of the system (a hiss is heard), let the engine cool down, then remove the plug.
12. When checking the coolant level, always pay attention to its condition. The fluid must be clear and clean. If the fluid is rusty, it must be immediately drained, the system flushed, and fresh fluid refilled. Even if the fluid looks normal, anti-corrosion additives still lose their properties over time and the fluid must be replaced periodically.
13. Do not allow coolant to come into contact with skin or painted surfaces of the body. Wash off spilled liquid with plenty of clean water.
Windshield washer fluid
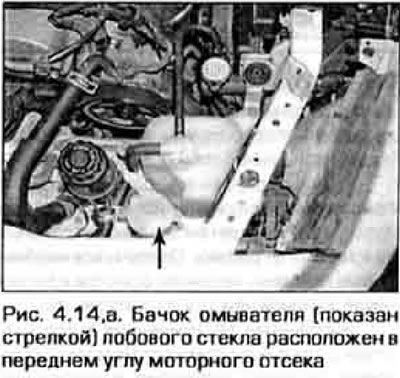
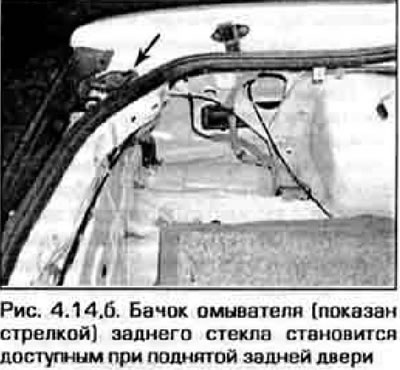
14 Windshield washer fluid is contained in a plastic reservoir located in the front corner of the engine compartment (pic. 4.14a). On models with a rear wiper, the tailgate must be lifted to access the rear window washer reservoir (pic. 4.14b). Check the float in the front glass reservoir cap - if the float does not sink, then the reservoir is full. In the rear window reservoir, the level should reach the filler neck. In mild climates, the reservoir can be filled with clean water, but not more than 2/3 of the height, because it expands when the water may freeze. In areas with a cold climate, a special anti-freeze fluid should be used for the washer. Mix liquid with water according to manufacturer's recommendations. Do not use antifreeze for washer - it destroys car paint.
 |  |
Brake and Clutch Fluid
15. Brake master cylinder mounted on a vacuum booster, clutch master cylinder (on models with manual transmission) located nearby. They have a common reservoir of reserve liquid.
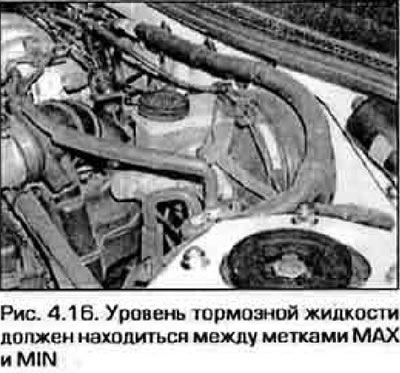
16. The tank has a transparent body and the liquid level is visible through it. The fluid level must be between the MIN and MAX marks (pic. 4.16).
17. Before opening the reservoir, remove dirt from and around the plug - do not allow dirt to enter the system.
18. Add only the recommended type of fluid (see Recommended oils and fluids at the beginning of this chapter or your vehicle owner's manual). Mixing fluids of different types can cause brake system failure. Fill the tank about 20 mm below the MAX mark. When the cork is screwed in, the correct level will be set.
Note. Be careful when handling brake fluid - the fluid can damage your eyes and the painted surfaces of your vehicle. Do not use liquid that has been stored in an open container or in a container that has been opened for more than a year. Brake fluid is hygroscopic - it absorbs moisture from the air, and brake fluid with a moisture content is unsuitable for its intended use.
19. While the lid is removed from the reservoir, inspect the reservoir for contamination. If dirt, deposits or drops of water are found in the tank, then the fluid in the system must be replaced (see chapter 8 or 9).
20. After topping up the fluid, carefully tighten the reservoir cap to prevent leaks and dirt from entering the system
21. As the brake pads wear out, the fluid level in the reservoir will gradually decrease. This is fine. If the fluid level in the master cylinder reservoir drops too quickly, then this indicates leaks in the system, which must be immediately found and repaired. Carefully inspect all brake pipes and their connections, as well as the master and wheel cylinders,
If the fluid level in the clutch reservoir drops quickly, then there are leaks in this system.
22. If you find that the brake system reservoir is empty or the fluid level in it is much lower than the permissible level, then the brake system must be bled (see chapter 9).