


Caution! When working with batteries, certain precautions must be observed. There is always some amount of hydrogen present in the battery cells. This is a highly explosive gas, so do not smoke, use open flames or allow sparks near the battery. The electrolyte inside the battery is a highly active sulfuric acid, which, if handled carelessly, can cause severe chemical burns or, at best, ruin your clothing or car paint. When disconnecting the battery, always disconnect the negative cable first, then the positive cable.
Examination
1. Constant attention to the battery is the only way to ensure fast and reliable engine starting. But before starting the next procedure, make sure you have everything you need for your maintenance-free battery (figure 11.1)
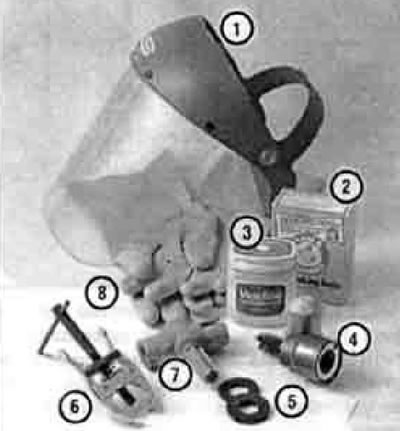
Figure 11.1. Tools and materials required for battery maintenance: 1. Wear a face mask or protective glasses - when cleaning terminals with a brush, particles of sulfuric acid salts can easily get into your eyes; 2. Soda - a solution of soda in water is used to neutralize traces of acid and its reaction products with the external parts of the battery; 3. Vaseline - a layer of Vaseline on the battery terminals will protect them from corrosion; 4. Terminal and Cable Terminal Stripper - This wire brush tool makes it easy to clean battery terminals and cable terminals; 5. Felt washer - placed on the battery terminals under the clamps, it will help protect the battery terminals from corrosion; 6. Puller - sometimes the cable clamp holds very tightly on the terminal even when the clamp bolt is completely loosened. The puller allows you to pull the cable from the terminal without damage; 7. Device for stripping terminal blocks and cable tips - has the same purpose as pos. 4, but it's a little different from it; 8. Rubber gloves - additional protection when working with batteries (keep in mind that there is sulfuric acid inside the battery)
2. When servicing the battery, some precautions must be taken. Before working on the battery, turn off the engine and disconnect the negative cable from the battery.
3. Hydrogen, a flammable and explosive gas, is formed in the battery. Therefore, do not smoke, use open flames or allow sparks near the battery. Charge the battery in a well-ventilated area.
4. Battery electrolyte contains poisonous and highly chemically active sulfuric acid. Avoid contact with skin, clothing, and especially eyes. Do not swallow. Wear glasses to protect your eyes. Keep children away from the battery.
5. Pay attention to the external condition of the battery. If the positive battery terminal has a protective rubber boot, make sure it is not torn and is in place - it should completely cover the terminal and clamp. Check the terminal clamps - they should be securely tightened and free from corrosion. Inspect the battery case and cover - there should be no cracks or other damage. Check the battery pressure. Finally, check the entire length of the battery cables for cracking or burnt insulation.
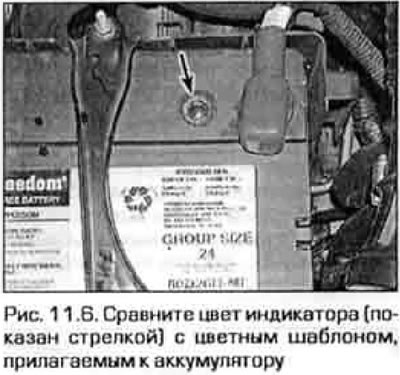
6. Some batteries (unattended) completely sealed and have no holes for filling with electrolyte. These batteries have a charge indicator on the top (Fig. 11.6). Compare the color of the indicator, visible through the window, with the template included with the battery. You may notice a dead battery before your car even stops in the middle of the road. If the battery is discharged, charge it and check the charging system (see chapter 5).
Service
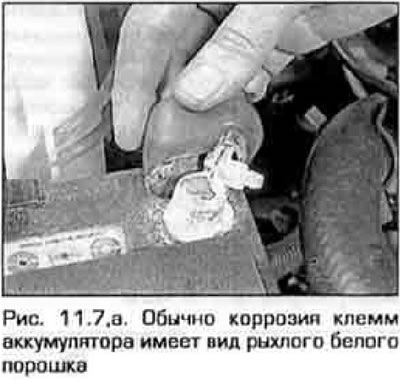
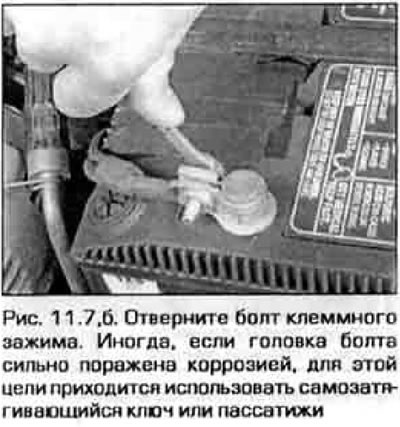
7. If there is any residue on the surface of the battery (especially on the terminals) corrosion was detected, which appeared as a loose white powder (figure 11.7,a), the battery must be removed from the car for cleaning. Loosen the terminal clamp bolts and remove the cable ends from the battery terminals - first the negative, then the positive(figure 11.7,b). Then release the battery from the clamp and remove the battery from the engine compartment.
 |
 |
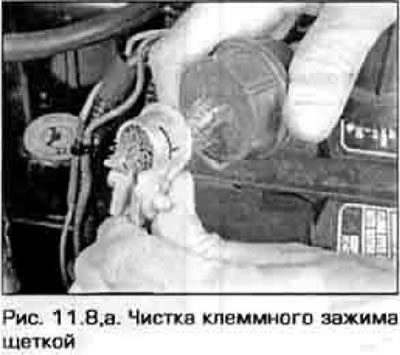
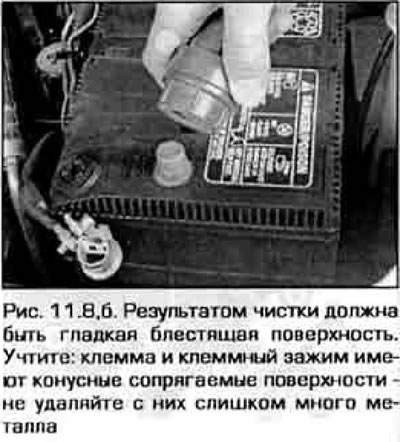
8. Clean the cable clamps thoroughly with a brush (see Fig. 11.1 - device 4 or 7) with a soda solution (figure 11.8,a). Wash the terminals and top panel of the battery with the same solution, being careful not to get any solution inside the battery. When cleaning cables and terminals, wear safety glasses and rubber gloves to protect your eyes and skin from contact with the solution. Do not work in good clothes - even in a diluted state, sulfuric acid will easily burn through your clothes. If the terminals are heavily corroded, clean them with a wire stripper (fig. 11.8.6). Rinse all cleaned surfaces thoroughly with clean water.
 |
 |
9. Since the battery is still removed, check its flow at the same time. If the tray is dirty or corroded, wash it with the same soda solution. Also inspect the brackets on which the tray rests for corrosion and, if necessary, treat them in the same way. If corrosion is significant, strip the brackets down to bare metal and spray coat them with a zinc-based primer.
10. Install the battery back into place. Make sure that there are no wires, rags or tools on the tray when installing the battery. More detailed information on removing and installing the battery is given in chapter 5.
11. Place specially treated felt washers on the terminals and coat the terminals and cable clamps with a layer of petroleum jelly or grease to protect them from corrosion. Place the cable clamps on the terminals and tighten the bolts securely (connect the negative wire first).
12. Secure the battery with the clamp. Do not overtighten the clamp nuts - the battery case may crack.
13. Make sure the battery is securely fastened to the tray and the tray is securely fastened to the body.
Charger
Caution! When charging, the battery produces hydrogen, a highly flammable and explosive gas. Do not smoke near the battery or use open flames. Wear safety glasses when near a charging battery. Before connecting or disconnecting the charging station from the battery, first turn off its power.
14. The best way to charge a battery that is so discharged that it cannot turn the starter is to slow charge it. It is also necessary to maintain the battery in working condition if the car is used mainly for short trips. Keeping the battery charged is especially important in winter, when the battery's chemical activity decreases and the load on it increases.
15. Good results are achieved by using a low-power two-ampere (buffer) charger. This device is safe and does not overload the battery. Besides, it is not expensive. For faster charging, you can use more powerful chargers, but with a current no higher than 1/10th of the battery's ampere-hour capacity. More powerful charging stations that charge the battery in one to two hours are not recommended, as high charging current is harmful to the car battery and can significantly damage its plates.
16. The average battery charging time is usually given in the instructions supplied with the charger. Typically, a buffer charger charges a battery in 12-16 hours.
(Text taken from an online platform: MAZBOOK)