


2. Checking the cooling system should begin with a cold engine. It is better if you did not drive your car at all that day, and if you did drive it, let it cool down for at least three hours.
3. Unscrew the radiator cap (on 4-cylinder models) or the filler cap (on V-shaped engines). Please note that on V-engine models the plug is located on the top of the engine on the belt side. If you hear a hissing sound when you unscrew the plug (this means that there is still excess pressure in the system), wait until the hissing stops. Only after this, unscrew the cap completely and remove it from the neck. Rinse the cork thoroughly with clean water, inside and out. Wipe the radiator neck. Remove all traces of corrosion. Look into the neck - the liquid in the radiator should be transparent. If the liquid has a rusty color, it must be replaced (see paragraph 24). If the fluid level does not reach the top of the filler neck, add a mixture of antifreeze and water to the system (see paragraph 4).
4. Carefully inspect the radiator and heater hoses that run to the engine bulkhead. If any hose shows cracks, abrasions or signs of rubber decomposition, replace that hose. Cracks are easier to spot if you squeeze the hose (figure 14.4).
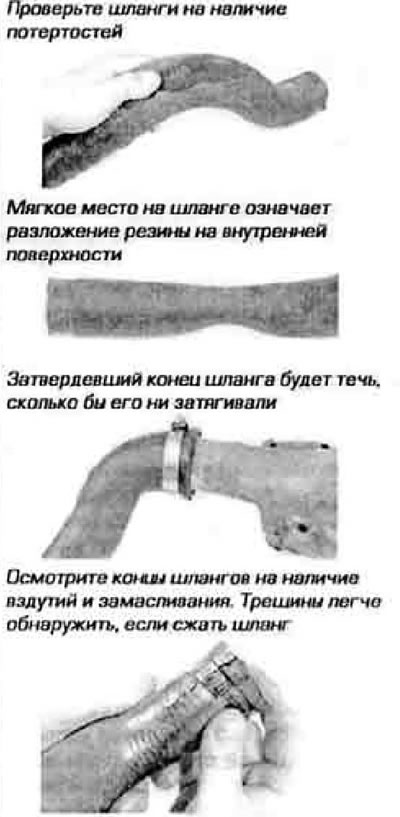
Figure 14.4. Hoses, just like belts, have a tendency to break at the most inopportune moment. To avoid being stranded on the road with a broken radiator or heater, check your hoses frequently as shown in these pictures
5. Check that all hose clamps are tight. A cooling system leak will usually show up as white or rusty deposits in the area of the leak. It is better to replace wire clamps with more reliable worm-drive clamps.
6. Use compressed air or a soft brush to clean the radiator core and air conditioner condenser from leaves and insects. Be careful not to damage the radiator fins or cut yourself on them.
7. If you have problems with the cooling system, first of all check the radiator cap valves. Most repair shops will provide you with this service for a reasonable fee.