MazBook.ru
English Русский
Български
Беларускі
Український
Српски
Hrvatski
Română
Polski
Slovenský
Magyar
• Bookmark • Sitemap • Contacts •   
Cars Opel Cars Ford Cars Volkswagen Cars Audi Cars Kia Cars Renault Cars Peugeot


Familia Capella Mazda3 Mazda6 CX-? Others Articles
Capella 3 (1982-1992, petrol) Capella 3 and 4 (1982-1992) Capella 4 (1987-1992) Capella 5 (1991-1997) Capella 6 (1997-2005, petrol)

Change engine oil and oil filter — every 5,000 km or every 3 months (Mazda Capella GF)

  • Home
  • Mazda Capella
  • Capella GF (1997-2005)
  • General information
  • Maintenance
  • Change engine oil and oil filter — every 5,000 km or every 3 months
0
1. Frequent oil changes are one of the reliable preventative measures for keeping the engine in good working order, which can be easily performed by a car owner. Over time, oil decomposes, deposits appear on it, and additives lose their original properties. All this leads to increased engine wear

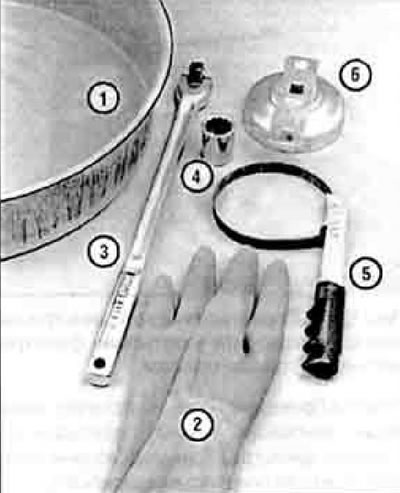
2. Before you start work, make sure that you have everything you need (figure 8.2) Also prepare plenty of rags or old newspapers to clean up any spilled liquid.

Figure 8.2. You will need these tools to change the engine oil and filter: 1. A container for…

Figure 8.2. You will need these tools to change the engine oil and filter: 1. A container for draining oil - it can be shallow, but wide enough; 2. Rubber gloves - when unscrewing the plug, be sure not to get oil on your hands (gloves will protect you from burns); 3. Ratchet - sometimes the plug can be tightened very tightly, so the ratchet for the key must be long enough; 4. Socket head - with a plug size; 5. Belt or chain wrench - for unscrewing the filter; 6. Adapter for unscrewing a filter with a faceted base (there are different adapters for each type of filter)


3. To make the work easier, it is advisable to lift the vehicle or place it on an inspection pit (overpass).


Caution! Do not work under a vehicle supported only by a jack.


4. If you are changing the fluid for the first time, think in advance about where you will put the drain plug and oil filter. Please note that the engine and exhaust system will be hot during operation - consider how to properly organize the work to avoid getting burned.

5. Place the vehicle on a level surface. Start the engine and let it warm up to operating temperature. Hot oil flows out faster and washes away deposits better. When the engine warms up, stop it. Remove the oil filler cap from the valve cover,

6. Raise the vehicle and securely support it in the raised position.

Caution! Do not crawl under the vehicle unless it is supported by a jack. The jack included with your vehicle is intended for changing wheels only. If you need to get under the car, install special stable supports under it.


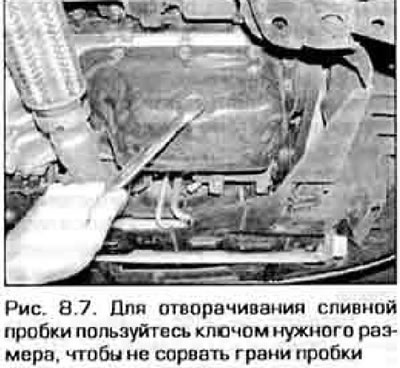
7. Place a suitable container under the engine oil pan drain plug and remove it (Fig. B.7). If the engine is hot, wear rubber gloves to protect your hands from the oil as it flows out.

7. Place a suitable container under the engine oil pan drain plug and remove it (Fig. B.7). If the…


Article is available on the website (MazBook.ru)

8. Allow the used oil to drain into a container. As the oil jet pressure decreases, the container may need to be moved. Feel the drained oil for metal particles and shavings


9. After all the oil has drained, wipe the drain plug with a clean cloth. Even a few metal particles remaining on the plug will immediately ruin the new oil.

10. Wipe the area around the drain hole, screw in the plug and tighten it securely.

11. Move the waste oil container under the filter.

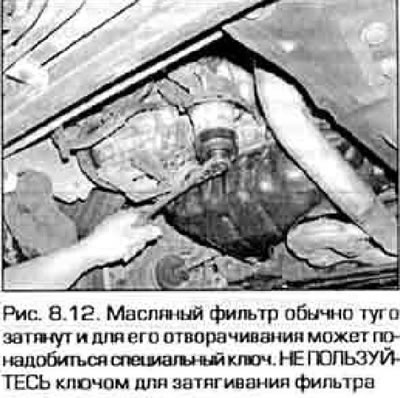
12. Loosen the filter with a suitable wrench for this type (figure 8.12). then unscrew the filter with your hands. As soon as the filter comes off the threads, immediately turn it with the hole facing up to prevent oil from spilling out of the filter.

12. Loosen the filter with a suitable wrench for this type (figure 8.12). then unscrew the filter…


Caution! Be careful - the exhaust system remains hot.


13. Wipe the surface of the cylinder block that is adjacent to the filter with a clean cloth. If there are any old oil residues left on the block, the block will start to smoke when it warms up. Also check to see if there is any gasket from the old filter stuck to the block. If necessary, scrape it off with a plastic scraper.

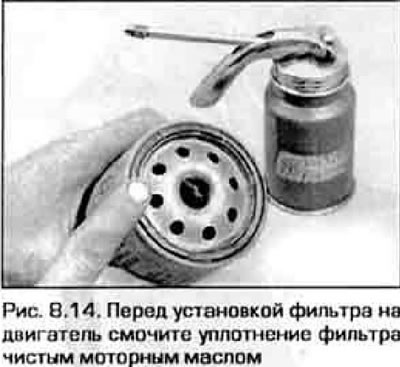
14. Compare the new filter with the old one and make sure it is the same type and size. Moisten the gasket of the new filter with clean engine oil and screw the filter into place (Fig. 9.14). Tighten the filter by hand only; do not use any tools, as overtightening may damage the filter seal. Screw the filter until it touches the block, then tighten it another three-quarters of a turn.


14. Compare the new filter with the old one and make sure it is the same type and size. Moisten the…


15. Remove all tools, the container with used oil and rags from under the car, then lower the car to the ground.

16. Pour three liters of oil into the engine. Wait a few minutes for the oil to drain into the pan, then check its level with the dipstick. If the level is close to the top, tighten the oil filler cap and start the engine.

17. Let the engine run for about a minute. At this time, inspect the affected areas - the drain plug and filter - and make sure that no oil is leaking from under them. If there is a leak, stop the engine and tighten the plug or filter.

10. Wait a few minutes for the oil to drain into the pan and check its level again. If necessary, add the required amount of oil until the level reaches the upper mark on the dipstick.

19. During the first few trips after changing the oil, check for leaks and check the oil level more often.

20. Used oil cannot be used in this condition - it must be disposed of or sent for recovery. Do not pour oil onto the ground or down a drain.
This article is available at: russian, bulgarian, belarusian, ukrainian, serbian, croatian, romanian, polish, slovak, hungarian
This text was checked by: German Vorobyov
Share with friends on social networks:

Previous
Capella 6 » Maintenance
Next

Check the automatic transmission fluid level every 5,000 km or every…
Check the power steering fluid level every 5,000 km or every 3 months
Check tires — every 400 km or weekly
Check fluid levels — every 400 km or weekly
Maintenance — general information
Check seat belts every 25,000 km or annually
Inspection and replacement of windshield wipers — every 10,000 km or…
Check, service and charge the battery every 10,000 km or every 6…
Checking, adjusting and replacing accessory drive belts
Check and replace hoses under the hood — every 10,000 km or every 6…
More articles on repairing other Mazda models
Engine oil change Mazda Familia 6 (1989-1994)
Engine oil change Mazda3 BK (2003-2009)
Engine oil change Mazda6 GG (2002-2008)
Engine oil change Mazda CX-5KE (2012-2017)
Engine oil change Mazda 121 (3) (1996-2003)
Link in different formats to this article
Comments and feedback from visitors
No comments yet


How much will 32 + 47 ?


Capella 6 (1997-2005, petrol) 
  • General information
  • Introduction to guide
  • User manual
  • Troubleshooting
  • Maintenance
  • Power unit
  • 4-cylinder engines
  • 6-cylinder engines
  • Engine overhaul
  • Cooling and ventilation
  • Power and exhaust systems
  • Engine electrics
  • Control system
  • Transmission
  • Mechanical gearbox
  • Automatic gearbox
  • Clutch and drive shafts
  • Chassis
  • Brake system
  • Car suspension
  • Steering
  • Body
  • Exterior (external elements)
  • Interior (internal elements)
  • Doors, windows and locks
  • Electrical equipment
  • Equipment and devices
  • Electrical circuits
Capella 5 (1991-1997) 
  • General information
  • User manual
  • Maintenance
  • Helpful hints
  • Power unit
  • Petrol engines 1.6 and 1.8
  • Petrol engines 2.0
  • 2.5 petrol engines
  • Overhaul engines 1.6 and 1.8
  • Overhaul engines 2.0 and 2.5
  • Diesel engine 2.0
  • Engine electrics
  • Cooling system
  • Air conditioner
  • Carburetor Nikki 30/34
  • Power system (1.6 and 1.8)
  • Power system (2.0 and 2.5)
  • Control system
  • Transmission
  • Mechanical gearbox
  • Automatic gearbox
  • Clutch and axles
  • Chassis
  • Brake system
  • Suspension and wheels
  • Steering
  • Body
  • Exterior (external elements)
  • Interior (internal elements)
  • Doors and windows
  • Electrical equipment
  • Equipment and devices
  • Electrical circuits
Capella 4 (1987-1992) 
  • General information
  • Introduction to manual
  • Vehicle specifications
  • Power unit
  • Engine repair
  • Lubrication system
  • Cooling system
  • Fuel system (carburetor)
  • Fuel injection (FE)
  • Fuel injection (DOHC)
  • Fuel system (diesel)
  • Ignition system
  • Transmission
  • Clutch
  • Gearbox
  • Drive shafts
  • Chassis
  • Front suspension
  • Rear suspension
  • Steering system
  • Brake system
  • Electrical equipment
  • Equipment and devices
  • Electrical circuits
Capella 3 and 4 (1982-1992) 
  • General information
  • User manual
  • Maintenance
  • Power unit
  • Gasoline engine
  • Engine overhaul (gasoline)
  • Diesel engine
  • Cooling and heating
  • Supply system
  • Ignition system
  • Emission reduction
  • Transmission
  • Clutch
  • Mechanical gearbox
  • Automatic gearbox
  • Drive shafts
  • Chassis
  • Brake system
  • Suspension and wheels
  • Steering
  • Body
  • Exterior (external elements)
  • Interior (internal elements)
  • Electrical equipment
  • Equipment and devices
  • Power devices
  • Electrical circuits
Capella 3 (1982-1992, petrol) 
  • General information
  • User manual
  • Maintenance
  • Troubleshooting
  • Late models
  • Power unit
  • Engine in car
  • Engine overhaul
  • Cooling and heating system
  • Fuel and exhaust system
  • Engine electrical system
  • Emission control system
  • Transmission
  • Mechanical gearbox
  • Automatic gearbox
  • Clutch and drive shafts
  • Chassis
  • Brake system
  • Suspension and wheels
  • Steering
  • Body
  • Exterior (external elements)
  • Interior (internal elements)
  • Electrical equipment
  • Equipment and devices
  • Lighting and lamps
  • Electrical circuits
MazBook.ru © 2018–2026 · Mobile version · Articles and news · Sitemap: EN BG BY UA RS HR RO PL SK HU · Feedback · Site search · Add to bookmarks Familia 5 (BF) · Familia 6 (BG) · Capella 3 (GC) · Capella 3 and 4 (GC) · Capella 4 (GD) · Capella 5 (GE) · Capella 6 (GF) · Mazda3 BK · Mazda6 GG · CX-5KE · Mazda 121 (3) · Mazda BT-50 (1) ·
By continuing to use the site, you agree to the use of cookies 🔐