MazBook.ru
English Русский
Български
Беларускі
Український
Српски
Hrvatski
Română
Polski
Slovenský
Magyar
• Bookmark • Sitemap • Contacts •   
Cars Opel Cars Ford Cars Volkswagen Cars Audi Cars Kia Cars Renault Cars Peugeot


Familia Capella Mazda3 Mazda6 CX-? Others Articles
Capella 3 (1982-1992, petrol) Capella 3 and 4 (1982-1992) Capella 4 (1987-1992) Capella 5 (1991-1997) Capella 6 (1997-2005, petrol)

Cooling system fans and their circuits — inspection and replacement (Mazda Capella GF)

  • Home
  • Mazda Capella
  • Capella GF (1997-2005)
  • Power unit
  • Cooling and ventilation
  • Cooling system fans and their circuits — inspection and replacement
0
Contents: Examination ⇓ Replacing the fan ⇓
Caution! To avoid injury, do not touch the fan blades with your hands, as the fan may start at any time!


Examination


1. Models equipped with air conditioning have two fans in the front of the engine compartment: one radiator fan and the second air conditioning condenser fan. The condenser fan runs continuously when the air conditioning system is on. If any of the fans does not turn on when it should work (i.e. the radiator fan does not turn on when the engine is hot enough or the condenser fan does not turn on when the air conditioning system is running), first of all, check the serviceability of the fan motor and its control circuit. To begin, check the integrity of the 40-amp radiator fan fuse in the box under the hood and the 15-amp condenser fan fuse in the box under the front panel (see chapter 12).

2. Disconnect the electrical connector from the non-running motor and connect the motor directly to the battery with jumper cables (insert a fusible link into the jumper just in case). Some models are equipped with a single-speed motor (with two terminals), and on some - two-speed (with three terminals). A single speed motor should run with one terminal connected to ground and the other connected to the positive battery terminal. If the motor has two speeds, then connect the terminal with the black wire to ground, and one of the remaining terminals to the positive terminal of the battery. The motor must run at low or high speed. Move the positive wire to the other terminal - the motor should change its operating speed. If the motor does not run at all or only runs at one speed, replace the motor.


Caution: Make sure the temporary contacts do not touch each other or any metal parts of the vehicle.


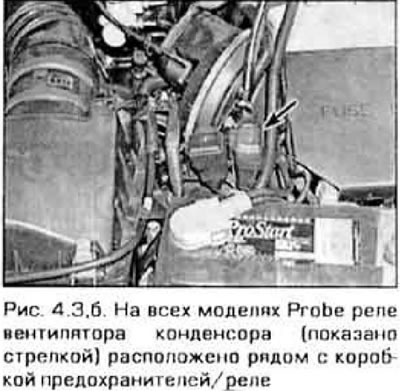
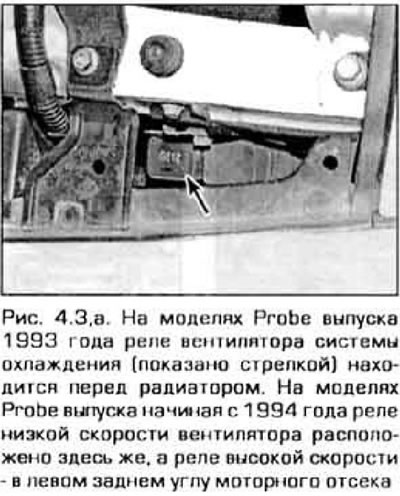
3. If the fan worked during the previous welding, but refuses to work when the circuit is restored, then the fuse, relay, thermal switch, or electrical wiring may be faulty. The number and location of fan relays varies by model. On Mazda models produced from 1993 to 1997, the cooling fan relay is located in the main fuse box, and the condenser fan relay is located in the right front corner of the engine compartment (v6 engines) or in the main fuse box (4-cylinder engines). On Mazda models produced since 1998, all fan relays are located on the left side of the engine compartment near the main fuse box. On Probe models, the cooling fan relay is located in front of the radiator or in the left rear corner of the engine compartment. The condenser fan relay on these models is on the left side of the engine compartment next to the relay/fuse box (figure 4.3,a,6). All relays can be easily tested (see chapter 12).
3. If the fan worked during the previous welding, but refuses to work when the circuit is restored,…

Note: The cooling fan relay is controlled by the electronic control unit based on information from the coolant temperature sensor. Checking the temperature sensor is described in Chapter 6. If all components of the fan circuit are normal, but the fan does not work, the control unit may be faulty. To diagnose the control unit, contact a specialized service station.


Replacing the fan


4. Disconnect the negative cable from the battery.

Caution: If your vehicle's audio system is equipped with anti-theft protection, make sure it is secured before disconnecting the battery. what do you know about the unlock code?.


5. Remove the air inlet duct (see chapter 4).

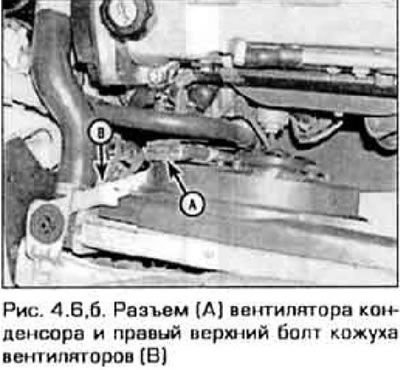
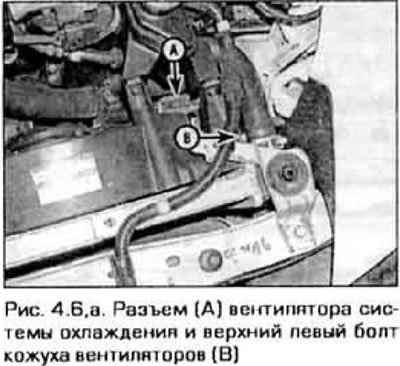
6. Disconnect the connector from the fan motor (figure 4.6, a, b). Disconnect the wiring harnesses from the fan shroud.
6. Disconnect the connector from the fan motor (figure 4.6, a, b). Disconnect the wiring harnesses…

7. Loosen the bolts and remove the fan shroud (both fans are connected to a common casing) and remove the fan assembly from the engine compartment. The fan shroud is secured with four bolts - two at the top and two at the bottom.

8. Holding the fan impeller, unscrew its mounting nut (figure 4.8). Remove the impeller from the motor shaft.
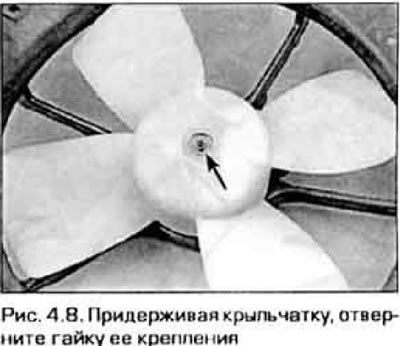


8. Holding the fan impeller, unscrew its mounting nut (figure 4.8). Remove the impeller from the…


9. Unscrew the three bolts and remove the fan motor from the casing.

10. Installation of fans is carried out in reverse order. Tighten the housing and air inlet duct mounting bolts securely.

The text of the article is taken from the website: MAZbook.ru
This article is available at: russian, bulgarian, belarusian, ukrainian, serbian, croatian, romanian, polish, slovak, hungarian
This text was checked by: German Vorobyov
Share with friends on social networks:

Previous
Capella 6 » Cooling and ventilation
Next

Thermostat — checking and replacing
Coolant — basic information
General information about the cooling and ventilation system
Technical data of the cooling and ventilation system
Radiator and expansion tank — removal and installation
Water pump — checking
Water pump — replacement
Coolant Temperature Indicator Sensor — checking and replacing
Oil Heat Exchanger (V-Type Engines) — removal and installation
More articles on repairing other Mazda models
Technical characteristics of the cooling system Mazda Familia 5 (1985-1989)
Radiator of the cooling system — description Mazda3 BK (2003-2009)
Cooling system — general information Mazda6 GG (2002-2008)
Safety precautions when working with the cooling system Mazda CX-5KE (2012-2017)
Checking the cooling system for tightness Mazda 121 (3) (1996-2003)
Link in different formats to this article
Comments and feedback from visitors
No comments yet


How much will 31 + 10 ?


Capella 6 (1997-2005, petrol) 
  • General information
  • Introduction to guide
  • User manual
  • Troubleshooting
  • Maintenance
  • Power unit
  • 4-cylinder engines
  • 6-cylinder engines
  • Engine overhaul
  • Cooling and ventilation
  • Power and exhaust systems
  • Engine electrics
  • Control system
  • Transmission
  • Mechanical gearbox
  • Automatic gearbox
  • Clutch and drive shafts
  • Chassis
  • Brake system
  • Car suspension
  • Steering
  • Body
  • Exterior (external elements)
  • Interior (internal elements)
  • Doors, windows and locks
  • Electrical equipment
  • Equipment and devices
  • Electrical circuits
Capella 5 (1991-1997) 
  • General information
  • User manual
  • Maintenance
  • Helpful hints
  • Power unit
  • Petrol engines 1.6 and 1.8
  • Petrol engines 2.0
  • 2.5 petrol engines
  • Overhaul engines 1.6 and 1.8
  • Overhaul engines 2.0 and 2.5
  • Diesel engine 2.0
  • Engine electrics
  • Cooling system
  • Air conditioner
  • Carburetor Nikki 30/34
  • Power system (1.6 and 1.8)
  • Power system (2.0 and 2.5)
  • Control system
  • Transmission
  • Mechanical gearbox
  • Automatic gearbox
  • Clutch and axles
  • Chassis
  • Brake system
  • Suspension and wheels
  • Steering
  • Body
  • Exterior (external elements)
  • Interior (internal elements)
  • Doors and windows
  • Electrical equipment
  • Equipment and devices
  • Electrical circuits
Capella 4 (1987-1992) 
  • General information
  • Introduction to manual
  • Vehicle specifications
  • Power unit
  • Engine repair
  • Lubrication system
  • Cooling system
  • Fuel system (carburetor)
  • Fuel injection (FE)
  • Fuel injection (DOHC)
  • Fuel system (diesel)
  • Ignition system
  • Transmission
  • Clutch
  • Gearbox
  • Drive shafts
  • Chassis
  • Front suspension
  • Rear suspension
  • Steering system
  • Brake system
  • Electrical equipment
  • Equipment and devices
  • Electrical circuits
Capella 3 and 4 (1982-1992) 
  • General information
  • User manual
  • Maintenance
  • Power unit
  • Gasoline engine
  • Engine overhaul (gasoline)
  • Diesel engine
  • Cooling and heating
  • Supply system
  • Ignition system
  • Emission reduction
  • Transmission
  • Clutch
  • Mechanical gearbox
  • Automatic gearbox
  • Drive shafts
  • Chassis
  • Brake system
  • Suspension and wheels
  • Steering
  • Body
  • Exterior (external elements)
  • Interior (internal elements)
  • Electrical equipment
  • Equipment and devices
  • Power devices
  • Electrical circuits
Capella 3 (1982-1992, petrol) 
  • General information
  • User manual
  • Maintenance
  • Troubleshooting
  • Late models
  • Power unit
  • Engine in car
  • Engine overhaul
  • Cooling and heating system
  • Fuel and exhaust system
  • Engine electrical system
  • Emission control system
  • Transmission
  • Mechanical gearbox
  • Automatic gearbox
  • Clutch and drive shafts
  • Chassis
  • Brake system
  • Suspension and wheels
  • Steering
  • Body
  • Exterior (external elements)
  • Interior (internal elements)
  • Electrical equipment
  • Equipment and devices
  • Lighting and lamps
  • Electrical circuits
MazBook.ru © 2018–2026 · Mobile version · Articles and news · Sitemap: EN BG BY UA RS HR RO PL SK HU · Feedback · Site search · Add to bookmarks Familia 5 (BF) · Familia 6 (BG) · Capella 3 (GC) · Capella 3 and 4 (GC) · Capella 4 (GD) · Capella 5 (GE) · Capella 6 (GF) · Mazda3 BK · Mazda6 GG · CX-5KE · Mazda 121 (3) · Mazda BT-50 (1) ·
By continuing to use the site, you agree to the use of cookies 🔐