


Contents: Removal ⇓ Installation ⇓
Removal
Disconnect the negative battery cable, remove the air filter and air supply lines.
Drain the coolant and disconnect the upper hose from the radiator.
Remove the ignition distributor.
Remove the camshaft timing belt cover and timing belt.
Remove the fuel pump.
Remove the intake manifold.
Remove the generator. On models with air conditioning, loosen the air conditioning compressor mounting clamp bolt and carefully remove the compressor, being careful not to damage the line (in which high pressure is maintained) or radiator. Loosen the bolts securing the generator and air conditioner bracket to the cylinder head and loosen the remaining bracket bolts.
Remove the cylinder head cover.
Remove the three bolts securing the exhaust manifold to the catalytic converter or exhaust manifold downpipe and remove the catalytic converter (or the exhaust pipe) from the exhaust manifold.
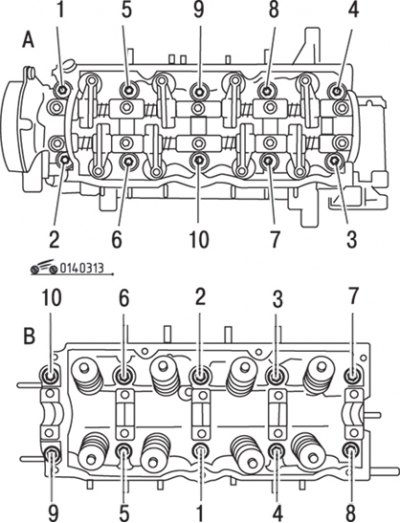
Figure 3.13. Sequence of loosening (A) and tightening (B) the cylinder head bolts
Loosen the cylinder head bolts by loosening each bolt a few turns at a time. Loosen the bolts in the sequence shown in the figure 3.13.
After loosening the cylinder head bolts, remove them and place them in a box with numbered compartments so that you can later install the bolts in their original locations.
Original material on the website: www.MazBook.ru
If removing the cylinder head is difficult, separate it by inserting the blade of a pry bar between the alternator/air conditioner compressor bracket and the cylinder head.
Remove the cylinder head and head gasket.
Installation
Clean the cylinder block and cylinder head from any remaining gasket material. Make sure that the threads of the cylinder head mounting bolts and the cylinder block holes are clean, as contamination may interfere with the tightening torque readings when installing the head.
Install the gasket, cylinder head, camshaft and valve train assembly with shafts and rocker arms (if it was removed). Make sure the gasket is positioned correctly.
Install the cylinder head mounting bolts and tighten them to the specified torques in the sequence shown in the figure 3.13.
Further installation is carried out in the reverse order of removal, taking into account the following.
After warming up the engine, check the clearances between the valves and rocker arms and tighten the cylinder head mounting bolts.